Contents
What are the various ways to document vaccinations in Elation?
You can document vaccinations using one of the following methods:
- From a visit note or note: click Vaccination.
- From the Clinical Profile Other Info section: click + Add Vaccination.
- From the Immunization Table: click Actions -> Add Details.
- From an Immunization Registry Integration: import immunization records.
Vaccines provide patients with active acquired immunity to a particular infectious disease to help reduce the risk of health complications, or even death, when a patient is exposed to the real causative agent of the disease. It is important to document vaccination information, or lack of, in the patient's chart to enable you to make the best healthcare decisions for the patient.
| 1 |
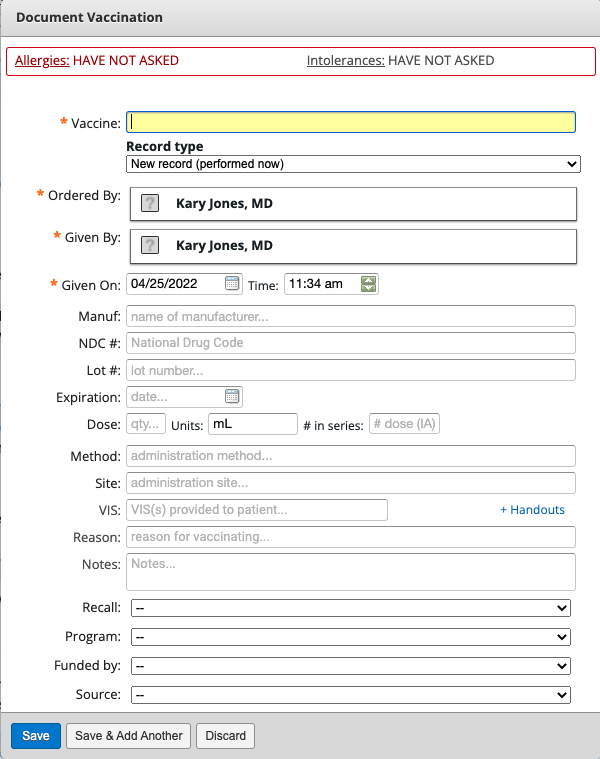
Open the Vaccine Form using one of the following methods:
- From a visit note or note: click Vaccination.
- From the Clinical Profile Other Info section: click + Add Vaccination.
- From the Immunization Table: click Actions -> Add Details.
|
| 2 |
Fill in the following required fields:
- Vaccine
- Vaccine Name = Enter the name of the vaccine.
- Record Type = Select one of the following:
- New record (performed now)
- Select this option if the vaccine was administered by your practice.
- Historical record (performed previously)
- Select this option if you are recording a vaccine that was previously administered to the patient and reported by the patient, a vaccine record or another source.
- Declined by the patient (available for certain vaccines)
- This option is only available for CDC schedule immunizations (ex. polio).
- Ordered By = Enter the name of the provider who ordered the vaccine.
- Select from the Directory (when possible) or free text the name of the provider.
- Given By = Enter the name of the person who administered the vaccine.
- If entering a provider, select from the Directory (when possible) or free text the name of the administrator.
- Give On = Enter the date and time the vaccine was administered to the patient.
|
| 3 |
Fill in additional optional fields if needed.
Click here for a detailed breakdown of the different fields.
- Manuf = Select from the list of Manufacturers as provided by our Manufacturer database.
- If the manufacturer is not on this list, choose “Other”.
- If the manufacturer is unknown choose “Unknown”.
- If the vaccine has been previously documented for any patient in the practice, the most Manufacturer will auto-populate here.
- NDC # = Indicate the National Drug Code (NDC) for the vaccine. If a vaccine is selected from our database, the NDC # will auto-populate from our database. You can also free text the NDC # here.
- Lot # = Indicate the lot # of the vaccine. If the vaccine has been previously documented for any patient in the practice, the most recent Lot # will auto-populate here.
- Expiration = Indicate the expiration date of the vaccine. If the vaccine has been previously documented for any patient in the practice, the most recent expiration date will auto-populate here.
- Dose = Indicate the quantity of the vaccine, the units administered, and which number in a series of vaccines this dose is for (ex a documented booster Moderna COVID-19 vaccine might be dosage #3 in the series).
- Method = Indicate how the vaccine was administered.
- Site = Indicate the physiological location where the vaccine was administered. If the method selected does not have more than one site, the Site field will not appear.
- VIS = Specify which Vaccine Information Sheet (VIS) was shared with the patient.
- Reason = Indicate the reason you are administering this vaccine as needed.
- Notes = Indicate any additional notes as needed.
- Recall = Specify whether a reminder or recall is necessary after administering this vaccine.
- Program = Specify the Vaccines for Children (VFC) or other program eligibility, if applicable.
- Funded by = Specify if the vaccine was purchased using private or public funds
- Source = Indicate the source of the vaccine information being submitted.
ℹ️ PREMIUM EHR ONLY Premium EHR Users can enable a feature for prior Manuf, Lot #, and Expiration, to populate based on the Service Location selected. This ensures the correct vaccination details are entered when different Service Locations have different supplies of the same vaccine.
- A new required field called Service Location will appear in the Vaccine Form when this feature is enabled.
|
| 4 | Click Save or Save & Add Another to save the vaccination data to the patient’s chart. |
When you are connected to an Immunization Registry, the Vaccine Form will have additional fields and different requirements to support vaccination documentation and registry reporting.
| 1 |
Open the Vaccine Form using one of the following methods:
- From a visit note or note: click Vaccination.
- From the Clinical Profile Other Info section: click + Add Vaccination.
- From the Immunization Table: click Actions -> Add Details.
|
| 2 |
Fill in the following required fields:
- Vaccine
- Vaccine Name = Enter the name of the vaccine.
- Record Type = Select one of the following
- New record (performed now)
- Select this option if the vaccine was administered by your practice.
- Historical record (performed previously)
- Select this option if you are recording a vaccine that was previously administered to the patient and reported by the patient, a vaccine record or another source.
- Declined by the patient (available for certain vaccines)
- This option is only available for CDC schedule immunizations (ex. polio).
- Send to an Immunization Registry? = Select “Yes, a record should be sent to an Immunization Registry”.
- Where should the record be sent? = Select the name of your State Immunization Registry in this dropdown.
- Is the patient in a Priority Population? = Skip this field unless you are reporting from New York City.
- Patient consents to sharing Personally Identifiable Information? = This is to notify the registry if the patient's consent to share the vaccination was gathered. Certain registries require this consent before you can submit vaccination data to them.
- Ordered By = Enter the name of the provider who ordered the vaccine. Please select from the Directory (when possible) or free text the name of the provider.
- Given By = Enter the name of the person who administered the vaccine. If entering a provider, please select from the Directory (when possible) or free text the name of the administrator.
- Give On = Enter the date and time the vaccine was administered to the patient
- Manuf = Select from the list of Manufacturers as provided by our Manufacturer database.
- If the manufacturer is not on this list, choose “Other”.
- If the manufacturer is unknown choose “Unknown”.
- If the vaccine has been previously documented for any patient in the practice, the most Manufacturer will auto-populate here.
- NDC # = Indicate the National Drug Code (NDC) for the vaccine. If a vaccine is selected from our database, the NDC # will auto-populate from our database. You can also free text the NDC # here.
- Lot # = Indicate the lot # of the vaccine. If the vaccine has been previously documented for any patient in the practice, the most recent Lot # will auto-populate here.
- Expiration = Indicate the expiration date of the vaccine. If the vaccine has been previously documented for any patient in the practice, the most recent expiration date will auto-populate here.
- Dose = Indicate the quantity of the vaccine, the units administered, and which number in a series of vaccines this dose is for (ex a documented booster Moderna COVID-19 vaccine might be dosage #3 in the series). You must select from the Units dropdown for Units
- Method = Indicate how the vaccine was administered.
- Site = Indicate the physiological location where the vaccine was administered. If the method selected does not have more than one site, the Site field will not appear.
- VIS = Specify which Vaccine Information Sheet (VIS) was shared with the patient.
- Recall = Specify whether a reminder or recall is necessary after administering this vaccine.
- Program = Specify the Vaccines for Children (VFC) or other program eligibility, if applicable.
- Funded by = Specify if the vaccine was purchased using private or public funds
- Source = Indicate the source of the vaccine information being submitted.
ℹ️ PREMIUM EHR ONLY Premium EHR Users can enable a feature for prior Manuf, Lot #, and Expiration, to populate based on the Service Location selected. This ensures the correct vaccination details are entered when different Service Locations have different supplies of the same vaccine.
- A new required field called Service Location will appear in the Vaccine Form when this feature is enabled.
|
| 3 |
Fill in additional optional fields if needed.
- Reason = Indicate the reason you are administering this vaccine as needed.
- Notes = Indicate any additional notes as needed.
|
| 4 | Click Save or Save & Add Another to save the vaccination data to the patient’s chart. |
User Tip: All submissions are one-time only. If you need to edit any vaccination data after clicking Save you will need to update the data in both the patient chart and the Immunization Registry directly.
You can open the Immunization Table by going to the Vaccination section of the Clinical Profile under Other Info and clicking "Immunization Table". The Immunization Table gives you a visual representation of the patient's vaccine history based off the CDC Schedule. Some additional features of the Immunization Table are:
- Click Immunization Hx to print the patient's immunization table and vaccine history.
- Click on the AAP Schedule: 0-18, CDC Schedule: 0-18, CDC Schedule: Adult buttons to see the vaccine schedule recommendations from the American Academy of Pediatrics or Center for Disease Control and Prevention.
- Click Actions -> Add Details in any Dose box to open the Vaccine Form.
Minimal documentation options:
- To store a basic, non-detailed vaccination record for the patient for that vaccine, enter a date in the corresponding Dose boxes for the vaccine.
- To record that a patient declined a specific vaccine, click Actions -> Patient Declined.
- To record that patient is immune to a specific infectious disease, click Actions -> Patient has immunity.
For customers using an Immunization Registry Interface with Elation, you can query (or request) immunization history or forecast for any patient as long as the required information is stored in the patients demographics.
To ensure successful queries for vaccination history, please make sure the following demographics information is stored in the patient’s chart.
- Legal First Name
- Legal Last Name
- Date of birth
- Sex at Birth
- Address
- Phone Number (first number)
- Mother’s Maiden Name
- The Mother’s Maiden Name field is next to the SSN field and can be found by clicking + add additional details in the Patient Details section of their demographic.
There are two options for querying for vaccination history for a given patient:
- Click on the Check Registry button in the Vaccination section of the Clinical Profile.
- Click Actions -> Check Registry next to the Other Info section header in the Clinical Profile.
- Elation only allows querying for vaccination history every 15 minutes. If you click Check Registry and successfully retrieve Vaccination History for the patient, you will not be able to query again for another 15 minutes.
Once the request is successful, you will see the patient’s vaccination history as available within the connected Immunization Registry. The most recent vaccination records will be at the top of the list and you can click on the header of any column to filter by specific details of the record. Vaccination History records include the following details:
- A View Registry button will be available for registries that allow you to directly log in to the registry.
- Vaccine Group
- The Vaccine Group is designated by the registry. ‘NOS’ stands for ‘Not Otherwise Specified”.
- Vaccine Name
- Date Administered
- Declined vaccines may also be available and will have the word ‘Declined’ next to the date.
The last column “Chart Status” of the Vaccine History will tell you whether or not the vaccination record exists in the Vaccination section of the patient’s chart. Elation will also automatically pre-select the records that are not in the patient’s chart to allow you to easily import those records if desired. Click Sign Off & Import at the bottom of the Vaccine History to sign off on the Vaccination History and import any selected records into the patients Clinical Profile.
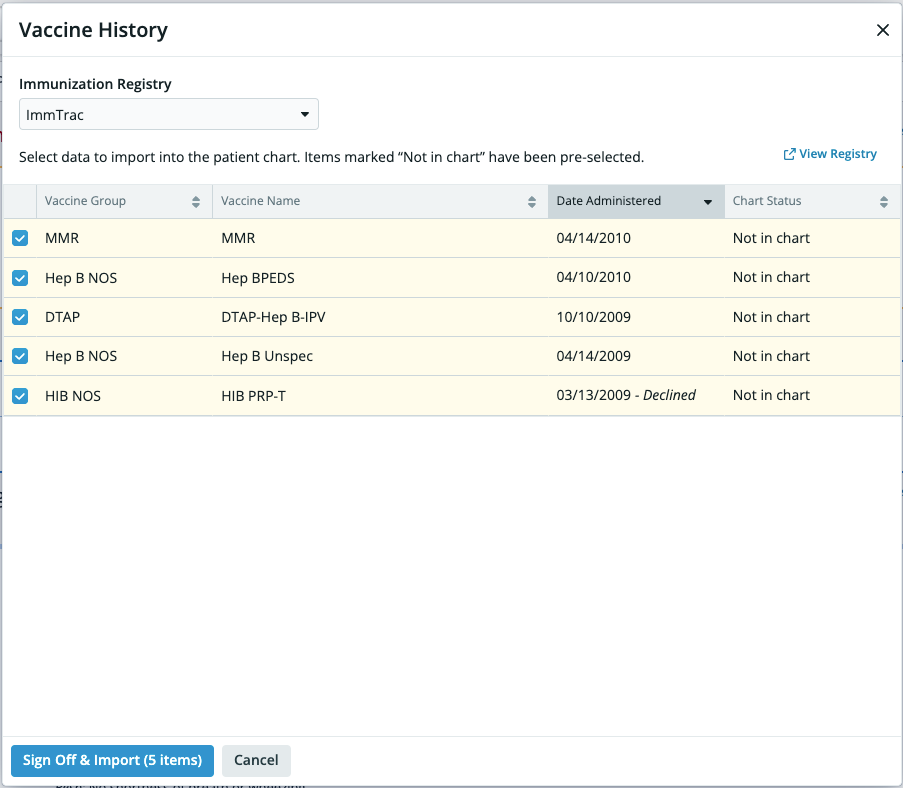
Imported vaccine records will have language in the Notes section of the record to indicate which Registry the record originated from, the name of the user in the practice who signed off on the record, and the date the record was imported - for example "Imported from ImmTrac by Beverly Crusher on 6/12/2022".
There are two options for checking the vaccination forecast using a connected Immunization Registry for a given patient:
- Click Actions -> Check Forecast next to the Other Info section header in the Clinical Profile.
- Click Immunization Table and then Check Forecast in the Immunization Table view.
Once the request is successful, you will see the vaccination forecast for the patient in the Vaccine Forecast dialog. The vaccines forecasted will be listed in alphabetical order and you will see the following:
- Due Date
- Earliest Date to Give
- Latest Date to Give

If the request does not return a vaccination history you will see one of the following reasons noted in the Vaccine History dialog:
- Immunization registry setup is incomplete
- Additional actions are required to connect you to the Immunization Registry. Contact Support for assistance with this issue.
- Unable to connect to immunization registry
- The registry is not responding during this time. Please try again in 30 minutes or Contact Support if the issue persists.
- No matching patient
- The registry was unable to find any matching patients based on the demographics information in their chart. Double check the Demographic Requirements for the patient and then try again.
- Too many patient matches
- The registry found too many matching patients based on the demographics information in their chart. Double check the Demographic Requirements to see if more information (such as Mother’s Maiden Name) can be supplied to narrow down the search and then try again.
- Missing patient information
If the Check Registry button is missing from the patient's Clinical Profile or not working as expected, follow these troubleshooting steps:
| 1 | Confirm the registry connection is active
Verify that your practice's Immunization Registry Interface is enabled and properly configured. If you are unsure whether your practice is connected to a registry, please reach out to the Support team via the I need help button in the blue navigation bar. |
| 2 | Verify patient demographics
Successful registry queries require specific patient information. Confirm the following demographics are complete and accurate in the patient's chart:
- Legal First Name
- Legal Last Name
- Date of birth
- Sex at Birth
- Address (including state)
- Phone Number (first number in the demographics)
- Mother's Maiden Name (for certain registries)
If any required information is missing or incorrect, update the patient's demographics and try again. |
| 3 | Contact Support if the issue persists
If errors persist after clicking the Check Registry button, even after confirming the patient demographics, please contact Elation Support for assistance. When reaching out, include the following details:
- The name of the Immunization Registry you are trying to use
- A description of the issue (for example, "Running into [insert error] when checking the registry")
- The approximate time the option last worked (if applicable)
- Patient ID example
ℹ️ CAUTION
Do not include PHI in your support request.
|
You can print the patient's Immunization History using one of these two options:
- Go to the Other Info section of the Patient’s Clinical Profile & click Actions -> Print Immunization History.
- Go to the Other Info section of the Patient’s Clinical Profile, click Immunization Table and then click Immunization Hx.
I cannot find the vaccine I am looking for. How do I document this vaccine?
Elation will have all commonly available vaccines in our Vaccine database. Please try searching for the vaccine using other commonly known names.
If you cannot find the vaccine substance you are looking for, you can enter any text in the Vaccine Name and store that as a vaccine substance in your own custom vaccine database. Once you save a vaccine record with the Vaccine Name you created, you will be able to select that same vaccine substance again in the future.
Can I send vaccination data to my State Immunization Registry from Elation?
Elation is working towards establishing connection with each State's Immunization Registry to allow customers to send vaccination data directly from the EHR to their State Immunization Registry. Learn about which State Immunization Registries are currently available through Elation here.
Why are certain vaccines missing from the Immunization Table?
The Immunization Table only displays CDC Schedule vaccinations. Vaccines that are not on the CDC Schedule can be recorded using the Vaccine Form, will be visible in the Clinical Profile and will display under Other Vaccines Documented when printed.
Only vaccines with known specified formulations will appear in the Immunization Table. Without formulation we will not be able to accurately tie a vaccine to the correct immunization in the Immunization Table. Recorded vaccines with unspecified formulations will be visible in the Clinical Profile and will display under Other Vaccines Documented when printed.
Can I change the vaccines that display in the Immunization Table?
Elation's Immunization Table is designed to match the Center for Disease Control and Prevention's recommendations for vaccinations based off of the patient's age. You cannot change the vaccines that display in the Immunization Table. Vaccines that are not on the CDC Schedule can be recorded using the Vaccine Form, will be visible in the Clinical Profile and will display under Other Vaccines Documented when printed.
Can I see more than 6 doses of a given vaccine in the Immunization Table?
The Immunization Table can only display up to 6 (six) doses of a given vaccine. Any additional vaccines will not be displayed in the Immunization Table but it will be visible in the Clinical Profile and will display under Other Vaccines Documented when printed.
Next Step
Try the Vaccine Form in your Patient's chart to start recording immunization history!
Related Articles

