Contents
The Provider availability and scheduling features allow Practices to:
- define the availability of each Provider Level User for any Practice Location and Appointment Type within the EHR. This availability will be visible on both the Practice Home calendar and the Booking Site calendar for each Provider Level User.
- specify overlapping availability for different Practice Locations and Appointment Types
- assign a specific time zone to each Practice Location to ensure accurate configuration and patient communication regarding appointments.
The Provider availability and scheduling features:
- provide scheduling control and accuracy because
- Staff can now visually discern on the Calendar both the availability of each Provider and the specific appointment types they are available for.
- Patients using the Booking Site can only select appointments based on the Provider's chosen Practice Locations and Appointment Types.
- help practices with multiple Practice Locations segment their patients according to each Provider’s availability
- ensure that practices operating across different time zones
- provide clear time zone details to patients on the booking site.
- accurately send appointment details to patients in their respective time zones.
Important Notes: The ability to adjust Provider availability preferences can be limited to
Admin Level Users if the “Admin Only” toggle located in the top right corner of the Calendar & Booking settings page is toggled on (green).
To ensure the Booking Site displays the correct time zone for each Practice Location, make sure the time zone for each Practice Location is accurate when setting availability.
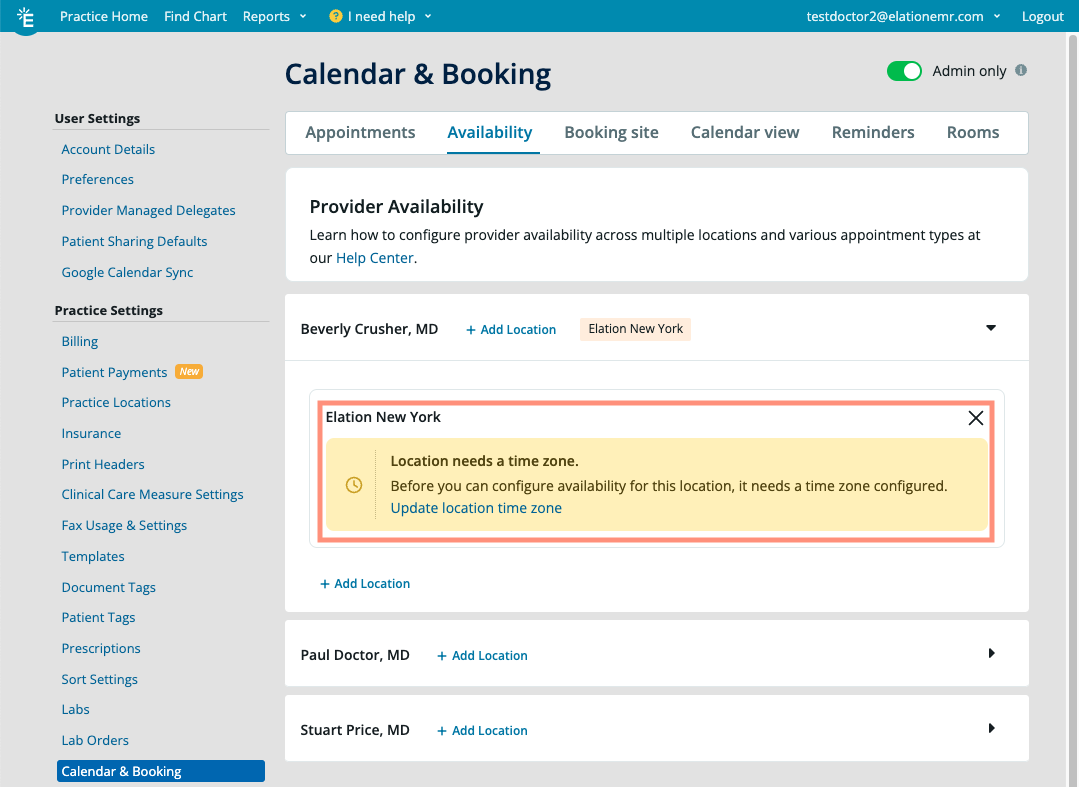
If you attempt to add availability for a Practice Location that does not have a time zone set, you will see the following “Location needs a time zone” alert. You must click “Update location time zone” and set a time zone before you can add availability to the location.


To define the availability for a specific Practice Location for Provider Level User:
- Go to “Settings” -> “Calendar & Booking” and then click into the Availability section.
- Find the Provider whose availability settings you want to update and click on the arrow to expand their availability preferences.
- Existing Booking Site users will see the Provider’s pre-existing availability preferences linked to the primary Practice Location for the practice. By default, all Appointment Types will be associated with the pre-existing specified time frames.
- To edit their availability for the primary Practice Location, jump to step 5 below.
- To define availability for a new Practice Location for that Provider, click "+ Add Location”
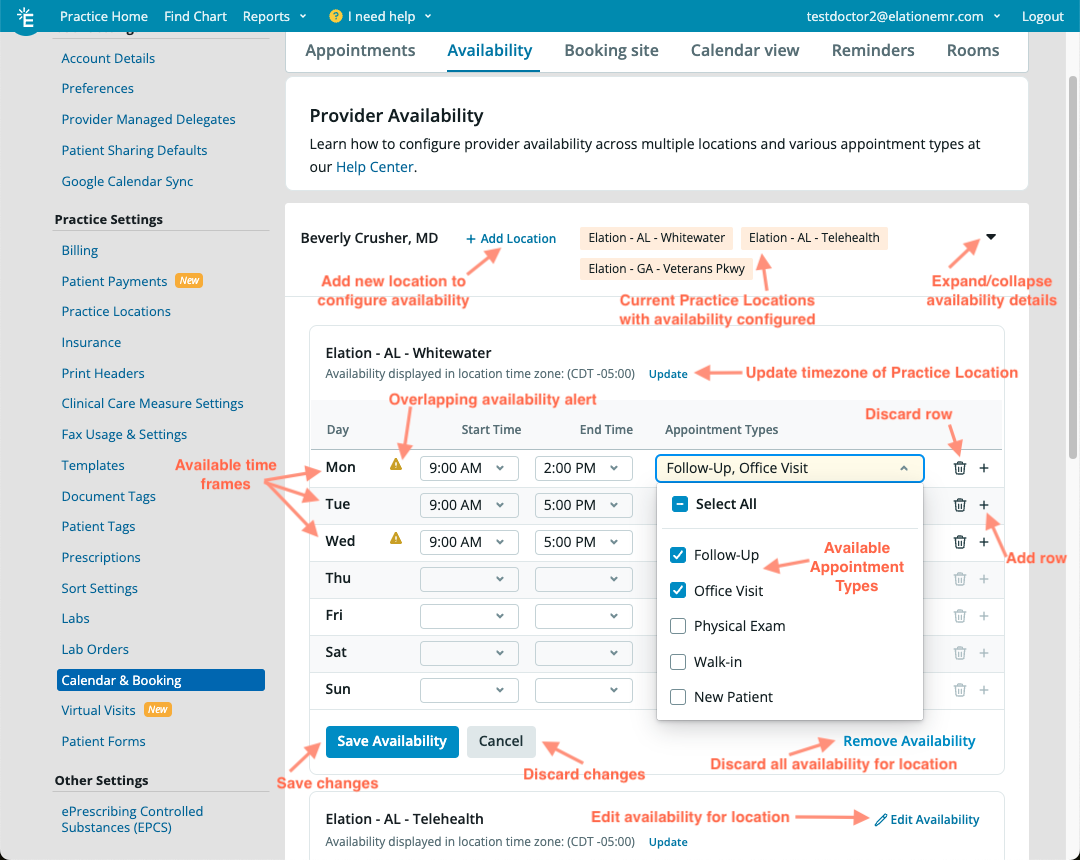
- To edit the availability for any Practice Location, click “Edit Availability”
- Select the Start Time and End Time for any day of the week as needed.
- The selected time will correspond to the time zone configured for that Practice Location. If you need to update the time zone for that Practice Location, click the “Update” button next to the time zone displayed for that Practice Location.
-
User Tips:
- If the chosen time frame overlaps with the availability of another Practice Location, you will notice an alert icon next to the time frame indicating this overlap. Place your mouse cursor over the alert icon to see which Practice Location it overlaps with.
- If a time frame does not have both a Start Time and End Time, Elation will not allow you to save the time frame.
- By default, all Appointment Types will be associated with that day of the week.
- To change the Appointment Types available, click on the Appointment Types dropdown and then unselect the Appointment Types that you want to remove for that timeframe.
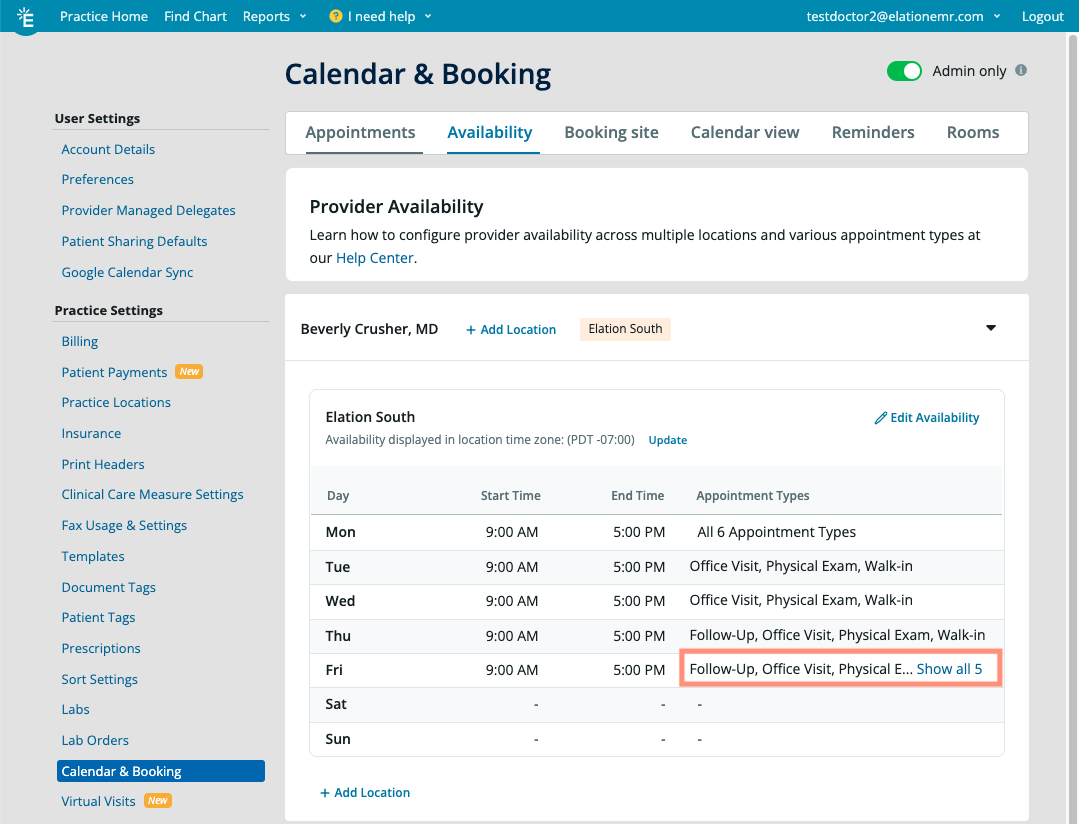
- The selected Appointment Types will appear on the main Settings page, as space allows. Click “Show all…” if you want to see the expanded list of the selected Appointment Types.

- To delete an availability time frame, click the (trash can) icon.
- To add a new availability time frame for that day of the week, click the “+” icon.
- Once you are done defining the availability for that Practice Location, click “Save Availability” to save your changes.
- To discard your changes, click “Cancel”.
- To remove all of the availability for that Practice Location, click “Remove Availability”.
- To define availability for the same Provider for another Practice Location, repeat steps 4 through 6.
- To define availability for another Provider in your practice, repeat steps 2 through 6.
To completely remove a location and all of its availability for a Provider Level User:
- Go to “Settings” -> “Calendar & Booking” and then click into the Availability section.
- Find the Provider whose availability settings you want to update and click on the arrow to expand their availability preferences.
- Click "Edit Availability" for the Practice Location you want to remove.
- Click "Remove Availability"
Important Note: Take caution when removing availability because it cannot be restored.
To completely remove availability for a specific day of the week or a specific Appointment Type for a Provider Level User:
- Go to “Settings” -> “Calendar & Booking” and then click into the Availability section.
- Find the Provider whose availability settings you want to update and click on the arrow to expand their availability preferences.
- Click "Edit Availability" for the Practice Location you want to edit.
- To delete an availability time frame, click the (trash can) icon.
- To remove an Appointment Type from a time frame, click on the Appointment Types dropdown and unselect the Appointment Types that you want to remove for that timeframe.
- Once you are done editing the availability for the Practice Location, click “Save Availability” to save your changes.
Important Note: Take caution when removing availability because it cannot be restored.

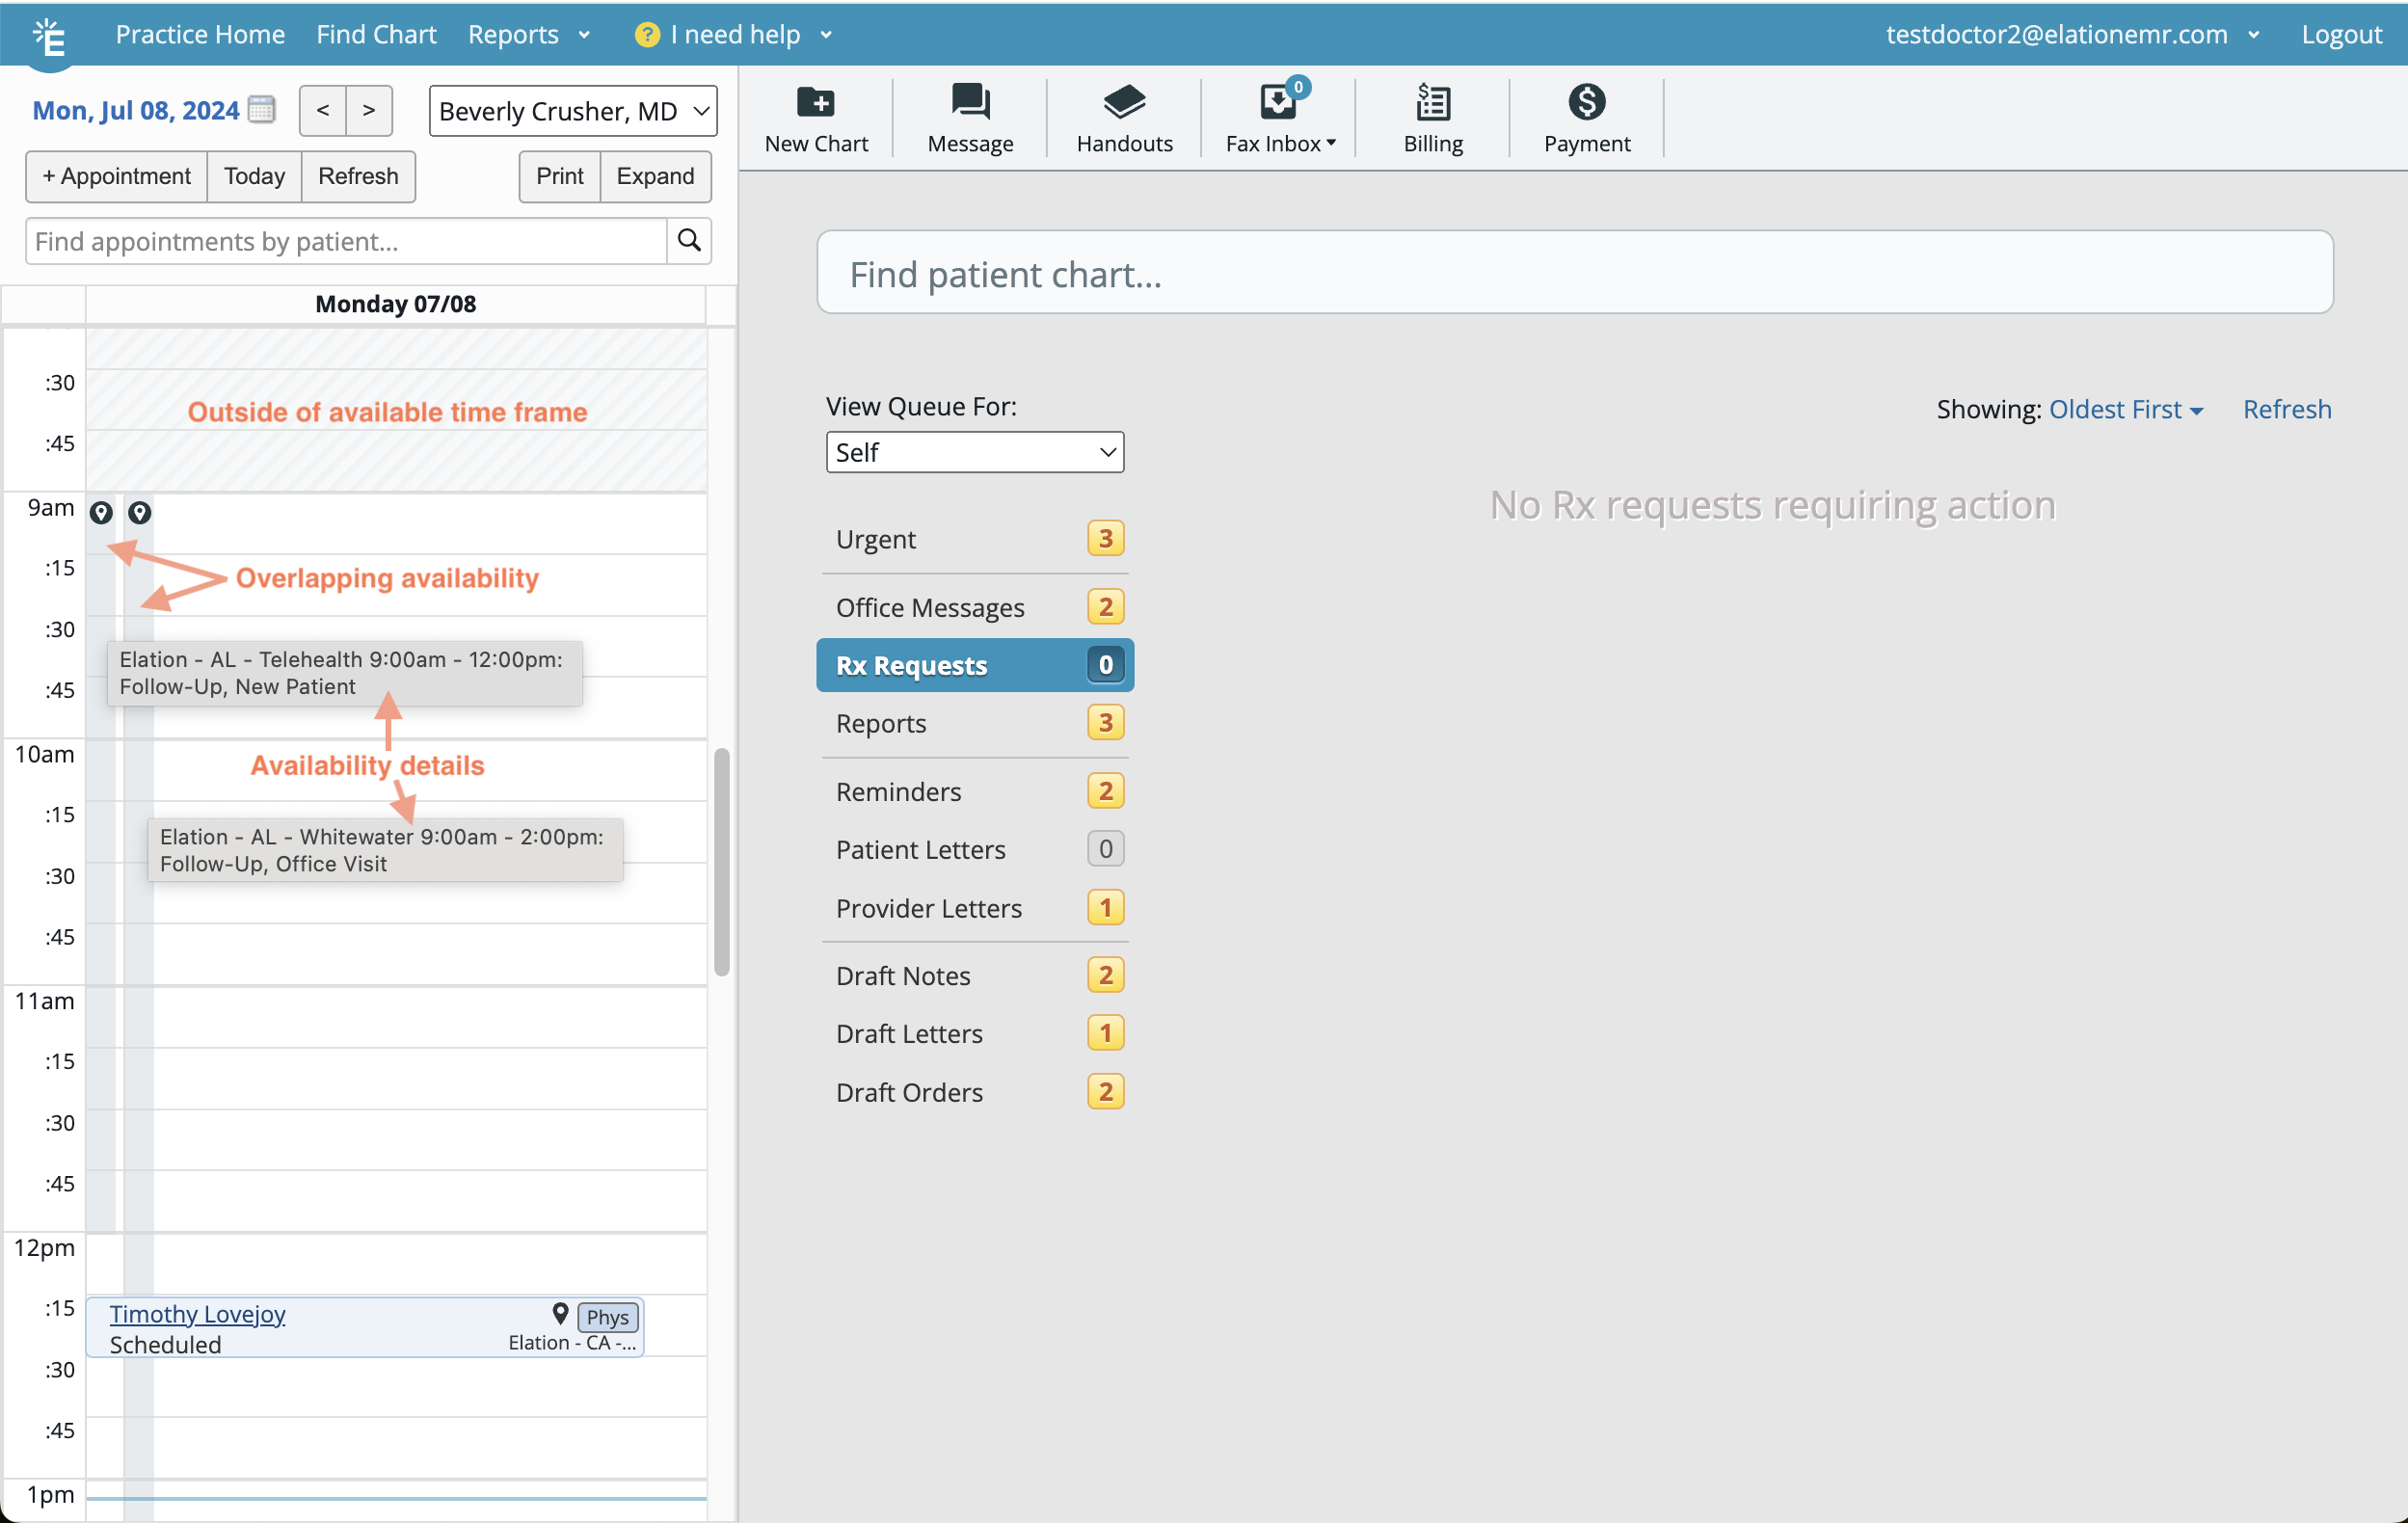
A Provider Level User's availability is marked using gray vertical bars in their EHR Calendar. Place your cursor over an availability bar to see the availability details. Each availability bar indicates when the provider is available, which location they are working at, and which Appointment Type(s) you can book. If there is overlapping availability then you will see multiple appointment bars in parallel.
In periods when the Provider is unavailable, the Calendar will display diagonal stripes. Your office can still schedule appointments during these time frames if necessary.
To schedule appointments on the calendar for a Practice Location where the Provider is available:
- Click on the gray vertical bar for the corresponding Practice Location at the time the appointment starts.
- The Location field will automatically populate the Practice Location you clicked on.
- Fill in the remaining appointment details and then click “Create Appointment”.
User Tips:
- You can click in the white space of the Calendar to schedule appointments. However, this will set the Location field to "No location specified" by default.
- You can schedule appointments during any unavailable timeframes by clicking a time in the timeframe or click “+ Appointment”.
To ensure that the available appointments are displayed correctly on the Patient Booking Site,
- Go to the Appointment Type Settings
- Click “Edit” for the Appointment Type you want to make available on your Booking Site
- Check off the “Show this appointment type on the booking site” box
- Select the name of any Provider you want visible for that Appointment Type under Providers
To share a direct URL for each Appointment Type with patients:
- Go to the Appointment Type Settings.
- Go to the summary box of the Appointment Type you want to share.
- Look for the Direct URL under the Booking Site section and click “Copy”.
- Share the Direct URL with the patient using any method of your choice.
The Patient Booking Site will only display the Provider availability configured in the Calendar & Booking settings. When patients first navigate to your practice booking site, they will see a list of all available Practice Locations. Patients can narrow down the availability displayed by selecting a Practice Location, and/or filtering by Provider, Appointment Type, or Time zone.
Default Booking Site display:
Booking Site display after a Practice Location is selected:
- If the patient selects a Practice Location, the page will display available providers and appointments for that Practice Location and the appointment times will display in the Practice Location’s default time zone unless the patient changes the time zone selection at the top of the Booking Site.
Patient's timezone preferences
To ensure that appointment confirmation and reminder notifications display the appointment date and time according to the patient's preference, save each patient's preferred time zone in their Patient Demographics. for appointment confirmation and appointment reminder notifications. The Time zone field is in the Contact Information section of Patient Demographics.
Any patient communications sent by the EHR will follow these time zone rules:
- If a patient’s preferred time zone is saved for the patient then appointment confirmation and appointment reminder notifications will use the preferred time zone.
- If a patient's preferred time zone is not saved, but their Patient Demographics include a valid zip code, appointment confirmation and reminder notifications will calculate the appropriate time zone based on the patient's zip code and use it for sending notifications.
- For practices with a single Practice Location:
- If a patient's preferred time zone is not saved AND the patient does not have a valid zip code in the Patient demographics, then appointment confirmation and appointment reminder notifications will use the time zone of your practice’s primary Practice Location.
- For practice’s with multiple Practice Locations:
- If a patient's preferred time zone is not saved AND the patient does not have a valid zip code in the Patient demographics, then the appointment confirmation and reminder notifications will be based on the time zone associated with the Practice Location of the appointment.
- If the Practice Location of the appointment does not have a defined time zone, then we will use the time zone of your practice’s primary Practice Location.
- Go to your Practice Location Settings to define a time zone for each Practice Location. Contact Elation Support if you need to update the time zone of your practice’s primary Practice Location.
- If a patient's preferred time zone is not saved AND the patient does not have a valid zip code in the Patient demographics, AND the Practice Location for the appointment does not have a time zone set, then appointment confirmation and appointment reminder notifications will use the time zone of your practice’s primary Practice Location.
Why are changes to availability not saving?
If a time frame does not have both a Start Time and End Time, Elation will not allow you to save that time frame. Add both a Start Time and End Time to save availability preferences.
I work in multiple time zones. How should I indicate my Practice Hours on my Booking Site?
Currently, you are unable to designate a time zone for your Booking Site Practice Hours. We recommend leaving the Practice Hours blank if you have Practice Locations in different time zones.
Can I specify which locations appear on the booking site?
Currently all locations configured on the Practice Locations Settings page will appear on the Booking Site.
I sometimes see patients virtually or I run a fully virtual practice, how should I set up my availability?
To set your practice up to use the Booking Site for virtual appointments, we recommend taking the following two actions:
- Adjust the Practice Location of any provider offering virtual appointments to match the provider's time zone.
- Save each patient's preferred time zone in their Patient Demographics.
This ensures that Providers see their calendar in the Provider’s own time zone and patients receive communications in the patient’s preferred time zone.
If I am also using Elation's Workspaces feature, what Time Zone will the Availability on my Calendar display in?
If you are using Elation's Workspaces feature, the Availability will display based off of the Time Zone your Workspace is configured for.
Related Articles


