Contents
Overview
What is the Patient Booking Site?
The Patient Booking Site is a personalized web page, specific to your office, that patients can access remotely on any internet enabled devices to book an appointment with you. Patients can easily book an appointment with you from anywhere and at anytime. The Booking Site can be customized to your office's information and preferences and all booked appointments will appear on your Elation calendar in real time.
Why is the Patient Booking Site useful?
The Patient Booking Site is useful because it allows patients to book an appointment with you from anywhere in the world and at any time during the day. Your availability will be displayed on the Booking Site in real time and all appointments booked through the Booking Site will also appear on your Elation Calendar in real time. This helps reduce the administrative workload of your front office staff.
Use of the Booking Site will also grant patients access to Appointment Reminders and Patient Forms if you link all the features together.
Workflow Instructions
Accessing the Calendar & Booking Site Settings
To access your Calendar & Booking Settings page:
| 1 | Click on your email in the top right corner and click Settings. |
| 2 | Under Practice Settings, click Calendar & Booking on the left-hand menu. |
Along the top you will see a series of tabs, which are used to configure your Booking Site. We recommend moving along the tabs from left to right to configure your Booking Site and have outlined each of these steps below.
Specifying which appointment types appear on the Booking Site
The Appointments section is where you can make changes to your Appointment Types, surface them on the Booking Site and configure how they appear on the Booking Site.
To add an Appointment Type to the Booking Site:
| 1 | Click on the Appointments tab on the top menu. |
| 2 | Click Edit in the top right hand corner of the Appointment Type you wish to add to the Booking Site. |
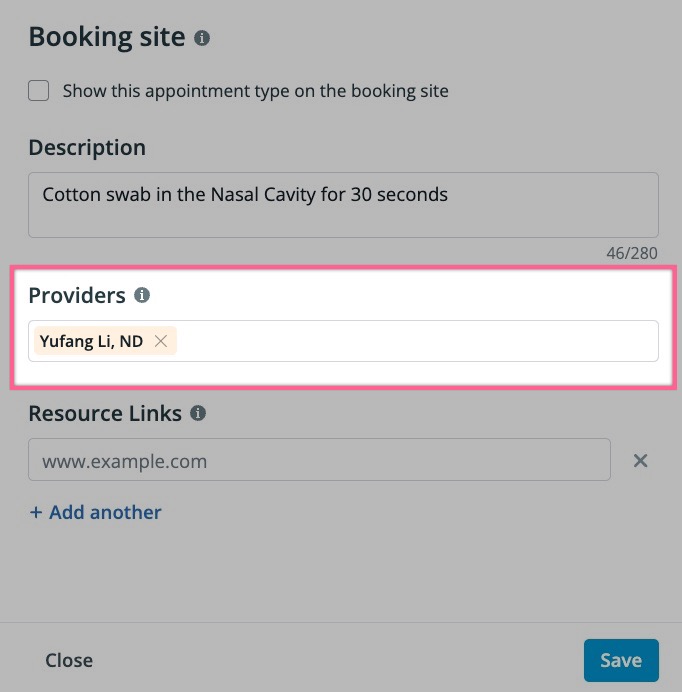
| 3 | Scroll down to the Booking site section and check the box for Show this appointment type on the booking site. |
| 4 |
(Optional) Enter the Description that you want to display on the Booking Site for that Appointment Type. This can let your patients know what to expect from this Appointment Type.
- For example, you can include details about what will happen during the appointment or indicate if the patient needs to arrive early for check-in.
|
| 5 |
Select all of the Providers who are eligible to be booked for this appointment, even if there is only one provider in your practice. This will list them on the Booking Site for this appointment. Each provider must have their availability configured for the Booking Site to reflect available appointment times.
|
| 6 | (Optional) Add any Resource Links you wish for patients to access after booking their appointment online. You can click + Add another to add multiple resources, or click the X button to remove them. |
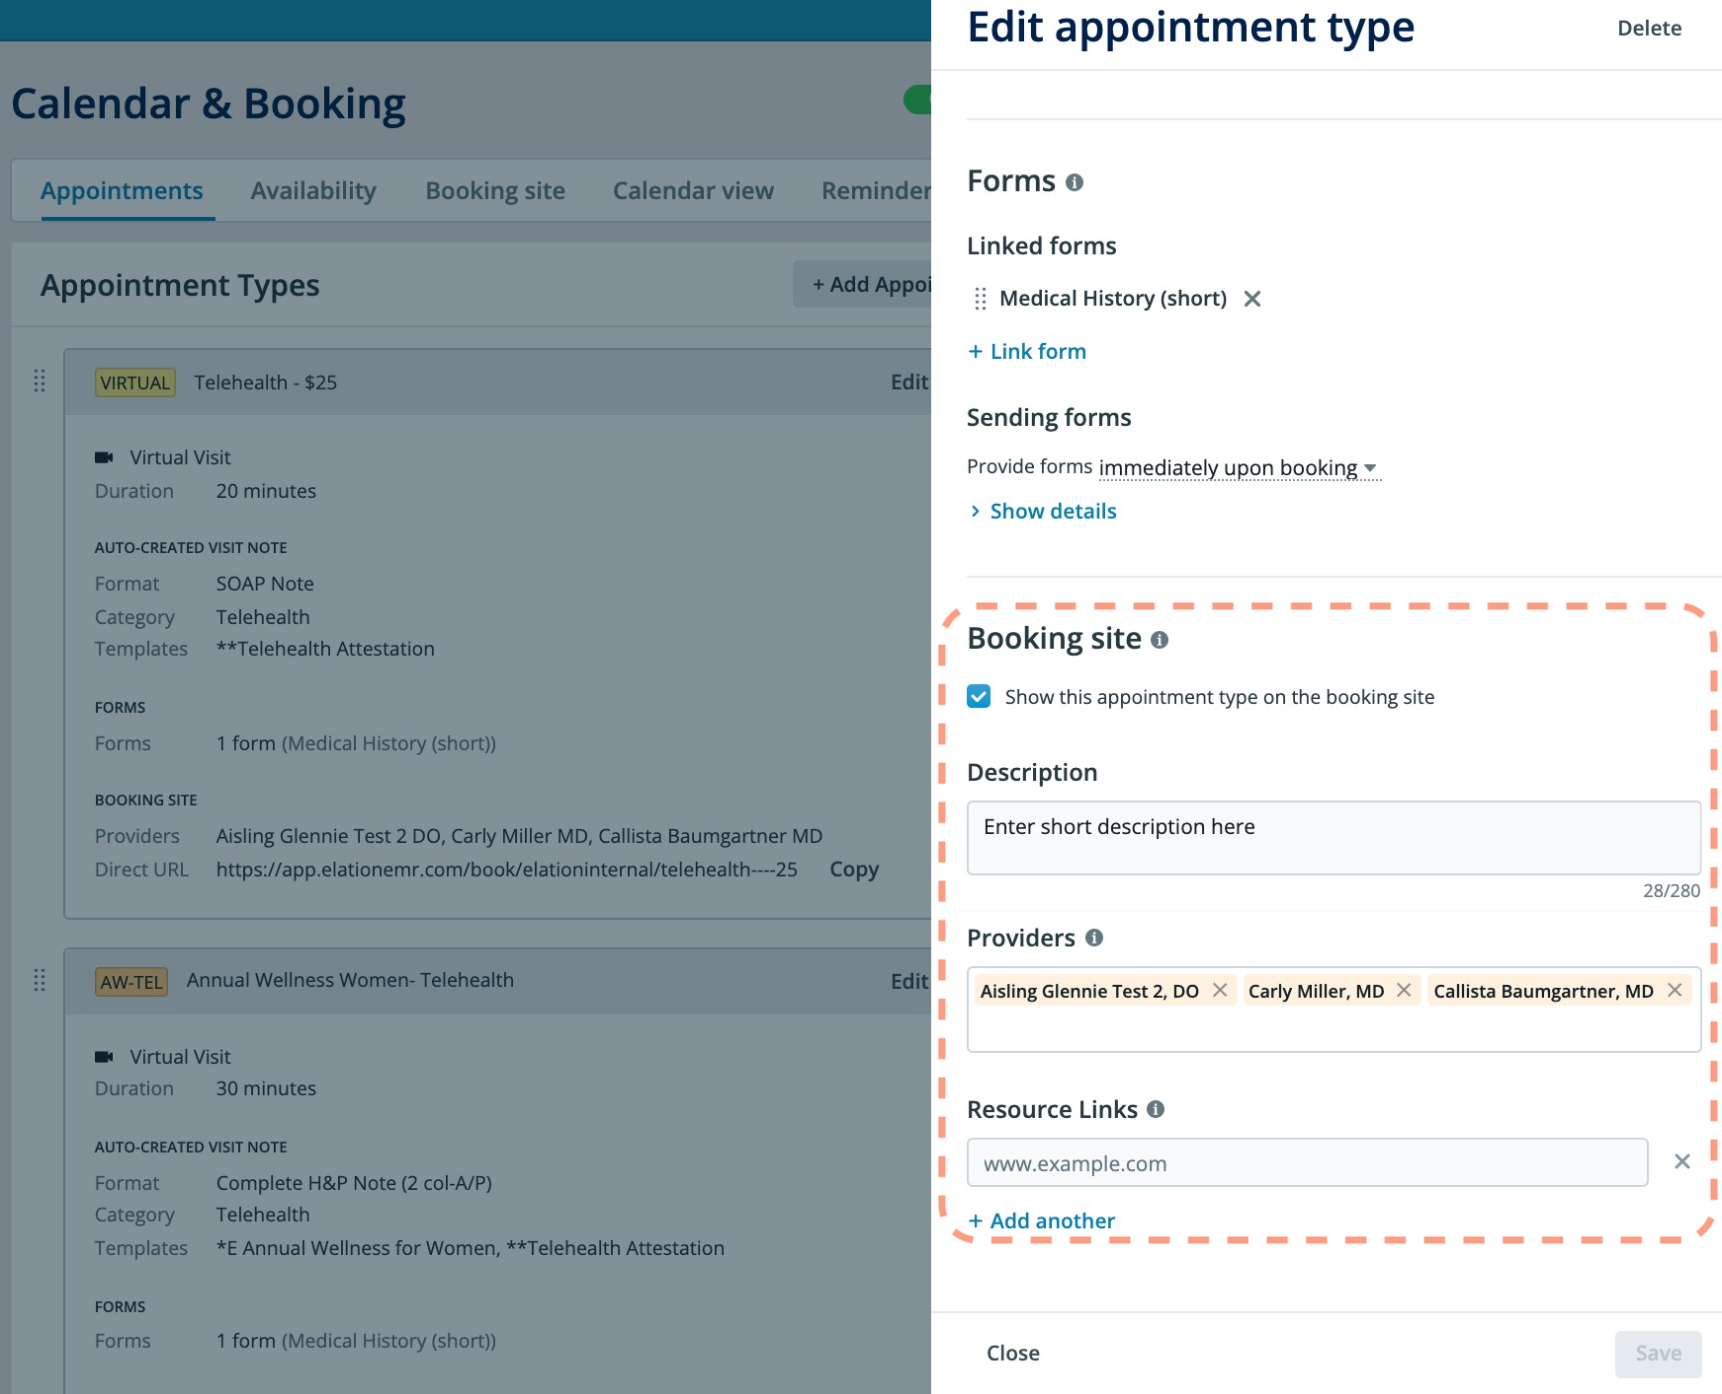
Click here for instructions about creating and managing appointment types.
💡USER TIP
To allow a patient to book this type of appointment on the Booking Site, you must add the provider they are booking with to this appointment type, even if there is only one provider in the practice.
Specifying Provider availability
The Availability section is where you can set each provider's Practice Location(s) and availability for the Booking Site. Reference the following guide: Calendar & Booking Site Guide - Enhanced Provider availability by Practice Location & Appointment Type
ℹ️ NOTE
Each provider must fill out their own availability otherwise patients will not be able to book with them through the Booking Site.
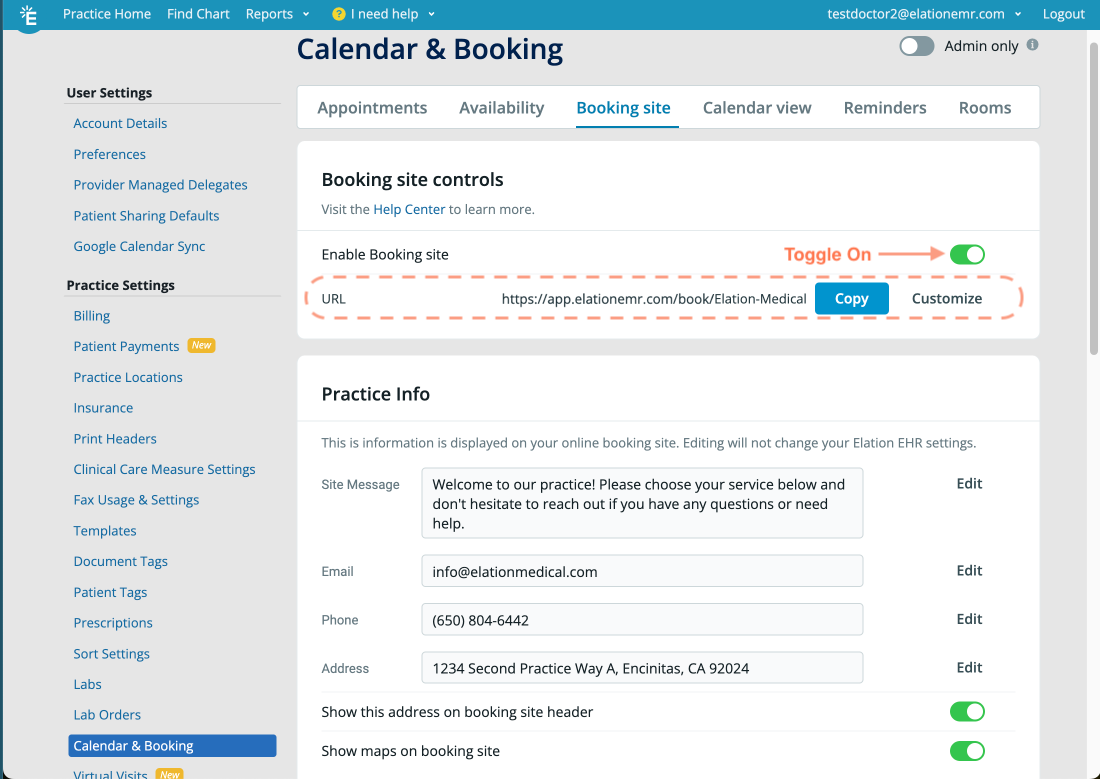
Configuring Booking Site settings
The Booking Site section is where you can configure details and preferences about the actual Booking Site itself.
|
1
|
Enable your Booking Site - Click on the toggle to the right of the Enable Booking site setting so that it switches from Off (grey) to On (green). Once enabled, you must share the URL with patients for them to book appointments.
|
|
2
|
Customize your URL - If you wish to customize your Booking Site URL link so that it is personalized for your practice (i.e. add your practice name to the end of the link), click the Customize button. Once you have entered your customized link text, click Save to save the new URL.
|
|
3
|
Share your URL - Click Copy to copy the URL link and post it anywhere you like (i.e. on your business website, in a message/letter to your patients, or on a social media site). You can also embed your booking site link on your Google Business profile. This will make it easier for patients to access your booking site and self-schedule based on your availability.
|
💡USER TIP
After customizing your URL, make sure you update any old links that were used publicly (i.e. on your website, in messages, or on social media).
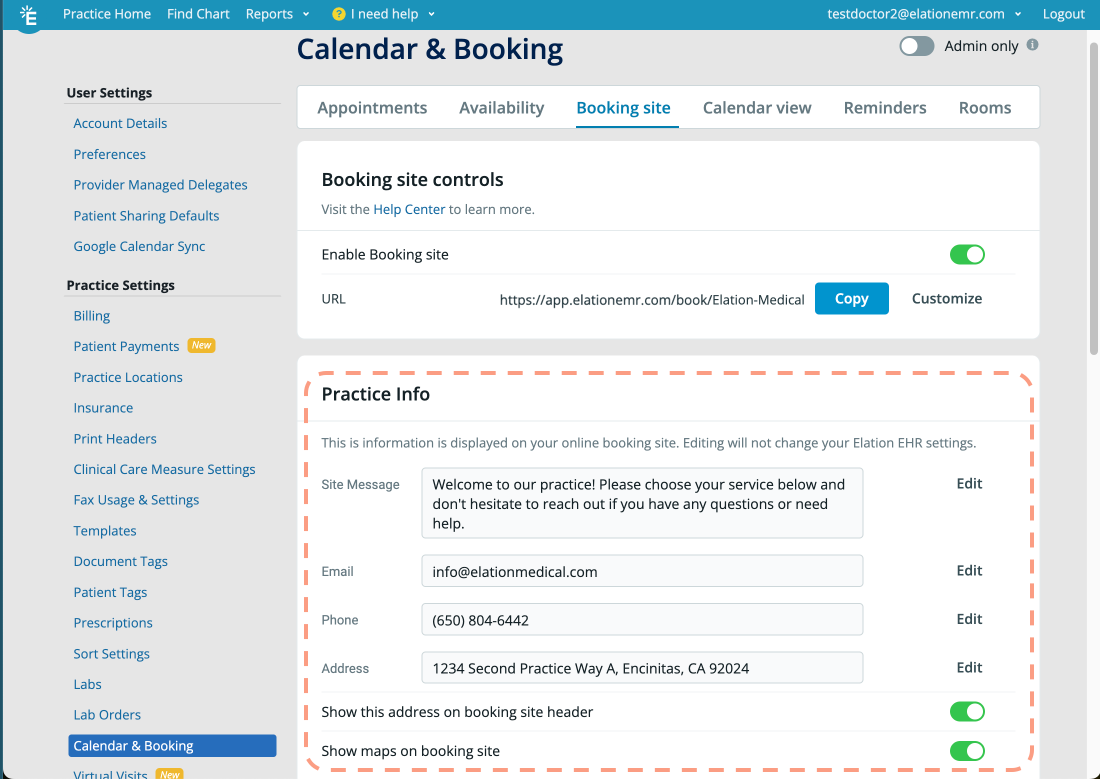
Practice Info
- Site Message
- Information entered in the Site Message box will display at the top of the Booking Site. You can use the Site Message box to:
- notify patients of important information regarding your practice
- provide instructions for how to use the Booking Site
- Email
- The email address stored in the Email field will display at the top of the Booking Site.
- The email address will also be used for booking confirmation emails for your practice if you enable the Send treating provider and ...... an email after each online booking Setting under Preferences.
- Phone
- The phone number stored in the Phone field will display at the top of the Booking Site. This is usually your practice's main phone number.
- Address
- The address stored in the Address will display at the top of the Booking Site and is used to determine what map will display on your Booking Site.
- Show this address on booking site header
- Toggle this setting On (green) if you want the address entered in the Address field to appear at the top of your Booking Site.
- Show maps on booking site
- Toggle this setting On (green) if you want a map of your practice's location to appear on your Booking Site.
💡USER TIP
If you do not wish to have your exact location on the map, you can simply enter the city and state. If you do not wish to have any map display on the Booking Site, enter dashes in the Address field.
Practice Hours
Update the Practice Hours section to display your business hours at the top of your Booking Site. This is like hanging a sign on your door displaying the open hours.
ℹ️ NOTE
The times listed in Practice Hours only display as business hours on your Booking Site. They do not determine what times patients can book appointments. The source of truth for available appointment times is determined by each provider's availability.
Preferences
- The amount of minimum notice required for booking online
- Enter the amount of minimum notice required for booking online. For example, if you select 2 days as the minimum notice timeframe, then a patient viewing the Booking Site on a Monday would see the first available appointment on the coming Wednesday.
- The amount of future availability shown on the booking site
- Enter the amount of future availability shown on the booking site. For example, if you select 2 weeks, patients will only see up to 2 weeks of appointments in the future and nothing more.
- Send treating provider and ... an email after each online booking
- Select whether you wish an email to be sent to the treating provider and your practice's email (the practice's email is designated by the Email field of your Practice Info Settings above) when a patient books an appointment by toggling this button On (green) or Off (grey).
- Automatically send patients an email invitation to join Elation Patient Passport after they book online (if they don't already have a Passport account)
- By default, Elation sends patients an invite to join patient passport after they book an appointment online (if they don't already have a passport account). However, If you would prefer patients do not automatically receive this invitation please toggle this setting from On (green) to Off (grey).
ℹ️ NOTE
For HIPAA compliant reasons, the patient's full name will not be displayed in this confirmation email. The confirmation email will only list the patient's initials, the type of appointment they booked, the name of the provider they are seeing, and the date and time of that appointment.
Cancellations
Enter a cancellation policy to ensure patients understand your policy in case they ever need to cancel. Please note, Elation does not enforce your practice's cancellation policy, we only display the policy to the patient.
💡USER TIP
Now that your Booking Site is enabled, you can send patients a direct URL for specific Appointment Types if preferred. For example, you may wish to send a patient a Patient Letter with the link to book an Annual Wellness Exam. To do this: Go to the Appointments tab at the top of the Calendar & Booking Settings page, find the Appointment Type you wish to share with the patient, then click Copy to the right of the Direct URL that is displayed at the bottom of the Appointment Type details.
Reviewing appointment reminder settings
After you enable your Booking Site, you may also want to review your reminder settings in the Reminders section if you wish to send automated appointment reminders to patients with appointments.
ℹ️ NOTE
Appointment reminder settings will be applied to all appointments, regardless of whether they were booked through your Booking Site or manually in the Elation scheduler.
Click here for instructions on how to set up your Elation calendar view, schedule appointment reminders for patients and manage the rooms in your practice.
Associating Patient Forms for appointments booked through the Booking Site
You can speed up your patient intake process by using Elation's Patient Forms feature along with the Booking Site. For more information on setting this up, watch our video walkthroughs or read Patient Forms Introduction.
Patients say they booked but the appointment isn't on your Calendar
If a patient reports they scheduled an appointment but you cannot find it in Elation:
|
1
|
Confirm the patient completed the booking process - The patient must reach the final Confirm step and select the confirmation button. If they navigated away before confirming, the appointment was not created.
|
|
2
|
Check for sticky Confirm button behavior - In some browsers, the Confirm button may appear unresponsive. Ask the patient to try a different browser or clear their cache and rebook.
|
|
3
|
Verify the patient's contact information - Confirm the email address or phone number the patient used matches what is on file. Booking confirmations are sent to the contact information entered during scheduling—if there is a mismatch, the patient may not have received confirmation, or the appointment may be under a different patient record.
|
No available times showing for patients
If patients report that no appointment times are available on the Booking Site:
|
1
|
Review your Availability configuration - The Booking Site only displays times you have set as available for online scheduling. Go to Settings → Calendar & Booking → Availability and confirm the correct days, times, and appointment types are enabled for each provider.
|
|
2
|
Check for Calendar Blocks - Calendar Blocks hide time slots from the Booking Site. Review your calendar for any blocks during the times patients expect to see availability.
|
|
3
|
Check for existing booked appointments - Booked appointments remove those time slots from the Booking Site. If your schedule is full, no times will display.
|
Frequently Asked Questions (FAQs)
Why are certain appointment types not appearing for my patients?
Appointment types have to be configured in order for them to appear in the Booking Site for each provider. To configure the different types of appointments, follow the steps in the Appointments section of this article.
What is the difference between practice hours and physician hours?
The practice hours will be displayed at the top of the Booking Site for patients to reference the regular business hours for the office.
Each provider will also be able to select their own availability under the Availability section of the Calendar & Booking settings page. The provider’s availability will determine the timeframe patients can select from when booking an appointment. This means that each provider’s availability can fall within or out of normal practice hours if they choose.
- If a provider is already booked for another appointment or other event, the availability for that provider will be automatically updated on the Booking Site to avoid double booking.
Will we be notified when a patient books an appointment? How will we be notified? Who will get notified?
There is a feature you can turn on if you want an email notification to be sent to providers and staff when a patient books an appointment. This feature is located in the Calendar & Booking → Booking Site → Preferences section.
For HIPAA compliant reasons, the patient’s full name will not be displayed in this email. We will display the patient’s initials, the type of appointment they booked, the name of the provider they are seeing and the date and time of that appointment. This email notification will go to the provider’s Elation email as well as the email listed in the Email section of the Booking Site section.
Can I turn off notifications about booked appointments or changes?
Yes, you can turn off notifications about booked appointments or changes. To turn notifications off, go to the Calendar & Booking section of the Settings page in Elation under the Booking Site → Preferences section. You will need to turn off the Send treating provider and ... an email after each online booking setting.
Do patients need to have a Patient Passport account in order to book an appointment through the Booking Site?
Patients do not need to register for a Passport account in order to book an appointment through the Booking Site. Patients who continue as a Guest will be prompted to enter their chart information to allow Elation to try to connect their appointment to their chart.
If the Patient has a Passport account, they may log in to connect their appointment to their account or they can continue as a guest to book appointments. We suggest recommending patients sign in to their Passport account when booking an appointment as this ensures the chart will guaranteed be tied to their Elation chart.
ℹ️ NOTE
Patients will not be able to book appointments directly through Patient Passport. Patient Passport will direct the patient to your Booking Site if they wish to book an appointment asynchronously. All Booking Site preferences —such as provider availability, appointment types, and time slots— should be managed through the Booking Site settings.
Can people book appointments on behalf of their children, significant other or family member?
People can book appointments on behalf of their children, significant other or family member. There are two options:
| 1 | Log in to that person's Passport account to link the appointment to their chart. |
| 2 | Book the appointment as a Guest for their child, significant other or family member. Enter their information as it is listed in their chart so that Elation can try to map the appointment to their chart. |
When a patient books an appointment, is the appointment considered fully booked or is the appointment requested and I need to accept it?
Appointments are considered fully booked when a patient books an appointment on the Booking Site. If you would like patients to confirm their appointments prior to the date of the appointment, utilize our appointment reminder feature which offers the patient an option to confirm their appointment.
Appointment reminders can be set in the Settings → Calendar & Booking → Reminders section of Elation. You can select up to 3 reminders to go out for each appointment. The reminders will be sent via the patient's preferred contact method found in the patient's chart under their demographics information. If the patient does not have a preferred contact method selected, the reminders will be sent via the first method listed below according to what information is available in the patient’s chart:
| 1 | Patient Passport Contact Settings (the default setting is email). If they do not have an active Patient Passport account, then: |
| 2 | SMS Text to the Mobile phone number. If they do not have a Mobile number, then: |
| 3 | Email notification to the email address. If there is no Email address on file, then: |
| 4 | Phone call to the Home or Main phone number. |
| 5 | If no phone numbers or email are available then the patient will not receive any appointment reminders. |
How do appointment reminders work? Can I customize the time range in which patients are reminded? Can I customize how the patient is reminded?
Appointment reminders can be set in the Settings → Calendar & Booking → Reminders section of Elation. You can select up to 3 reminders to go out for each appointment. The reminders will be sent via the patient's preferred contact method found in the patient's chart under their demographics information. If the patient does not have a preferred contact method selected, the reminders will be sent via the first method listed below according to what information is available in the patient’s chart:
| 1 | Patient Passport Contact Settings (the default setting is email). If they do not have an active Patient Passport account, then: |
| 2 | SMS Text to the Mobile phone number. If they do not have a Mobile number, then: |
| 3 | Email notification to the email address. If there is no Email address on file, then: |
| 4 | Phone call to the Home or Main phone number. |
| 5 | If no phone numbers or email are available then the patient will not receive any appointment reminders. |
Can patients confirm, reschedule or cancel appointments? If so, how and in what time frame?
Patients can confirm, reschedule and cancel appointments via the appointment reminder they are sent. Options to confirm and cancel are displayed for the patient to select in the appointment reminder. If the patient cancels an appointment, they will be prompted to reschedule. If the patient needs to reschedule or cancel the appointment before they receive the appointment reminder, they will need to call the office.
If you do not want to allow patients to cancel their appointment, turn off the Allow patients to cancel their appointments online feature under Settings → Calendar & Booking → Reminders.
Can I see what the patient sees when they try to book an appointment with me?
Yes, you can see what the patient sees when they try to book an appointment with you by copying the booking site URL and opening it in Google Chrome or Mozilla Firefox. To find the URL, go to Settings → Calendar & Booking → Booking Site. The URL is at the top of this page. You can customize it to your preference by clicking the Customize button to the right.
Why can’t I use the custom URL I want for my booking site?
If you try to save a customized URL and it does not let you save, this means another Elation user is using that URL and you will need to choose a different one.
How come a new chart was created for this patient? How come this patient’s chart is blank? They have been seen by me multiple times.
Please search Elation and see if you see another chart for this patient. A new chart might have been created for this patient when they booked an appointment because we could not match the patient to their existing Elation chart based on the information they entered when booking an appointment. (See the patient's booking options here).
To merge the new chart to the patient’s existing chart, you can follow these steps:
| 1 | Open the new chart. |
| 2 | Click on the patient’s name to open their Demographics. |
| 3 | Click on the Merge Chart button at the bottom right hand corner. |
| 4 | Find the patient’s other chart and then click Merge Chart. |
| 5 | Click Yes, merge chart when the Confirm box pops up. |
What are resource links?
Resource links are website addresses that you can share with patients when they book an appointment with you. These links will direct a patient to where you want them to go to take a specific actions prior to their appointment. Feel free to utilize resource links to share any web based content with patients.
- Some customers link the patient to an intake form the customer can fill out online. Some customers link the patient to a folder of paperwork they want the patient to fill out and bring to the office.
Will appointments booked through the booking site appear in my integrated practice management system automatically?
Appointments booked through the booking site will appear in your practice management system if the integration is set up for Elation to push appointment information from the Elation Calendar to the practice management system.
If appointment information is only pushed from the practice management system to the Elation Calendar, then you will need to manually add the patient’s appointment to your practice management system.
Will patients be able to access the Booking Site on their phone?
Yes, patients will be able to access the Booking Site on their phone. The Booking Site is visible and formatted for all mobile devices of all sizes.
Is the Booking Settings page only for admin level staff or can everyone at the practice access this Settings page?
The Booking Site Settings page is default accessible to all users. There is a feature on the Settings page that allows you to set the page as Admin Only. You will see the option at the top right corner of the Calendar & Booking Settings page.
- Once the Admin Only option is selected, then only Admin level users will be able to adjust the Calendar and Booking Site settings.
Are there text limits for the Calendar & Booking Site text boxes?
Yes, the text limit for the different boxes are as follows:
- Site Message = 255 characters
- Address = 255 characters
- Cancellation Policy = 255 characters
- Appointment Type Description = 280 characters
What time zone will the availability of the Booking Site display in?
The Booking Site will automatically display availability based on the Time Zone of your practice.
Can I allow more than one patient to book the same time slot?
Each appointment slot can only be booked by one patient. Elation does not allow for double booking the same time slot.
What happens when a patient cancels an appointment? Does the time slot free up for other patients to book?
When a patient cancels an appointment, the time slot will become available for other patients to book.
Can patients schedule recurring appointments?
No. Patients cannot schedule recurring appointments through the Booking Site. Only staff can create recurring appointments in Elation.
For instructions on scheduling recurring appointments, see the Calendar Guide - Scheduling recurring patient appointments article.
Can patients join a waitlist online?
No. Elation does not include a built-in online waitlist for patient self-scheduling.
Recommended alternatives:
- Maintain a manual recall list in Elation to track patients who want earlier appointments.
- Instruct patients to call the office if they would like to be added to a cancellation list.
Next Step
Set up your Patient Booking Site today and start seeing the advantages of online booking!
Related Articles

