Content
Structured insurance information allows you to create your own database of Carriers (Payers) and corresponding Carrier Plans in Elation. You can then select Carriers and Plans from your database when adding primary and secondary insurance coverage information in the patient's demographics to use for insurance billing and claims management.
By setting up and managing the insurance Carriers and Plans list for your practice, you are setting up your practice for success. Having accurate insurance information in each patient's chart is critical to your practice’s ability to store accurate patient records, submit claims and receive payment from Payers and run reports based on patient insurance.
You can view, search for and manage your practice’s list of insurance Carriers and Plans in the Insurance section of your Elation Settings page.
By default, only users in your practice who are set as 'Admin' will have the ability to add, edit, and delete insurance Carriers or Plans for your practice. This is designated by the green "Admin Only" toggle on the Insurance Settings page. This Setting is ideal for preventing duplicates.
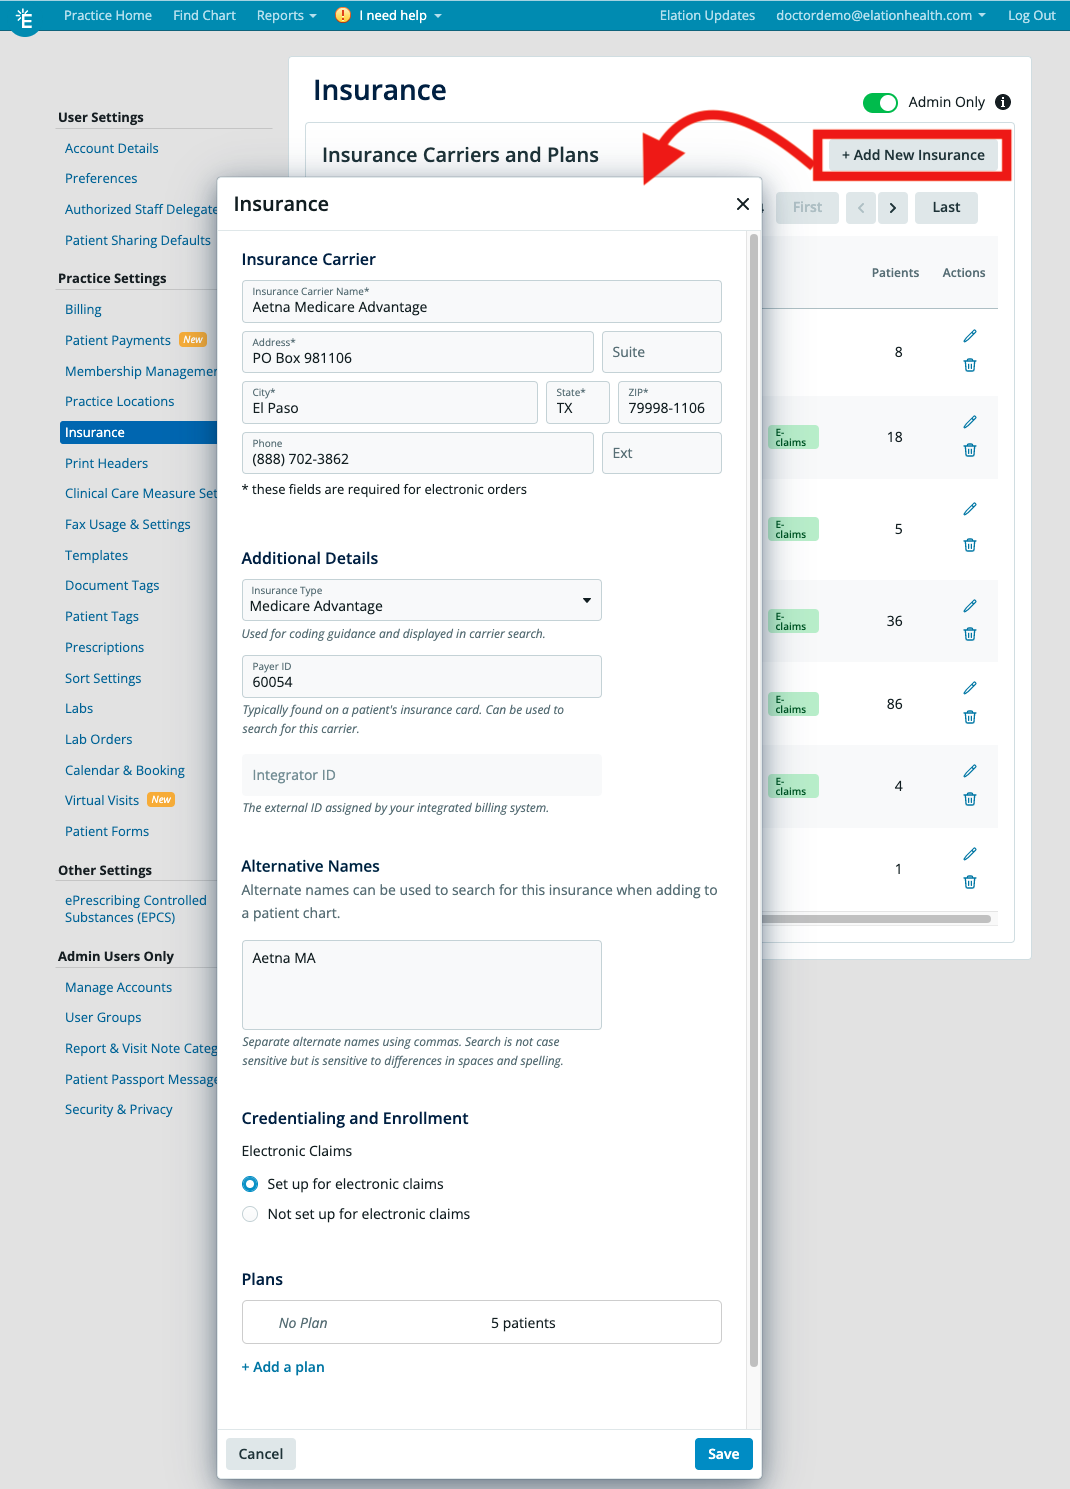
- Click on the “+ Add new insurance” button at the top right of the Insurance Settings page
- Enter the Insurance Carrier Name (required)
- Enter the address and phone (if available)
- Select an Insurance Type, if applicable. Available options are:
- Capitated
- Commercial
- Managed Medicaid
- Medicaid
- Medicare
- Medicare Advantage
- Medicare Supplement
- Self Pay
- Workers Compensation/Third Party Liability
- Store the Payer ID in the Payer ID field
- Enter alternative search names for the Carrier if needed.
- Use commas to separate multiple names. The search is not case sensitive but is sensitive to differences in spaces and spelling.
- Store the Electronic Claims status for the Payer if needed.
- Available options are:
- Set up for electronic claims
- When selected, an “E-claims” label will appear the Carrier Details table of the Insurance Settings page
- Not set up for electronic claims
- The Electronic Claims status section is generally used to designate whether you are approved to send claims electronically to the Carrier.
- Click “+ Add a plan” to add a Carrier Plan to the Carrier.
- Enter the Plan name
- Click “Save” when done
- Find the insurance Carrier or Plan you want to edit
- Click the “pencil”
 icon to edit
 - Make changes as needed within the window that appears
- Click “Save”
User Tip: To prevent the duplication of insurance carriers, each Carrier must have a unique mailing address.
- Ex. One Cigna has the address P.O. Box 1122, New York, NY 10002. If you add a second Cigna with the same address you will receive an alert telling you it is a duplicate and you will be blocked from adding this second Cigna. If you add a Cigna with a different address or if you leave the address blank, you will be allowed to add this second Cigna.
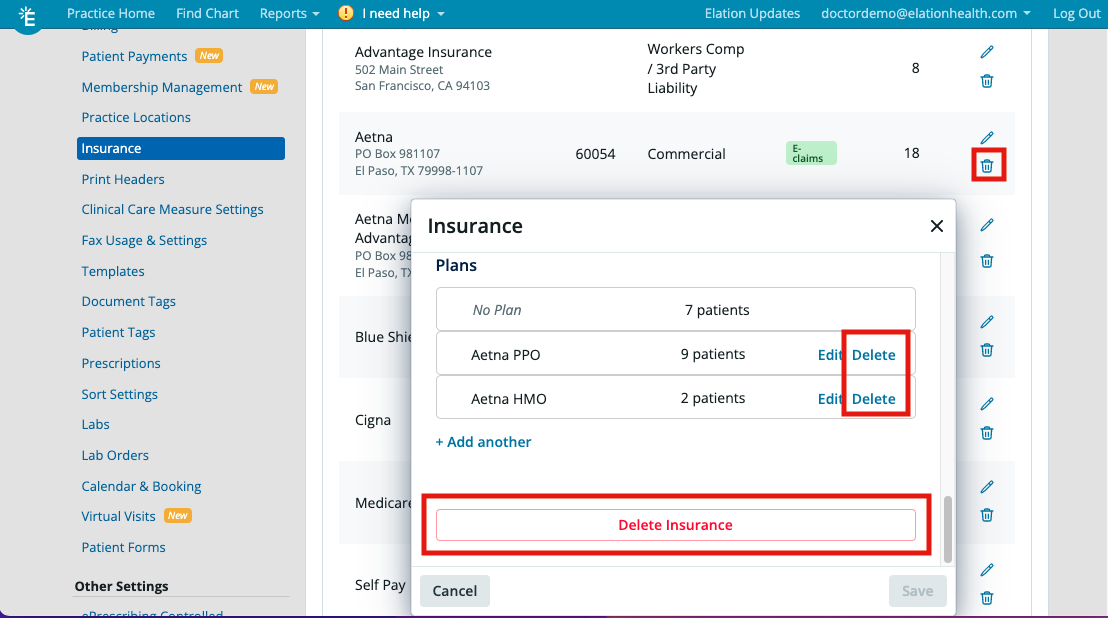
Important Note: Deleting an insurance Carrier and/or Plan from the Settings page will remove it from your practice’s list of insurances AND will also delete this insurance information from any patient charts with this insurance carrier/plan. Please use this feature with discretion.
You can delete an entire insurance Carrier and its associated Plan(s), or you can delete individual plans within each Carrier.
- To delete an entire Carrier and all Plans associated to that Carrier
- Click the “trashcan”
 icon next to the Carrier name from the Insurance table
 - Click the "Delete Insurance" button at the bottom of the Carrier Details
- To delete individual Plan(s) within a specific Carrier, click the “Edit” button next to the Carrier name, find the Plan you want to delete, and then click the “Delete” button next to the Plan name
When entering insurance information into a patient’s chart, you will be prompted to select from your pre-populated list of the insurance Carriers and Plans. Reference the Patient Demographics Guide- Managing patient insurance to learn more about storing patient insurance details.
Who within my practice can add/edit/delete insurance carriers and plans?
By default, only practice 'Admin' Level Users will have the ability to add, edit, and delete insurance Carriers and Plans for your practice. To change this default, an Admin User can click the “Admin Only” toggle on the Insurance Settings page to switch it to gray to turn off the “Admin Only” restriction. Once the ‘Admin Only’ toggle is off, any user within the practice will be able to add, edit, and delete insurance Carriers and Plans.
What happens if I import a patient chart that contains an insurance carrier/plan that does not currently exist within my practice?
If a patient chart is imported into your practice with an insurance Carrier that does not currently exist, then Elation will automatically create that insurance Carrier for your practice and add it to the list of insurance Carriers and Plans in your Insurance Settings page.
Next Step
Review your list of Carriers and Plans and begin storing patient insurance details!
Related Articles

