Contents
Overview
What is the Patient Payments feature?
Elation partnered with Stripe, a secure, Payment Card Industry (PCI) compliant, digital, payment processing platform, to provide you with the ability to collect payments from your patients directly within Elation. Using Elation Patient Payments, your practice can collect payments for any services you offer, at any time during the day, and manage your full transaction history directly within Elation.
What are the benefits of using Patient Payments?
Elation Patient Payments provides your patients a secure, digital, self-service way to conveniently pay your practice. This integrated solution will increase your collection rate, provide an easier way for your patients to pay your practice, and save your practice time.
How much does the Patient Payments feature cost?
Elation will charge a percentage-based fee for each transaction you collect through the Patient Payment feature. There are no additional startup costs, termination fees, monthly minimums, transactional minimums or any additional fees from credit card companies or Stripe outside of the amount charged by Elation.
If you are interested in using the Patient Payment feature and would like additional details about the rate, use the I need help -> Contact Elation Support button at the top of your Elation account to reach out to our team for additional details.
Elation charges a percentage-based fee on each payment processed through Patient Payments. This fee is deducted from your practice's payout—not added to the patient's bill.
- Stripe and card networks do not charge additional fees beyond Elation's processing fee.
- There is no fee for logging a cash or check payment.
- Elation remits payouts to your practice every Monday, weekly, except on Bank Holidays.
If a patient pays $100 and your contracted processing rate is R%, Elation remits $100 − (R% × $100) to your account on the next payout. If you have any questions, use I need help → Contact Elation Support at the top of your Elation account.
Elation does not support automatically passing processing fees onto patients through Elation. If you are considering adding a separate convenience fee to patient bills, consult your legal counsel about surcharging practices and applicable state regulations.
Setup
1. Activating your Elation Patient Payment account via Stripe
| 1 | Go to the Settings -> Patient Payments. |
| 2 | Click Activate… to begin the Stripe account set up process. |
| 3 |
Next, you will be prompted to enter the following details about the business and business owner. For more detailed instructions on how to activate your patient payments account, click here. Some important fields to highlight are:
- Type of entity - This should map to the type of bank account you plan to connect to Stripe.
- If you select 'Individual, sole proprietor or single-member LLC' then the bank account must have you as the same entity.
- If you select 'Company' then the bank account must also be associated to your business/company.
- Business representative - Someone who owns 25% or more of the business.
- To verify their identity, a two-factor authentication code will be sent to the mobile phone # provided.
- Payout details - Banking information so we know where to deposit payments from patients (accounting and routing #).
- The entity tied to the bank account should match the Type of entity you entered earlier.
|
ℹ️ NOTE
You cannot connect an existing Stripe account to Elation. You will need to activate a new Stripe account through your Elation Settings page. However, you can connect the same bank account to multiple stripe accounts so that funds flow into the same account.
2. Setting up your Elation Payment Site
Once registration is complete, it’s time to set up your personalized Payment Site. Your Payment Site is a secure online portal that allows your patients to submit payment to your practice at any time, even if you have not sent them a payment request. Patients do not need a Passport login to use your custom payment site.
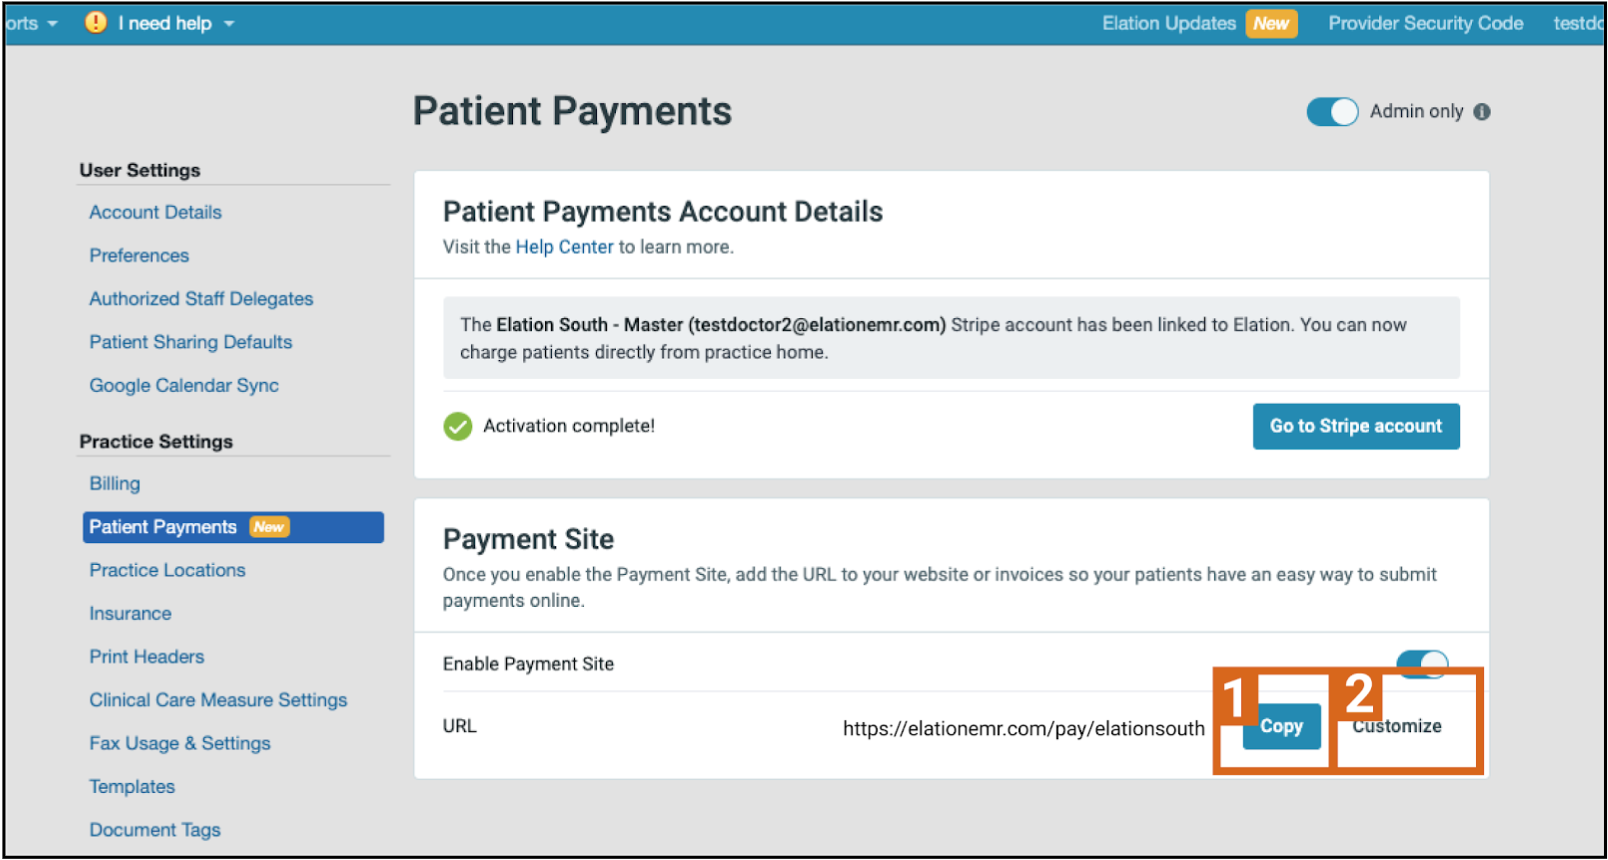
| 1 | Go to the Settings -> Patient Payments. |
| 2 | Under the Payment Site section, click Customize to edit the URL path to your preference. |
| 3 | Copy and add that link to your business website. |
Workflow Instructions
Collecting payments from your patients
Use Elation Patient Payments to collect payments at any time:
- Before the visit, so you don't need to worry about doing this at the time of the visit. This is popular for practices that charge a set-price up front.
- During the visit, so your patient can pay during the check-in process. This is a popular option for insurance-taking practices who charge copays or coinsurance upon check-in.
- After the visit, if your practice prefers to wait to confirm the full set of services to charge for. This is a popular option for direct pay or cash-based practices.
Requesting a payment
| 1 |
Open the Patient Payment Request window using one of the following:
- From the Practice Home: clicking Payment in the navigation bar.
- From the patient's chart: clicking Payment in the navigation bar.
- From the Patient Payment Report: clicking Send payment request.
|
| 2 | Search for the name of the patient if you're sending a request from the Practice Home or Patient Payment Report.
ℹ️ NOTE
If the patient has contact methods stored, their preferred contact method will pre-populate (either SMS or email).
💡 USER TIPNotify your patients about what to expect through our patient guide on how to complete payment requests - available here. Feel free to download and send this to your patients directly.
- Emails will be sent from the contact 'Payment Notification <sysadmin@elationemr.com>'
- Text message will be sent from 36331 (the same phone number that appointment reminders are sent from).
|
| 3 | Enter the amount you'd like to charge the patient.
- The minimum allowed charge amount is $0.50.
|
| 4 |
Select a Payment Reason so the patient knows why they are paying.
💡 USER TIP
You can add an internal memo and will be able to reference these notes in your Patient Payments Report (these notes are not visible to patients).
|
| 5 |
(Optional) Click Add internal note to record payment details visible only to your practice.
|
| 6 |
(Optional) Click Add patient payment note to share details about the payment with the patient.
|
| 7 | Select a Payment Method.
- Log a cash or check payment by selecting Cash/Check on the Payments toggle (the patient will receive an electronic receipt automatically).
- Charge a card or bank account on file by selecting the Charge... option from the dropdown.
- If the patient has multiple payment methods on file, the payment method designated as Primary will be automatically selected. Select a different payment method if you do not want to charge the primary.
- Collect a point of service payment by selecting Enter a card from the dropdown.
- Send a payment request by selecting Send patient a request from the dropdown (includes ACH payments).
|
Managing a payment request
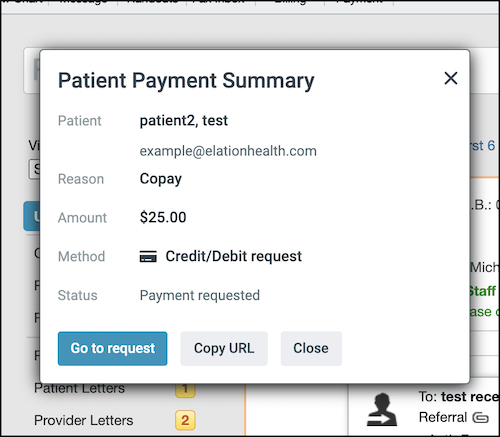
After you confirm the payment details and method, a payment request is sent to the patient, a confirmation summary will display. From the confirmation:
- To send the payment request via another route, click Copy URL. Examples may include: adding the link to virtual visit instructions or a Patient Letter.
- To assist the patient in filling out the request, click Go to request.
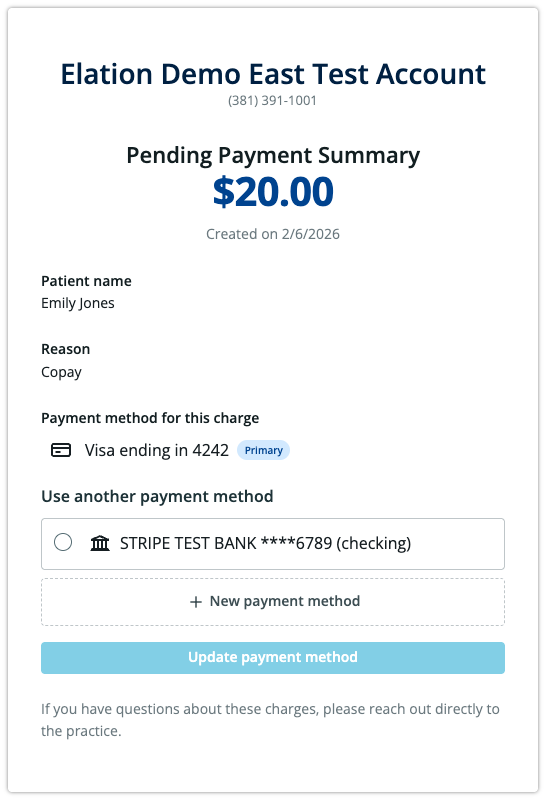
Patients will receive the payment request or charge notification via email or text message. Patients can either use a different saved payment method for the payment or enter a new payment method.
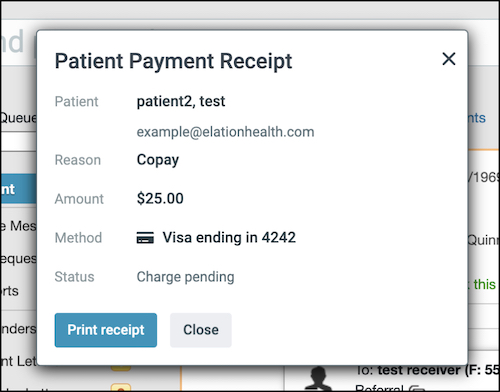
An electronic receipt will be sent to the patient upon payment completion.
Charging a payment method on-file
Once you have charged a card or bank account on file, the patient will be notified of the pending charge. The charge will automatically be collected within 24hrs. This gives the patient time to update their payment details on-file or contact your office with any questions. Once the charge is completed, the patient will receive a receipt via text or email.
ℹ️ NOTE
This option is only available once the patient has a stored card or bank account on file. Patients can choose to store multiple payment methods on-file for future payments through completing a payment request.
Entering a card for payment
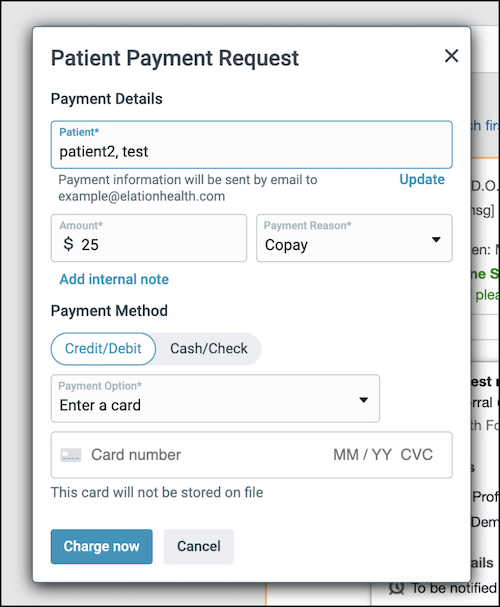
After selecting Enter a card from the Payment Method dropdown, you will be able to enter card information on behalf of the patient. Card number, expiration date, and CVC are all required fields, and zip code may be required for certain card types.
ℹ️ NOTE
In order to ensure consent has been collected from the patient before storing card on file, the card you enter for this charge will not be stored on file. If you wish to store a card on file for the patient you can collect payment using a payment request instead or you can Request card info from the patient's demographics dialog.
Once you have charged the card you entered, the patient will receive a receipt via text or email. You also have the option to print the receipt if you would like to provide a paper copy for the patient.
Troubleshooting the Charge Now button
The Charge now button is only enabled when:
- Your Stripe account is fully activated and verified (business details and payouts) AND
- A valid Payment Method is selected or card details are entered
If you are experiencing issues with the Charge now button, use the following troubleshooting steps:
Button is greyed out
- Verify that an amount has been entered in the payment request
- Check for missing required fields
- Look for inline validation messages near the amount, patient name, or payment method fields
Button does not respond
- Refresh the page and try again
- Try another browser (Chrome or Firefox recommended)
- Temporarily disable pop-up blockers or browser extensions and retry
Error related to Stripe or payouts
| 1 |
Go to Settings → Patient Payments.
|
| 2 |
Click Go to Stripe account.
|
| 3 |
Review your Stripe dashboard for incomplete verification or payout-related warnings.
|
Contact Support if the issue persists
If errors persist, even after confirming the above, please contact Support using I need help -> Contact Elation Support. When reaching out, include the following details:
- Patient ID example
- Error messages (if applicable)
- Non-PHI screenshots
ℹ️ NOTE
Stripe will re-initiate the business verification process if any business information is changed. A two-factor authentication code will be sent via text message to the mobile number the account was activated with.
Managing cards and accounts on file
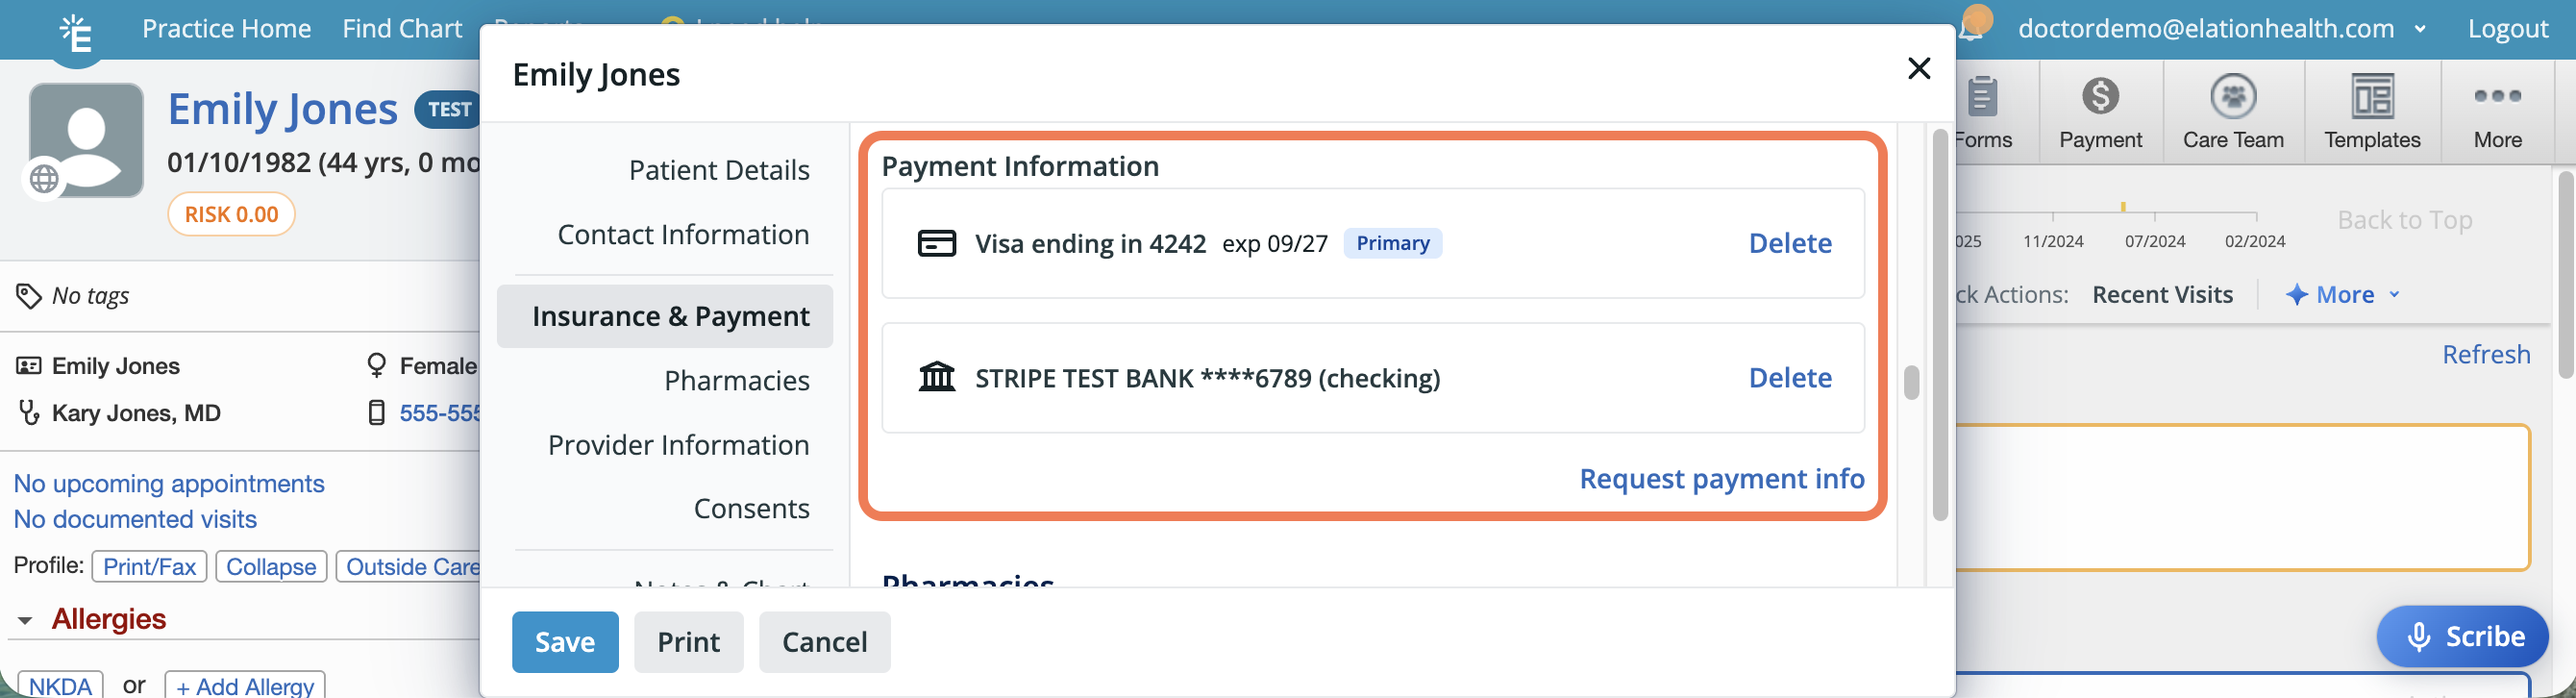
In a patient's demographics dialog, you can see whether there is a card or bank account stored on file under Payment Information under Insurance, Payment, & Membership.
| 1 | If there is no payment method on file, you can click Request card info to send a message to the patient, via SMS or email depending on their preferences, requesting that they enter their payment details and save them on file.
ℹ️ NOTE
This is not a request for payment, only a request to store their card or bank account on file for future payments.
|
| 2 | If there is are any payment methods on file for the patient, you'll have the option to remove each method. |
Enabling self-service patient payments through your Payment Site
With Elation Patient Payments, your practice will have access to its own payment site. The Payment Site is a secure online portal that allows patients to submit payment to your practice at any time, even if you haven’t sent them a payment request. Patients do not need a Passport login to use this site.
Post your Payment Site link by copying the link and including it:
- On your practice website
- In your waiting room
- On any mailed invoices - Update your practice management system invoice template or include a cover letter!
- As part of appointment reminders - Add your payment site link to the appointment’s visit instructions
- In patient letters
How patients use your self-service Payment Site
| 1 |
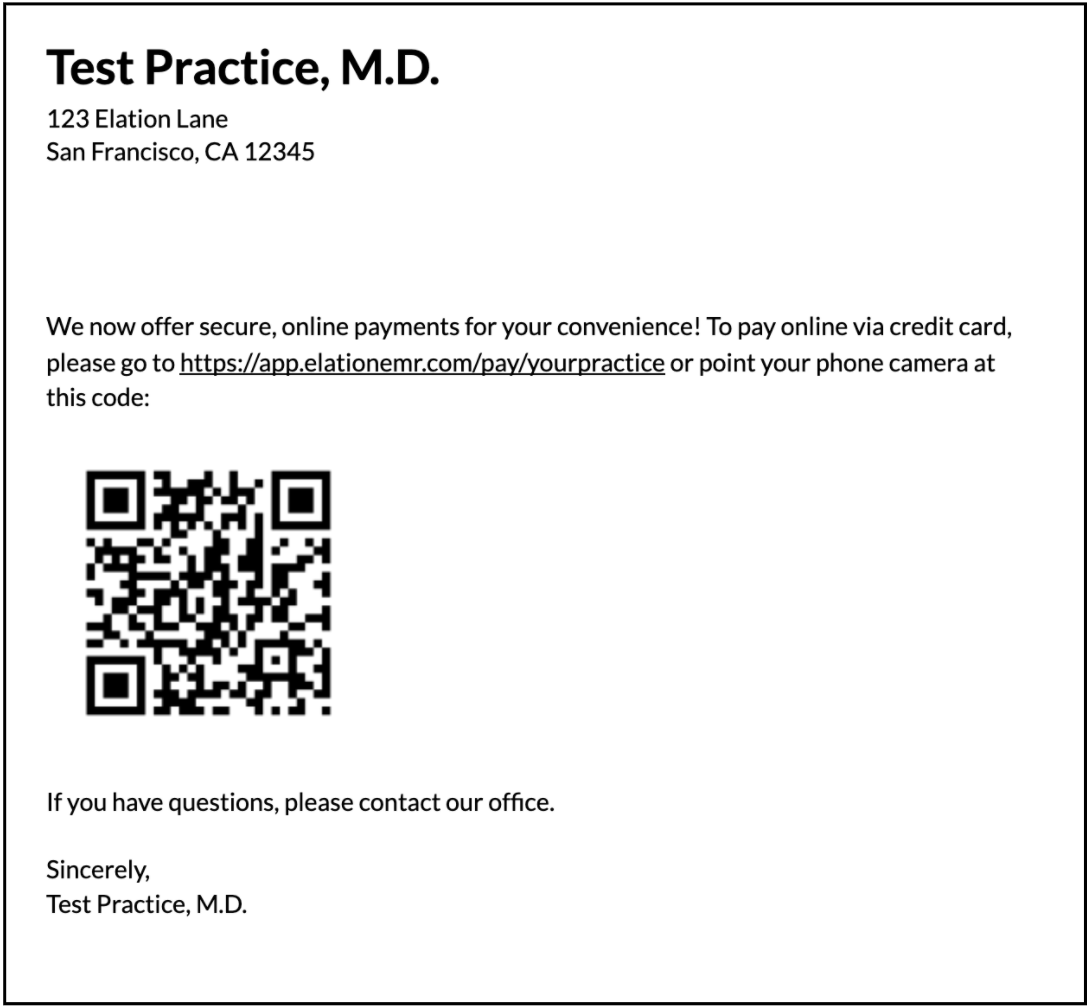
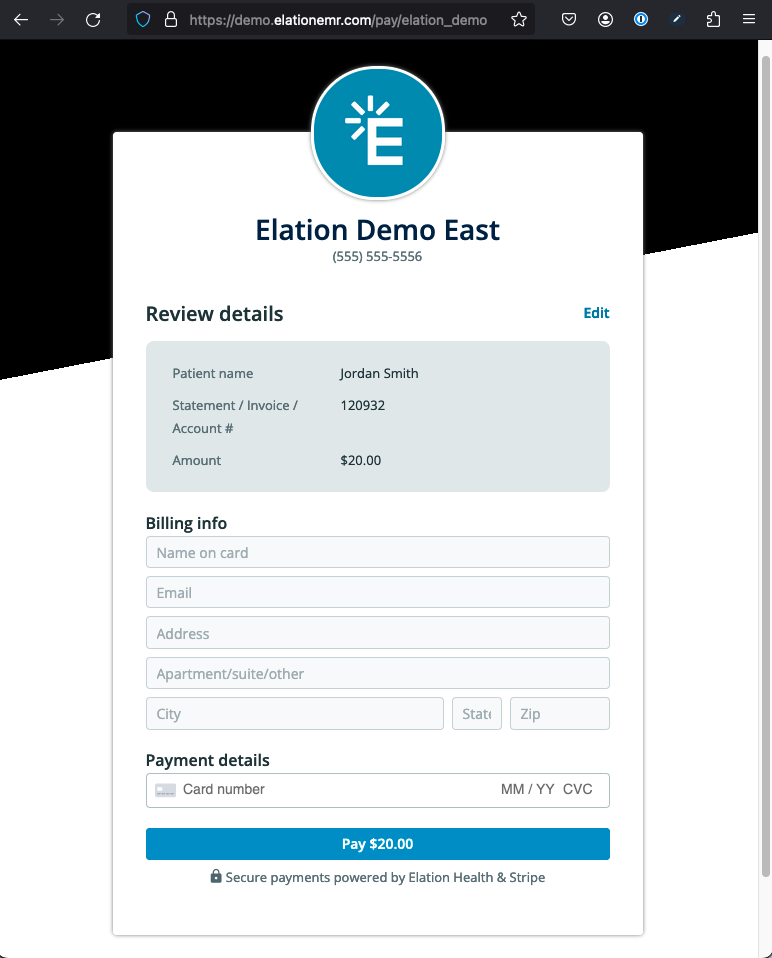
Patients can navigate to your Payment Site by clicking on your payment site link or pointing their phone camera at the QR code. Patients will be prompted to enter their First name, Last name, the Amount they want to pay, and their Statement or Invoice or Account #. Patients can also include a note about the details of the payment in the Notes field.

💡 USER TIP
To facilitate internal workflows, patients can be directed to enter the identifier from their statement or invoice, generated by your Billing or Practice Management System, into the "Statement or Invoice or Account #" field. If no specific identifier is required for payment association, patients may enter "N/A."
|
| 2 |
Patients then enter their billing information and payment information and will automatically receive a receipt after they submit their payment. The transaction will appear in your Patient Payment Report in your Elation account.
|
Generating detailed patient invoices for HSA/FSA reimbursement
For patients who require more detailed invoices for HSA or employer reimbursement, your practice can leverage Elation’s patient invoicing feature.
Once you have activated Elation Patient Payments and have billing invoicing turned on in your settings, your practice's Payment Site will automatically be included on your patient invoices, providing your patients with an easy way to submit payments to your practice in a secure, electronic manner.
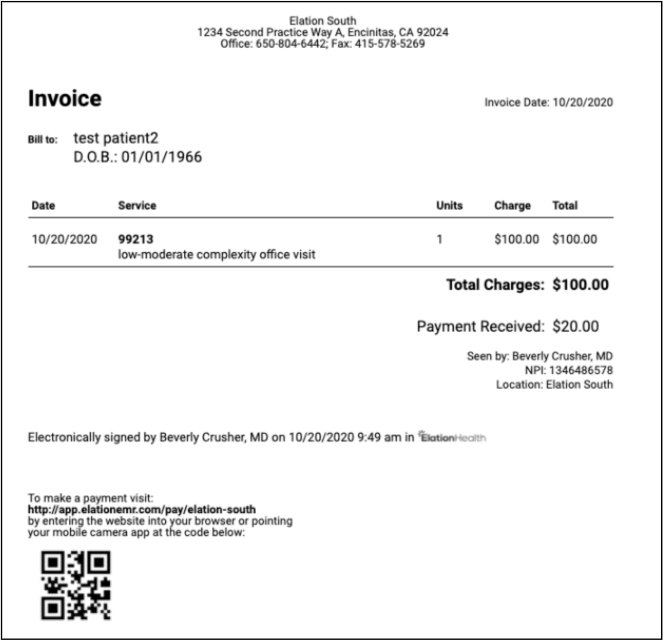
Patients can simply point their phone camera at the QR code and will be automatically directed to your practice's Payment Site to submit payment. They can alternatively visit your Payment Site by typing in your Payment Site URL into their browser.
ℹ️ NOTES- If you are running into issues receiving FSA or HSA payments, follow these steps to verify you have the correct 'Industry' selection in your Stripe settings:
- In your Patient Payments settings page in Elation EHR, click on Go to Stripe account.
- Click Edit.
- Update your Industry to 'Doctors and Physicians'.
- Patients are not required to log in to Patient Passport in order to complete payment.
For more information on Patient Invoicing, see How to set up Patient Invoicing.
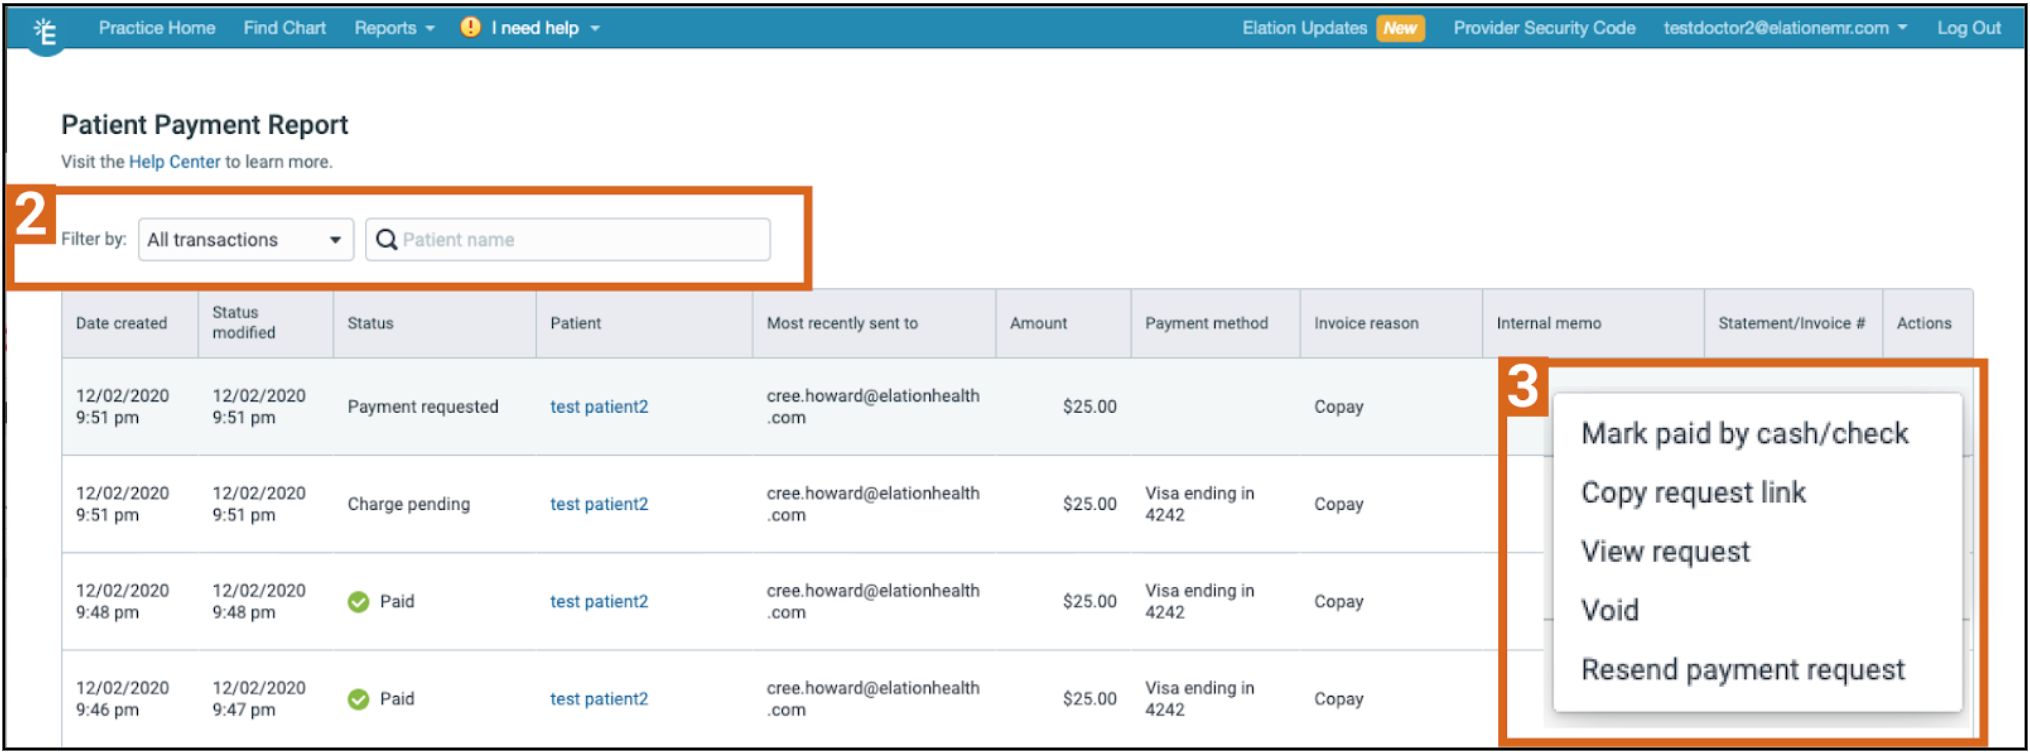
Viewing & managing payment transactions
Through the Patient Payments Report, your practice will be able to view all patient payment transactions including completed payments (from a request, charge, or submitted through the payment site), outstanding requests and cash/check collections. This embedded report will allow your practice to manage each of these transactions directly, giving you the ability to:
- resend requests
- resend receipts
- mark payments as paid by cash/check
- void transactions
- process refunds
To view your Patient Payment Report:
| 1 | From the blue navigation bar click on Reports -> Patient Payment Report. |
| 2 | Use the available filters to view payments by transaction status or search by patient name. |
| 3 | Click the “...” next to any transaction to bring up the action menu. |

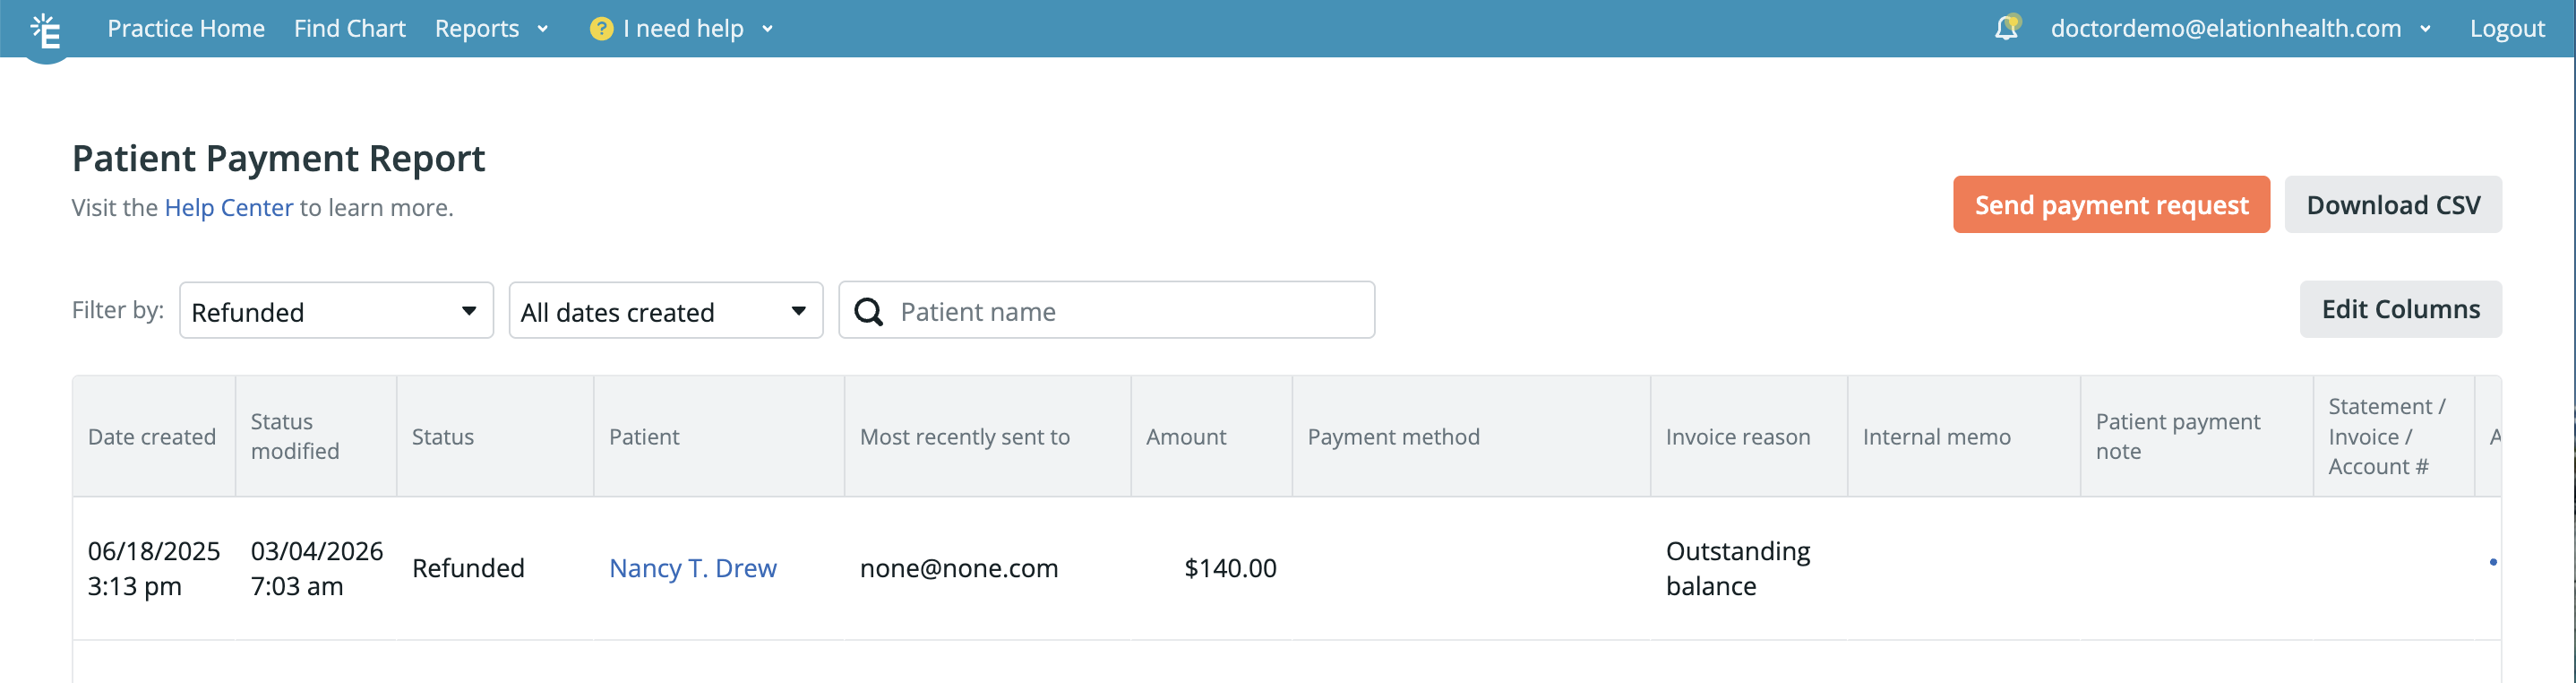
Issuing refunds from the Patient Payment Report
Refunds are managed from the Patient Payment Report, not from Billing Home.
| 1 | From the blue navigation bar, click Reports → Patient Payment Report. |
| 2 | Use the available filters or search by patient name to find the transaction you want to refund. |
| 3 | Click the "..." next to the transaction to open the action menu. |
| 4 | Select the appropriate action based on the transaction status:
- If the payment is still pending (e.g., "Charge pending" status), click Void to cancel the transaction before it settles.
- If the payment has settled (e.g., "Paid" status), click Refund to return funds to the patient.
|
| 5 | Confirm the refund amount. |
ℹ️ NOTE
Individual line items in the Patient Payment Report can be refunded, but there is no option to issue a partial or pro-rated refund.
How refunds appear in the report
After processing a refund, the transaction status will update to Refunded in the Patient Payment Report. This indicates the payment was refunded to the original payment method.
How refunds impact your practice
- Net collected amount: The refund amount will be deducted from your net collected amount in your weekly payout.
- Processing fees: Elation will not charge you for refunding a transaction. However, the processing fee originally charged for the transaction will not be refunded.
- Patient experience: The patient will typically see the refund in approximately 5–10 business days. The refund request is submitted to the card issuer immediately, but processing time varies based on the card issuer and underlying bank.
💡 USER TIP
To download a detailed breakdown of payments and refunds, click Download CSV from the Patient Payment Report.
Viewing transaction fees
Download the Patient Payment Report to see a breakdown of the payments collected and the transaction fees deducted for each collected payment.
| 1 | From the blue navigation bar click Reports -> Patient Payment Report. |
| 2 | Filter the report as needed. |
| 3 | Click Download CSV. |
Managing your Patient Payments account
Viewing your weekly payout report
Your Stripe funds will be paid out weekly, every Monday on a two day rolling basis. The cutoff for weekly Monday payout is 7pm Pacific the Thursday prior. Therefore, if a payment was made on a Thursday after 7pm Pacific, you will see these funds in two Mondays (9 days later), and not the upcoming Monday. Here is a sample payout schedule for you to reference:

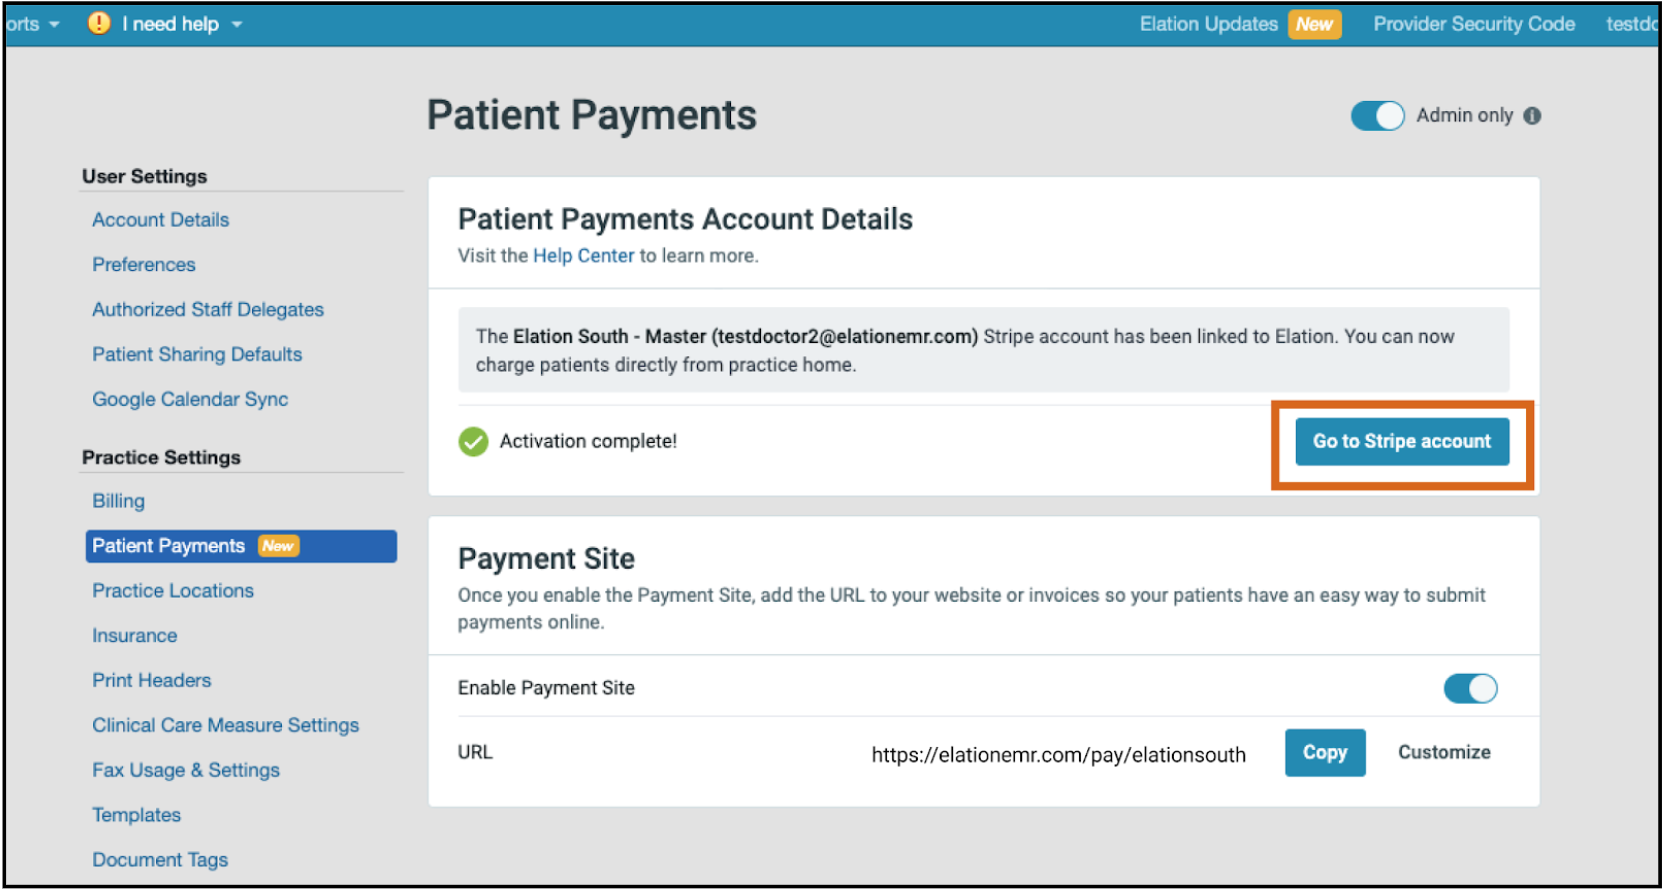
You can view your payout history by going to the Patient Payment Settings page in your Elation account and clicking on Go to Stripe account.
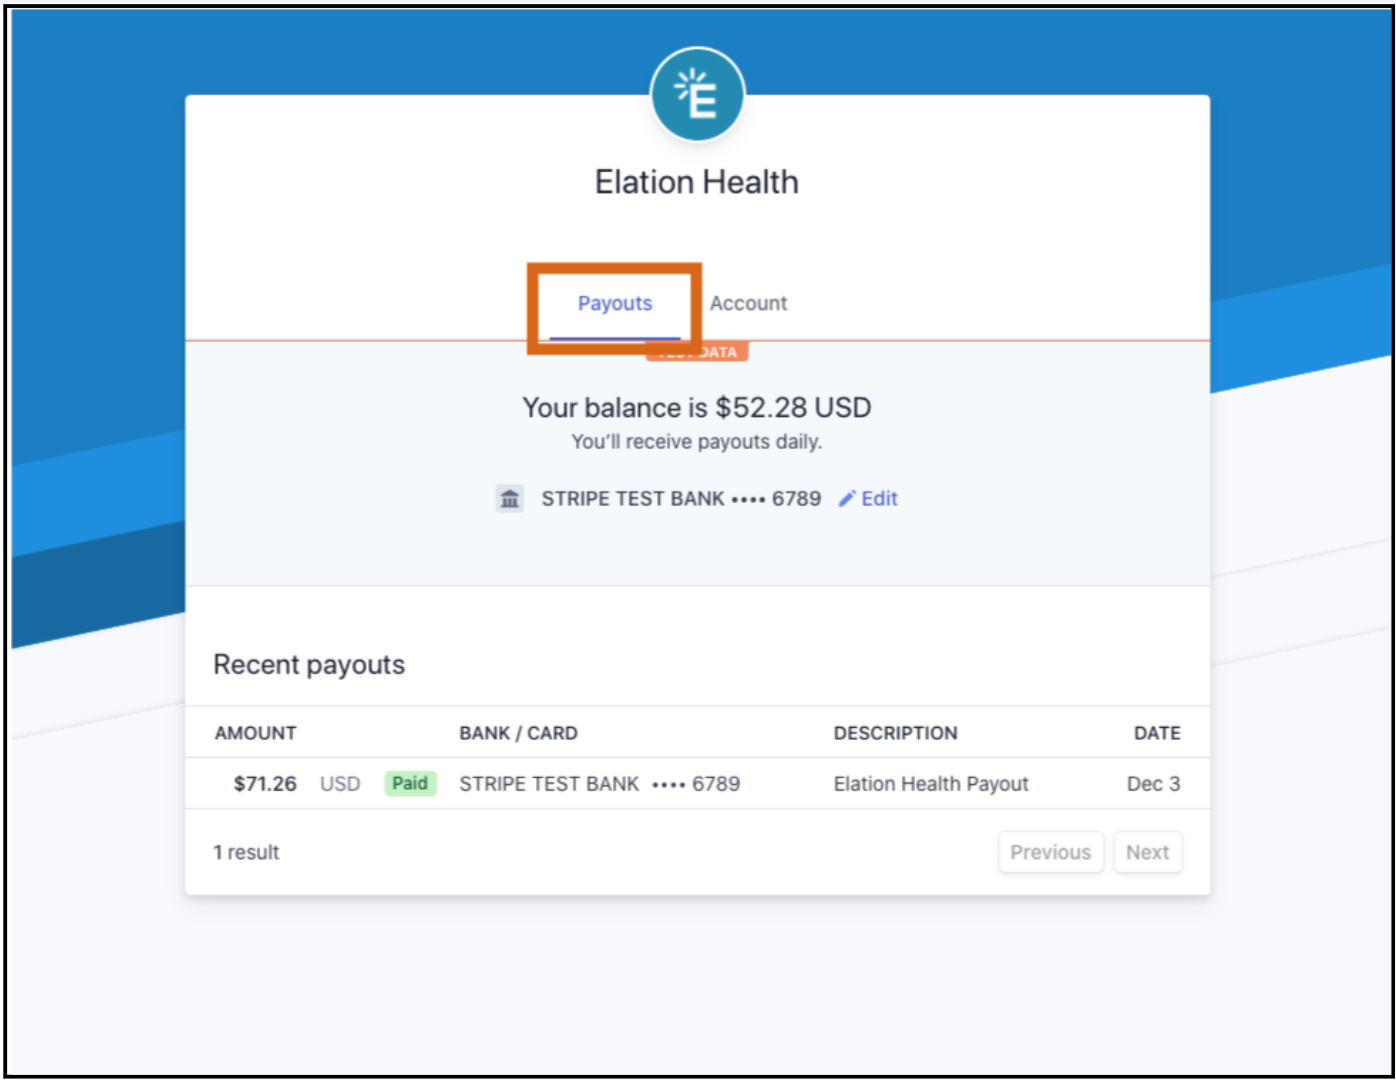
ℹ️ NOTE
The payout will show a sum of the total payments received for the previous week minus the transaction fees.
Stripe issues 1099 tax forms for payments collected through Patient Payments. You will receive your 1099 via email by January 31st each year. To learn more about 1099 forms, including what to do if you did not receive one, see Patient Payments Guide - Obtaining a 1099 Tax Form for your Stripe account.
Accessing your account information
To manage the business name, management and ownership information, payment information and team members tied to your Stripe account:
- Go to Patient Payments in your Elation Settings page.
- Click on Go to Stripe account.
- Select the Account.

ℹ️ NOTE
Stripe will re-initiate the business verification process if any business information is changed. And anytime information is edited here, a two-factor authentication code will be sent via text message to the mobile number the account was activated with.
💡USER TIP
You can allow more team members to manage this account information by clicking the Manage button next to Team members.
Next Step
Send a payment request to a patient and start collecting on patient balances!
Related Articles

