Contents
Elation offers the feature for you to send an electronic Lab Order from the patient's chart directly to Quest Diagnostics. This Lab Order will go directly into the Quest Diagnostics system and patients can ask the lab technician to locate and process the order at any Quest Diagnostics location.
This reduces the need to print orders for patients to bring to the lab and eliminates the chance of misplaced lab orders.
To enable the Quest interface, click I need help -> Contact Elation Support and send Elation the following information:
- Your Quest Diagnostics lab account number
- The full name of your lab representative for Quest Diagnostics
- The email address of your lab representative for Quest Diagnostics
Creating a Quest electronic laboratory order and requisition
Verifying Billing Information
In order to create and send a Quest electronic laboratory order (eOrder) and requisition, Billing Type must be selected.
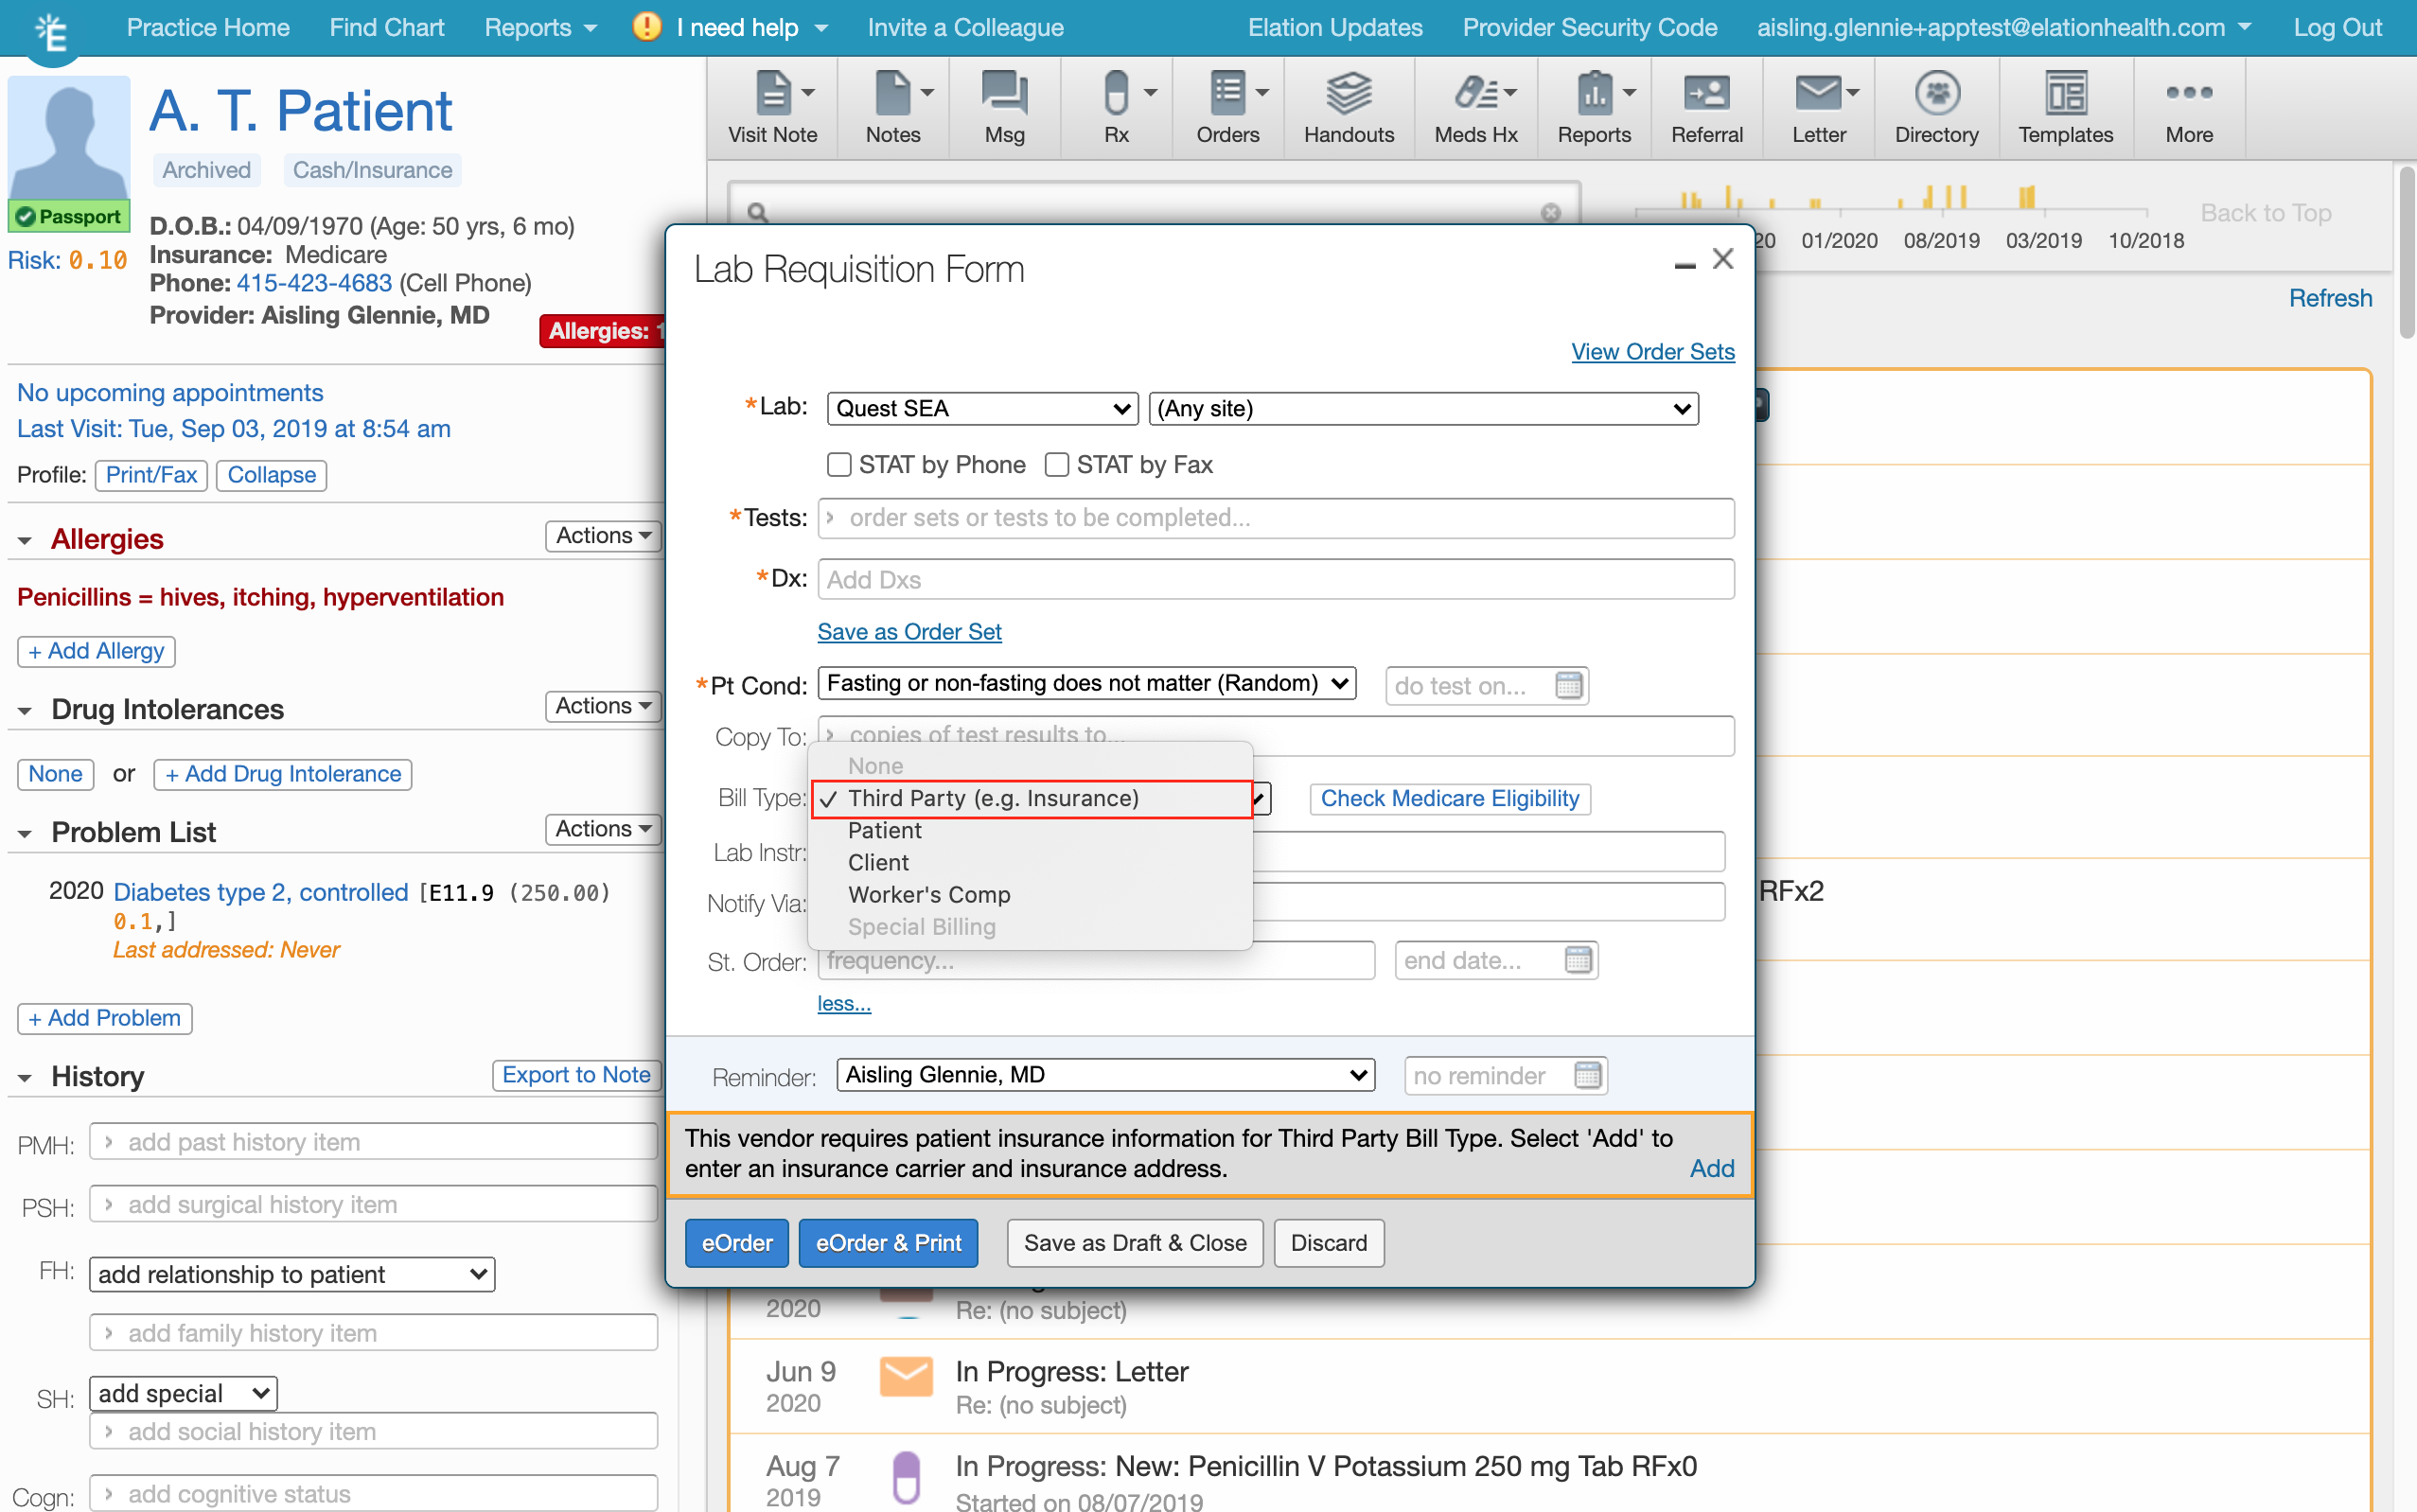
- If the order will be billed to a “Third Party” (e.g Commercial, Medicare, Worker’s Comp), confirm that the patient’s insurance information is documented in their patient demographics by clicking on the patient’s name in the chart.

- Quest requires 'Third Party' Bill Types to include the following insurance information:
- Insurance name
- Insurance address
- Insurance member ID
- Insured person
- Insured person relationship
User Tips
- If insurance address information is missing for a Payer, go to the Insurance Settings page to add it to the Payer, see this article for more details.
- Selecting “Client” will bill to the practice at which the lab test was ordered.
Creating a Quest eOrder with the Orders tool
Quest electronic laboratory orders can be created from the Orders tool in the patient’s chart. To create an eOrder from the Orders tool:
- Click the Orders button in the patient’s chart, then select Lab Orders.
- Select Quest as the lab vendor and start typing to search for the desired test.
- Quest electronic ordering in Elation uses the Quest compendium database for your region for test selection. The database is supplied and maintained by Quest and is updated on a monthly basis. You will not be able to create your own tests or select previously created lab tests from your database.
-
User Tip: If you cannot find a test in the test search, we recommend trying to search for the test using different terms (ex. the Complete Metabolic Panel is known as "Comprehensive Metabolic Panel" for Quest). If you have a question about a specific test or test code, please contact your Quest representative for assistance. Custom Quest codes are not supported at this time.
- Complete the required fields and any other desired fields.
- Once ready, select “eOrder” or "eOrder & Print".
Once a Quest eOrder is successfully created and sent, the order can be viewed from the patient’s chronological record or from the Reports tab.
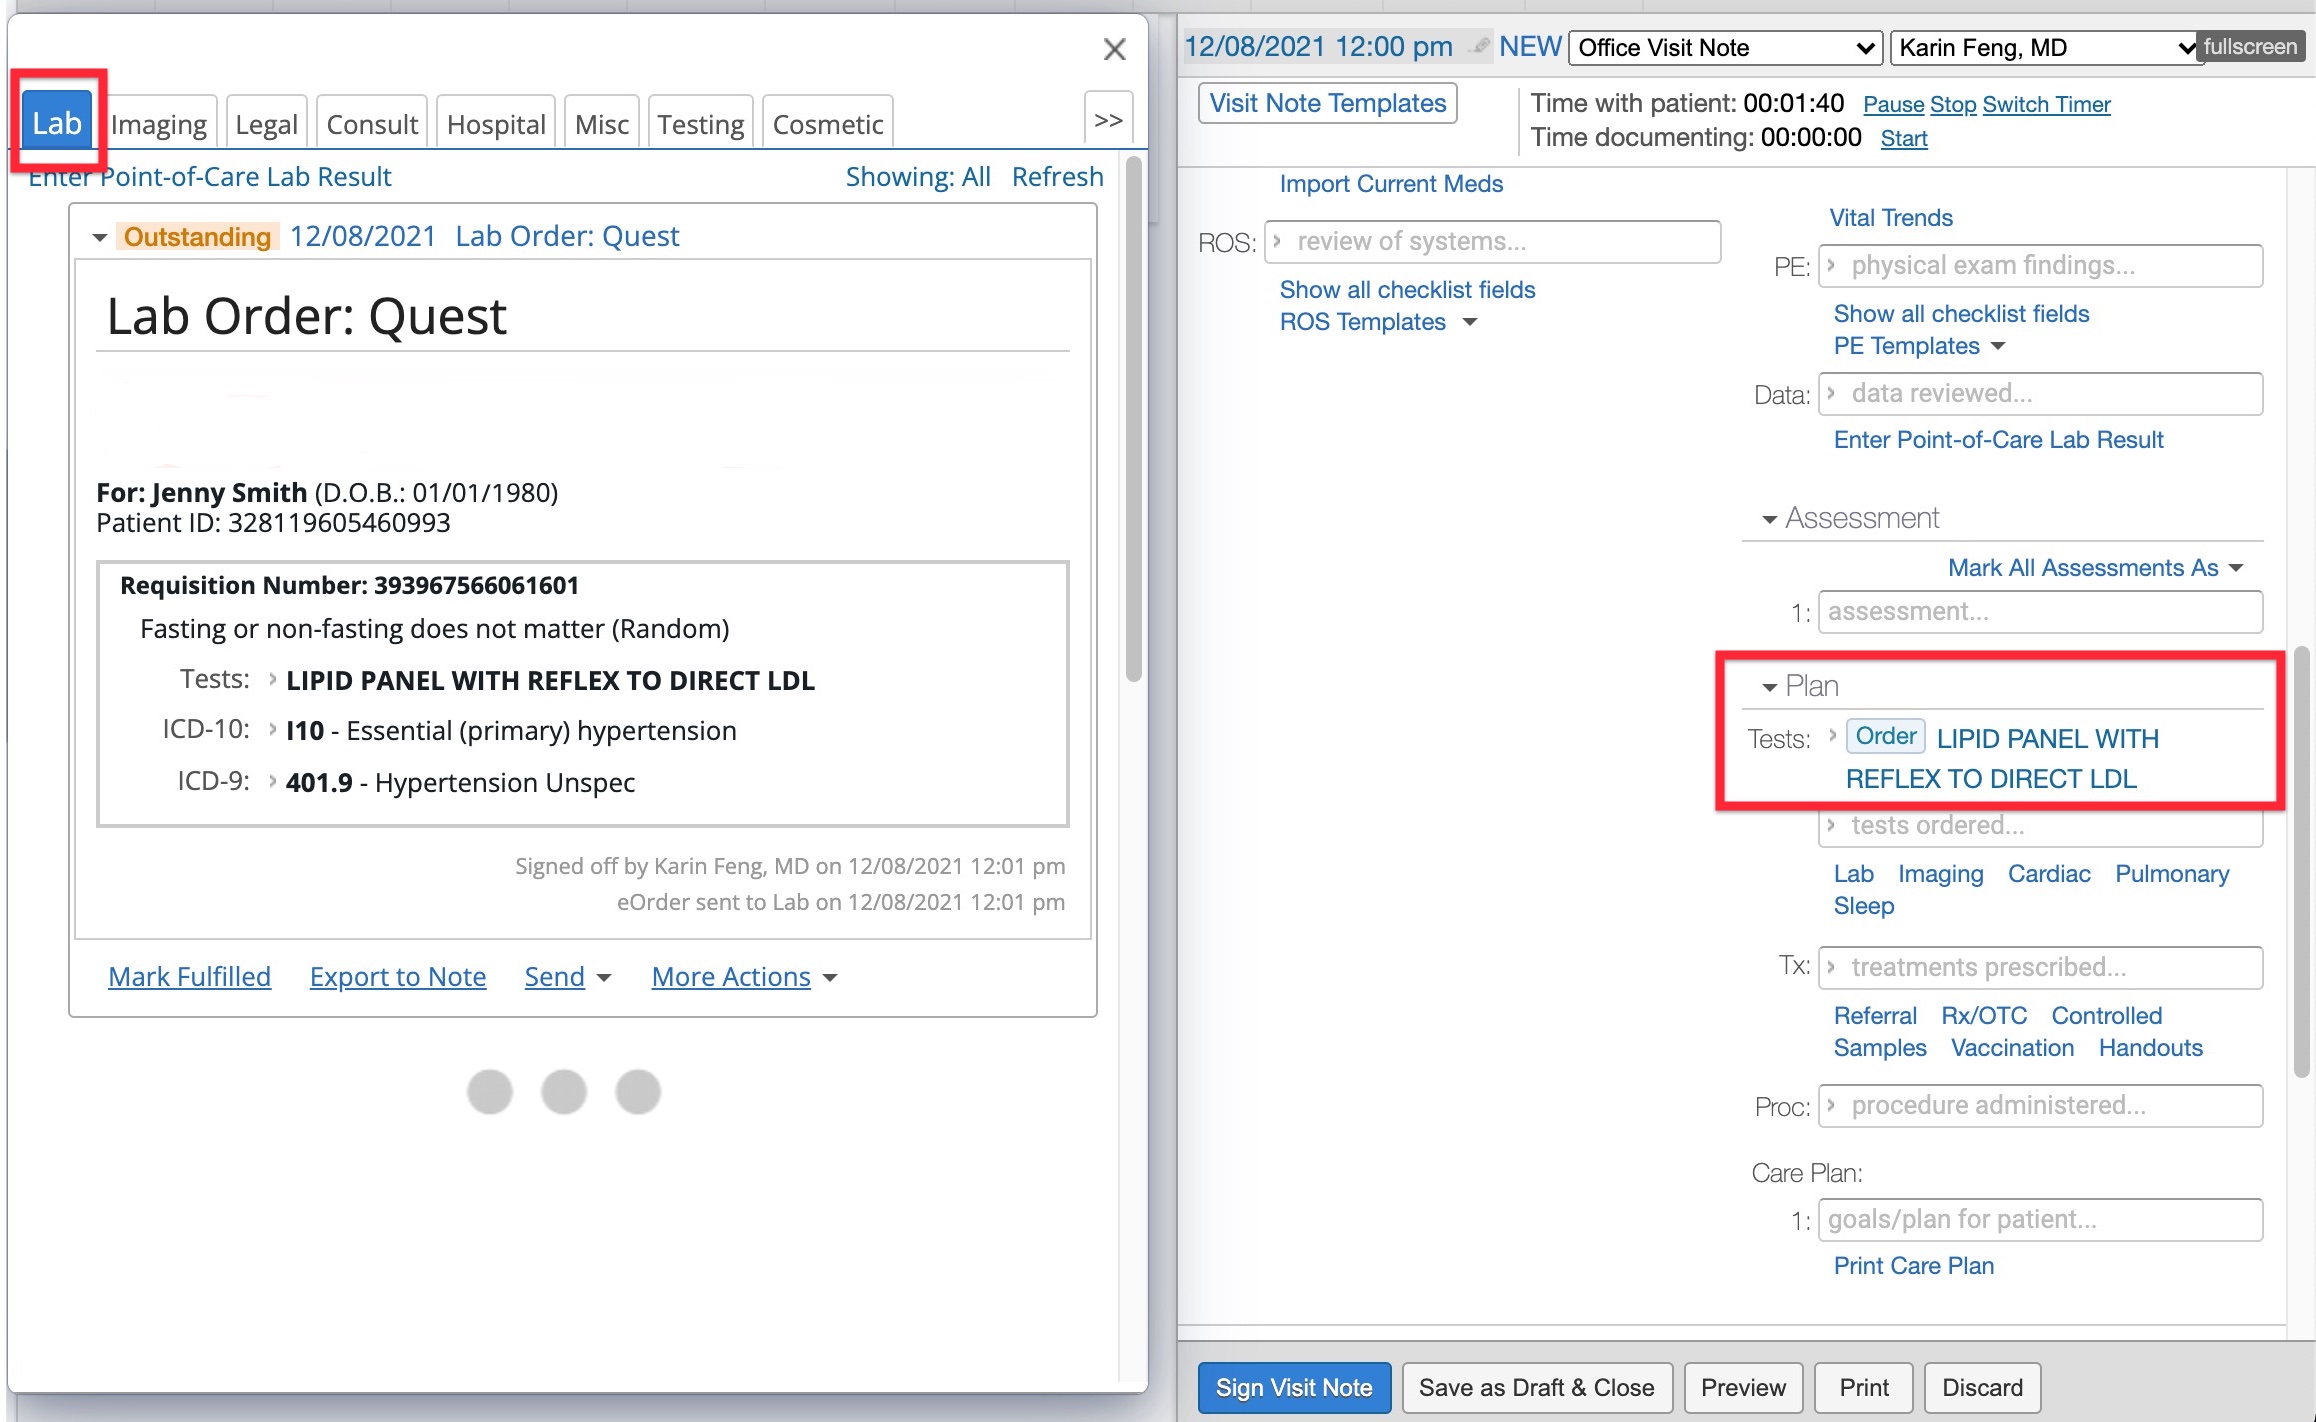
Creating a Quest eOrder from a visit note
Quest electronic lab orders can also be created from any visit note type during a patient encounter.
To create an eOrder from a visit note:
- Open an existing in-progress visit note or a new visit note.
- Select the “Lab” link under the Assessment/Plan section of the visit note.
- Select Quest as the lab vendor and start typing to search for the desired test.
- Complete the required and other applicable fields.
- Once ready, select “eOrder” or "eOrder & Print".
Once the Quest eOrder is successfully created and sent, the order will be associated to the visit note can be viewed from within the visit note or the Reports tab.
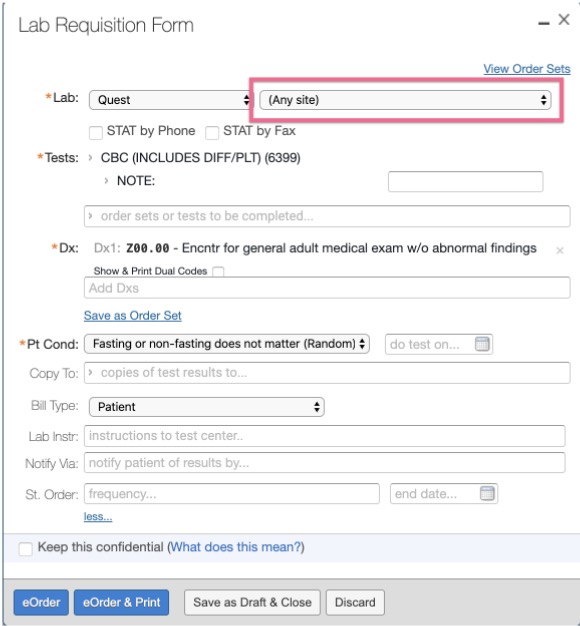
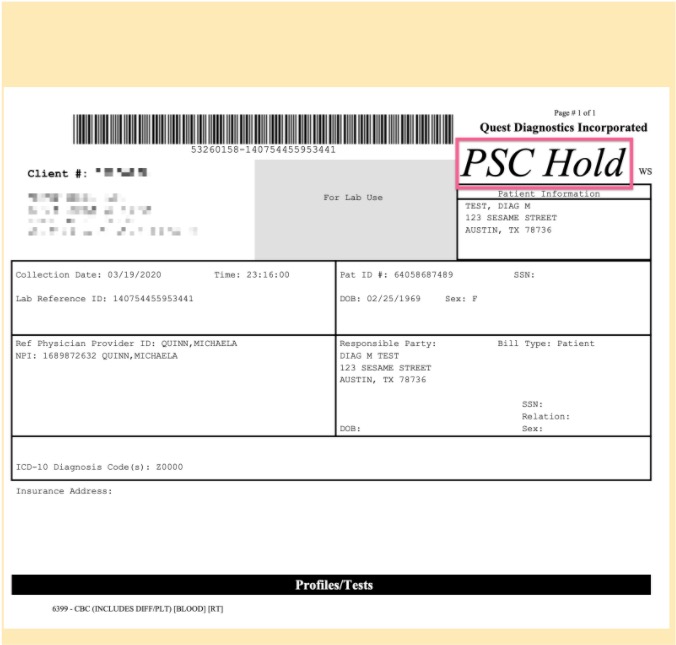
eOrdering for Patient Service Center (PSC) collection and hold
Quest supports electronic lab orders for Patient Service Center (PSC) collection. PSC hold allows your practice to electronically send lab orders to Quest that your patient can complete at any Quest lab location.
To create an eOrder for PSC Hold:
- Click the Orders button in the patient’s chart, then select Lab Orders or open a visit note and select the “Lab” link under the Assessment/Plan section of the visit note.
- Select Quest as the lab vendor.
- Confirm that “Any Site” (right of lab vendor) is selected.
- Enter all required fields and complete the lab order by selecting “eOrder” or "eOrder & Print".
- The PSC Hold status will be included in the electronic transmission to Quest and on the requisition form
eOrdering for In-House specimen collection
Elation supports Quest electronic ordering for In-House Draws (point of care specimen collection) at your practice.
To create an eOrder for In-House draws:
- After selecting the Lab Vendor, select “In-House Draw” from the drop down menu to the right of “Lab”.
- Enter all required and applicable fields and complete the lab order by selecting “eOrder” or "eOrder & Print".
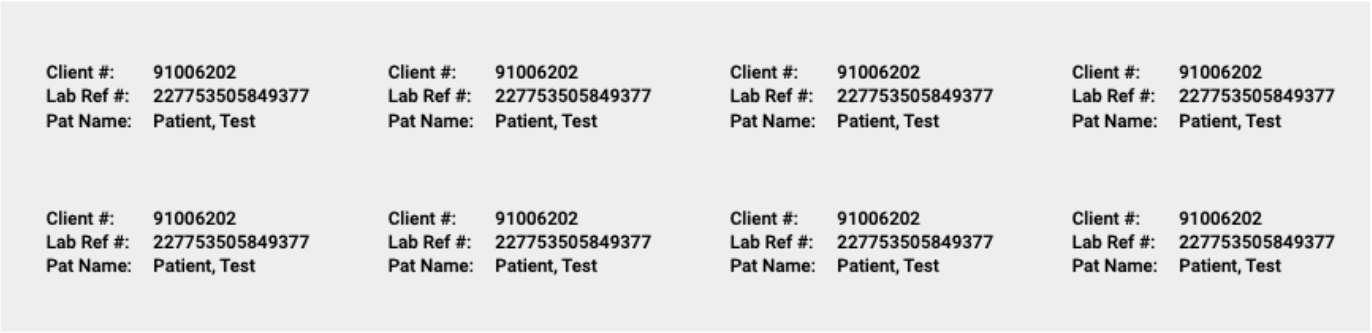
The specimen collection date/time will be included in the electronic transmission to Quest and on the requisition form. The printed requisition will also provide specimen labels that can be used with label print paper.

eOrdering for the Quest Uninsured Patient Program (UPP)
Please talk to your Quest representative to learn more about the Uninsured Patient Program (UPP). When ordering a test for a patient through the Uninsured Patient Program, please select Third Party as the bill type and add the specific insurance name and address your Quest representative has provided you for the UPP.
When the electronic order is sent to Quest with that UPP insurance information, Quest's Insurance Master Database will read the address and match it to the Quest UPP payer code and adjust billing accordingly.
Printing requisition and specimen labels
The requisition form can be printed while eOrdering (“eOrder & Print”), directly from the chronological timeline, or from the Lab Reports view.
-
To print from the chronological timeline, hover over the lab order, click the ‘Actions’ tab on the top right corner, and then select “Print Specimen Labels”.
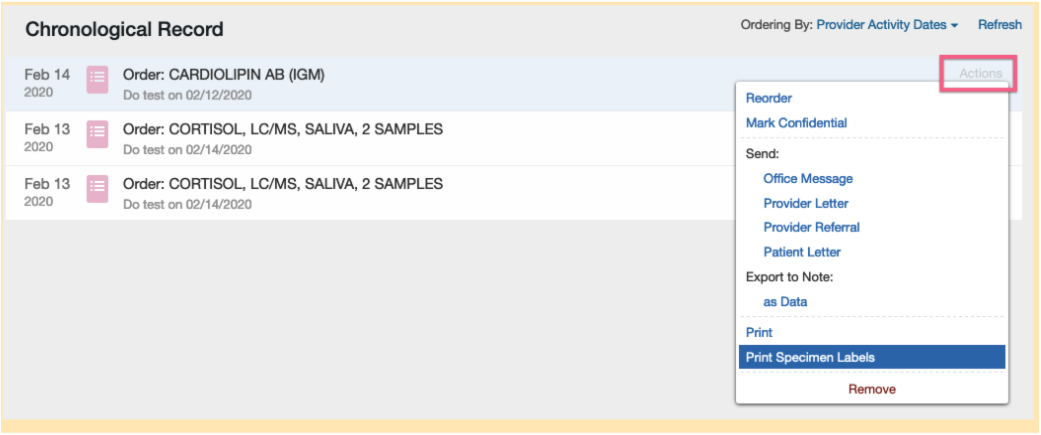
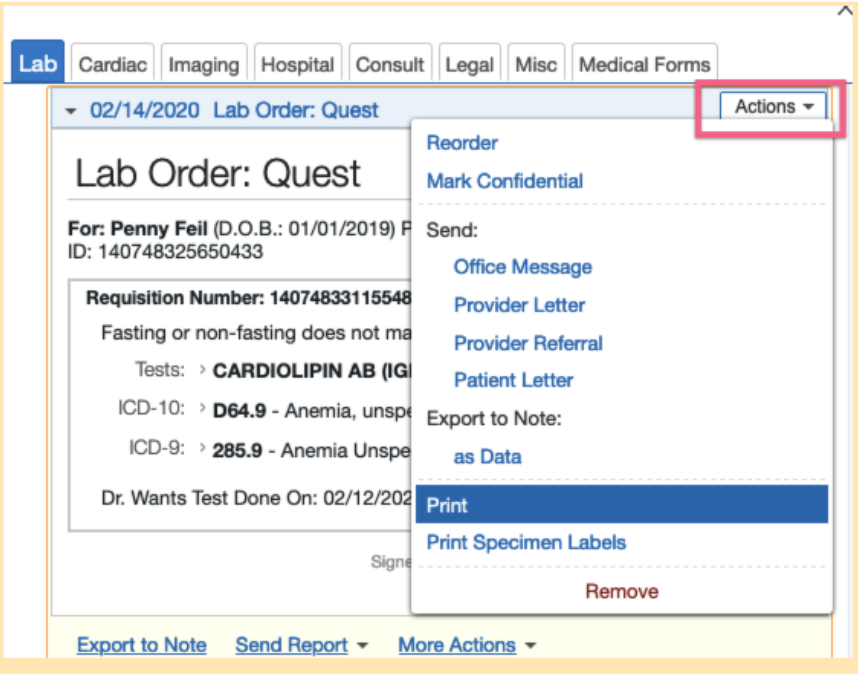
To print specimen labels, click "Actions" -> "Print Specimen Labels". Quest’s recommendations for sizing and are 1.75” length by 0.75” height.
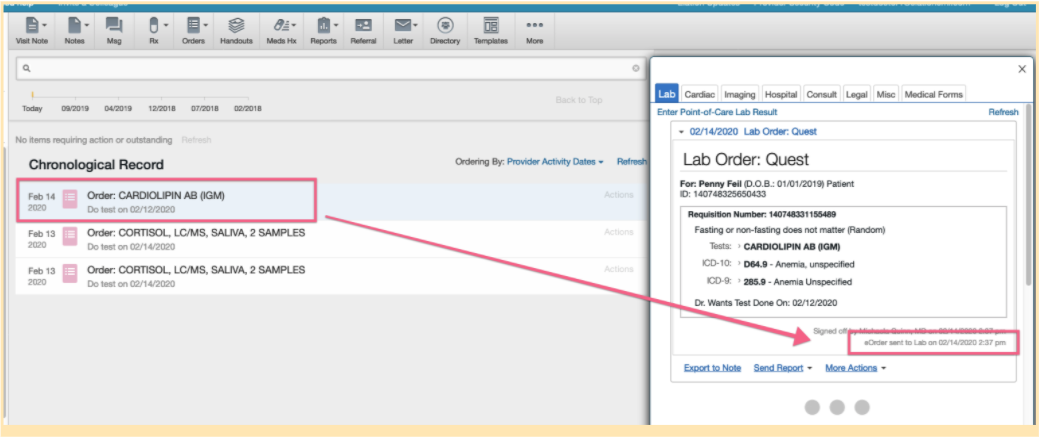
Orders in the chronological timeline
Orders that have been created and sent to Quest can be found in the chronological timeline and are organized by the date the requisition was created.
If there was a specified date on which provider wanted the patient to do the test, the “do test on” date will also display in the timeline in grey.
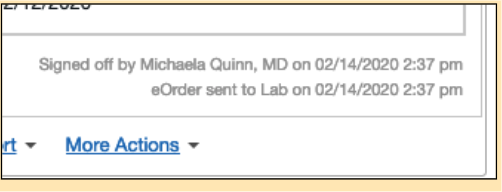
To view which provider signed off on the order, click into the lab order from the chronological record to view the confirmation and the “eOrder sent to Lab” timestamp.
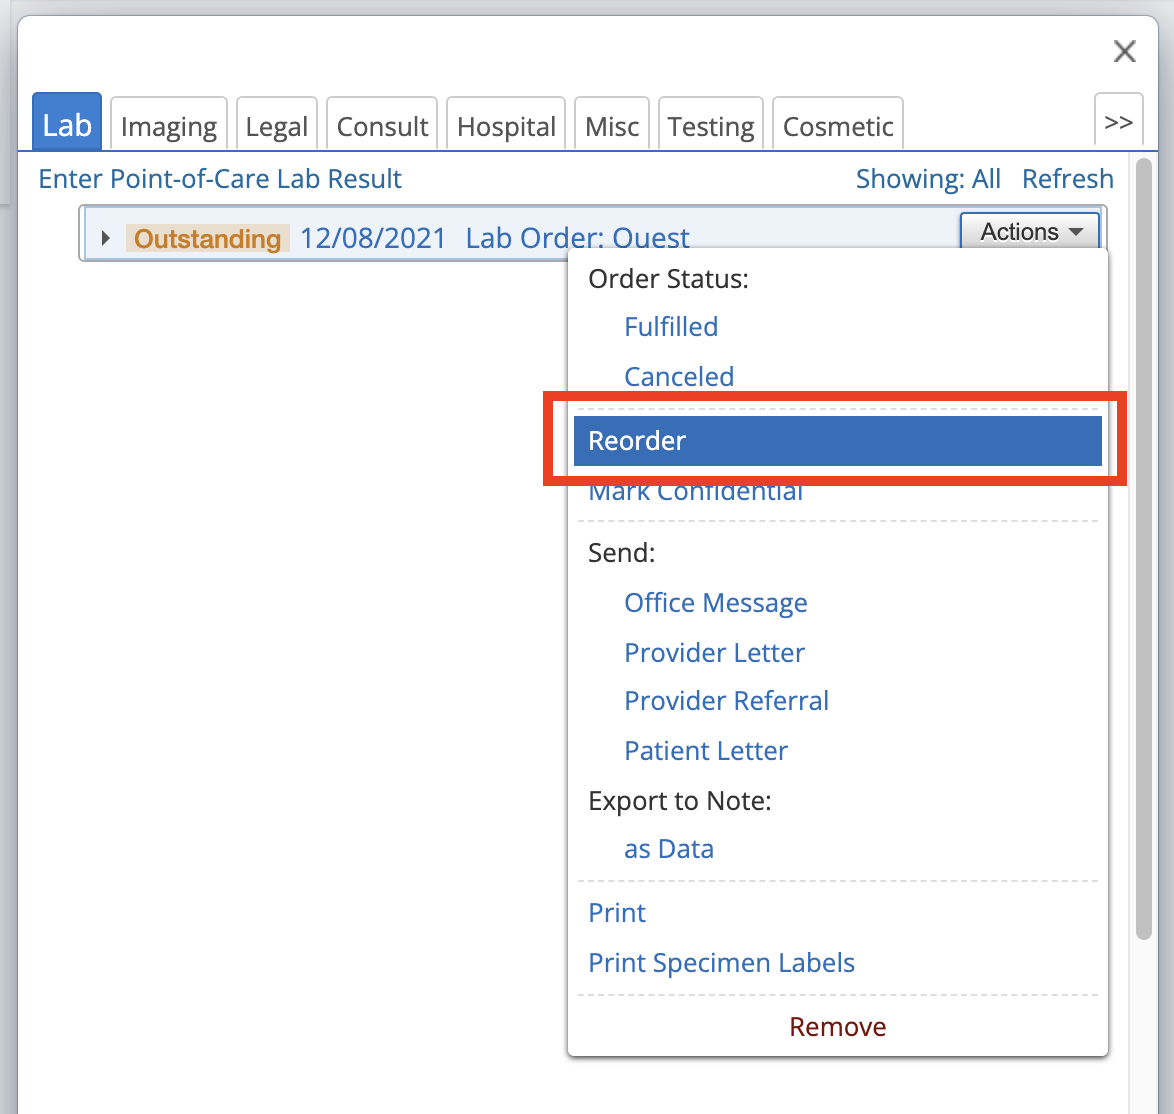
Reordering, changing, and canceling Quest orders
Previous laboratory orders can be easily reordered by hovering over the order from the chronological record or from the Reports tab and clicking “Actions”, then “Reorder”.
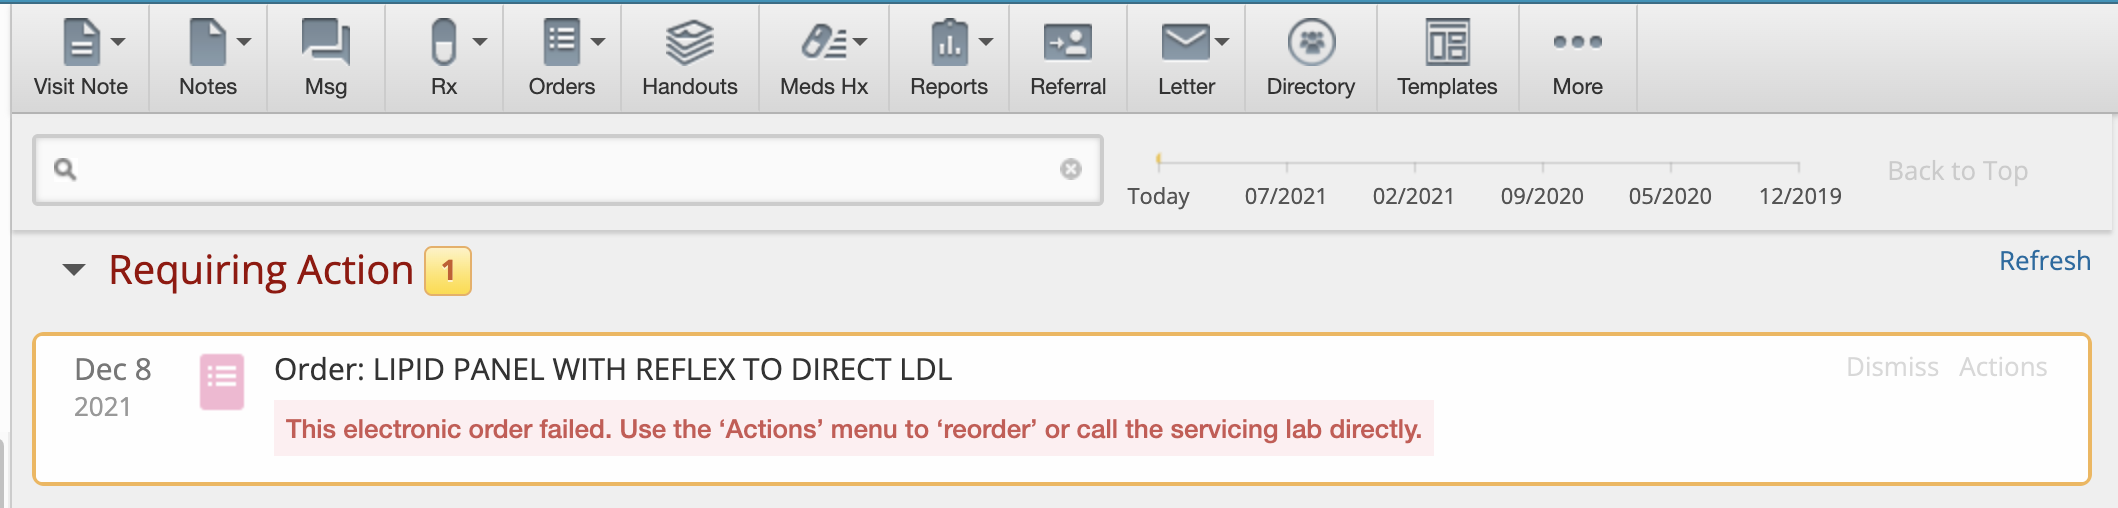
Quest failed electronic orders
The Quest electronic ordering interface can experience connectivity issues intermittently. If something goes wrong while sending your order to Quest, you will be notified on the requisition printout, the Patient Chart’s Requiring Actions queue.
Quest Order Sets, Ask on Entry Questions, and Compendium
Creating a Quest Order Set for eOrdering
Practices can create order sets using Quest’s compendium. Order sets are helpful for quickly adding a set of lab tests that your practice often orders.
To create a Quest order set from Settings:
- Go to your Settings page, then click Lab Orders on the left panel.
- Click “+Add Lab Order Set”.
- Name your lab order set. (Note: Order sets cannot have the same name.)
- Begin typing in the test names and select from the Quest compendium dropdown to add each test to your lab order set.
- Diagnosis codes are optional for order sets and can be assigned to a specific set.
- Click “Save” once complete.
Completing Quest Ask-on-Entry (AOE) Questions
Included in the Quest compendium are ask-on-entry (AOE) questions, which Quest requires for certain tests. Selecting the test will automatically prompt the provider to answer any applicable questions.
The answers to the ask-on-entry questions are electronically sent to Quest and will display on the requisition. While the ask-on-entry questions will automatically appear for specific tests, please note that these questions are not required to submit an electronic order. If ask-on-entry questions are not completed, Quest may follow up for additional information.

Quest compendium and order codes
The Quest compendium, the directory of all tests available for a Quest region, is supplied and maintained by Quest. Elation EHR updates our Quest compendium on a monthly basis. Lab tests within the Quest compendium will appear with a blue “Quest” tag next to the name of the lab test.
Viewing Quest Results
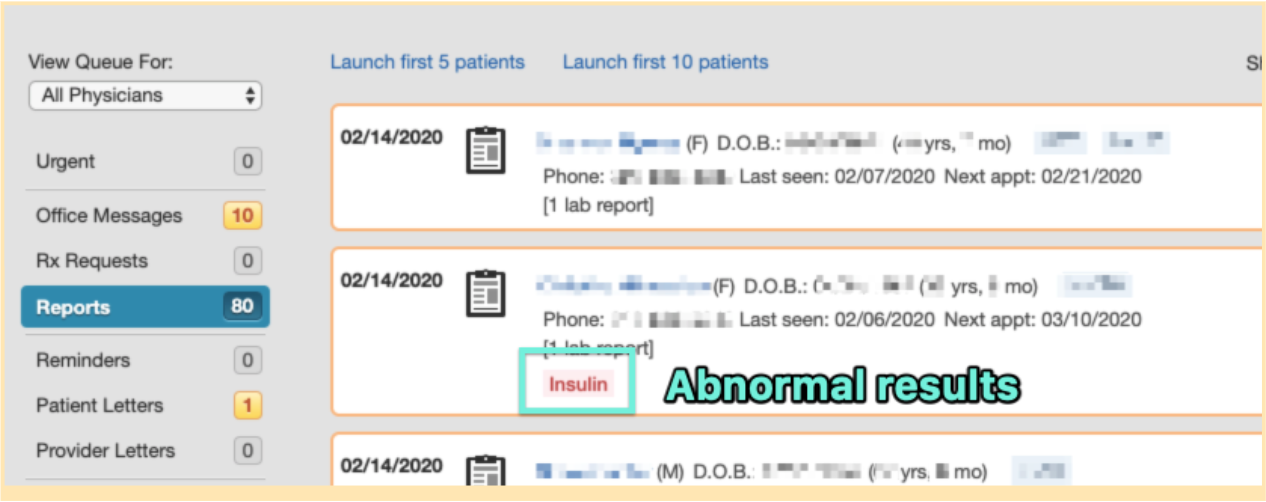
Viewing Quest results in Elation: Reports Queue
Lab results will appear in the ordering provider’s Reports queue. Any abnormal results will be flagged in the Report queue with red text.
- To view the report, click the patient’s name to open the chart.
- For other users at the practice to view the report, change “View Queue For” setting to “Everyone” or a specific user’s name to see the reports at the practice or user-level.
Viewing Quest results in Elation: Patient Chart
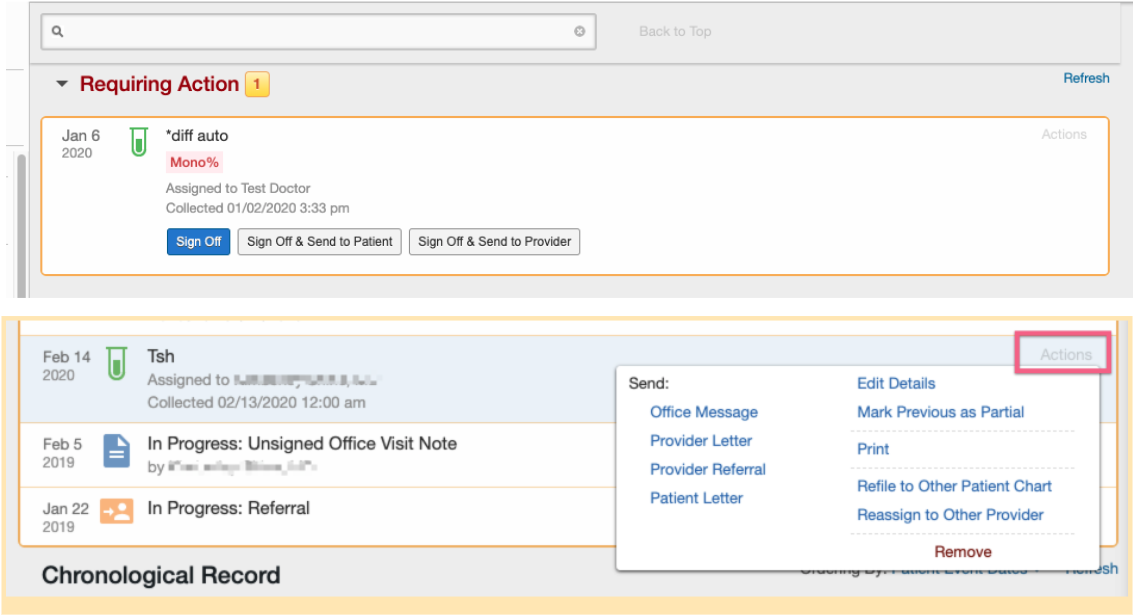
When a new result is received, the result will appear in the Requiring Action queue of the patient’s chart. The provider can choose to “Sign off”, “Sign off & send to patient”, or “Sign off & send to provider” the result.
Once the report is signed off, the report will be filed in the chronological record. Hovering over the lab result will allow the user to click “Actions” to take any next steps.
The actions that can be taken from a lab result are:
- Sending an internal office message about the patient’s results
- Sending the results to another provider via a letter or referral
- Sending a letter to the patient with the results
- Editing the details to change the document date, report category, title, or tags
- Marking the previous lab report as partial
- Printing
- Refiling to other patient chart
- Reassigning to other provider
Viewing Quest results in Elation: Reports Tab
The result report can be viewed as well by clicking the Reports tab from the grey navigation bar and then selecting “Lab Reports”.
PDF attachments are sometimes sent with the result. To view these, press the “Download PDF version of report” link to download the attachment. Note: To protect PHI, Elation recommends dragging and dropping the attachment into the chronological record and deleting the downloaded report from your computer.
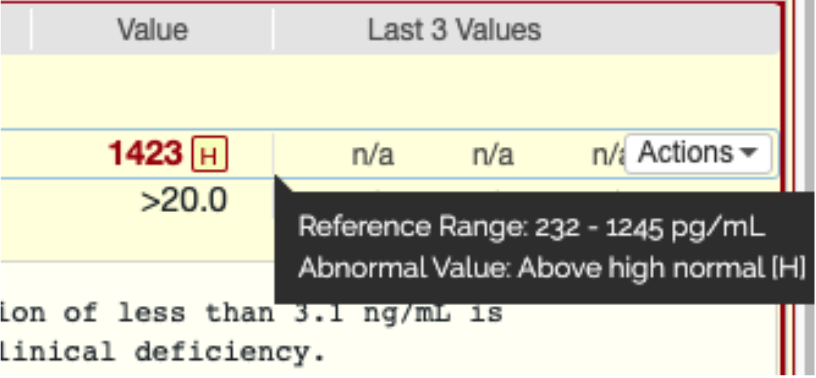
Hovering over result values with your mouse will display the reference ranges and provide additional comments. All abnormal results will be flagged in red to emphasize results.
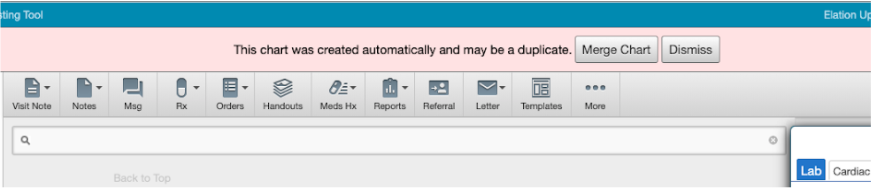
Charts created by incoming results
Elation matches incoming laboratory results to existing charts by patient name, date of birth, and gender. If an incoming result does not match an existing chart, a new chart will be created with a warning banner at the top. The banner will prompt you to “Merge Chart” or “Dismiss”. If “Merge Chart” is selected, you will be prompted to merge the chart and Quest result into an existing chart. Once this merge is completed, Elation will “remember” the chart merge for future results for this patient.
Send electronic orders and lab results to patients
Patient Passport is Elation’s patient portal that allows your practice to send copies of lab orders and lab results to your patients. Click here for more information about Patient Passport.
Why can't find a Quest test that I have ordered before?
The directory of all tests available for a Quest region (Compendium), is supplied and maintained by Quest. Elation EHR updates our Quest compendium on a monthly basis. Elation will automatically assign your practice the Quest compendium specific to your region. We recommend trying to search for the test using different terms (ex. the Complete Metabolic Panel is known as "Comprehensive Metabolic Panel" for Quest)
If you have a question about a specific test code, please contact your Quest representative for assistance. Custom Quest codes are not supported at this time.
What do the different Bill Types mean?
- Third Party= Bill the Patient's insurance information on file
- Patient= Bill the Patient directly
- Client= Bill my practice
- Worker's Comp= Bill the patient's worker's compensation payer
Why can't I see or select my existing Order Sets?
Quest requires you to use tests (Compendium) from their database. You cannot use your old order sets because those tests are not tied to the Quest Compendium. You must create new order sets for Quest eOrdering.
Next Step
Send a lab order to Quest for any patient!
Related Articles

