Contents
To view your Billing Settings, go to "Settings" >> "Billing". The Billing Settings allows you to do the following for your practice:
- set automatic coding preferences
- turn on Elation's Patient Invoicing feature
- turn on reminders to code your visits
- manage your practice's CPT Code database
- enable additional billing fields
- turn on special settings for Practice Management System (PMS) Integration users
Elation's coding automation is designed to help you get credit in quality programs for the documentation already present in your visit note by automatically adding CPT and/or ICD-10 codes to the billing information section of your visit notes based on certain information you enter or certain actions you take. Currently this feature applies to body mass index assessments (BMI), blood pressure (BP), and negative PHQ-9 depression screening results. For more information on this feature, please reference
Elation Coding Automation for BMI, Blood Pressure, and negative PHQ-9 screen results.
Patient Invoicing is a practice-wide setting that can be turned on or off inside Billing settings. Patient Invoicing can allow you to assign charges to procedures and generate invoices for patients from your bills. For more information on updating these settings and understanding this functionality please click here.
User Tip: You can create your own custom code to use as a Popular CPT Code to charge patients for services that do not have standard CPT Codes when using
Patient Invoicing. Here are some common use cases:
- You can create a code called FORMS and associate a charge of $10 to it if you charge patients $10 for completing medical paperwork.
- You can create a code called RCOPY and associate a charge of $25 to it if you charge patients $25 for a copy of their medical records.
- You can create a code called VMB12 and associate a charge of $35 to if if you charge patients $35 for Vitamin B12 injections.
Billing Guidance is available to help your practice ensure you have entered all appropriate Procedure Codes and Diagnosis Codes in the Billing Form when signing visit notes. This feature is designed to trigger a reminder at visit note sign-off if any Procedure Codes or Diagnosis Codes are missing. To enable this feature
- Go "Billing Settings" -> "Billing Guidance"
- Click the button on the right hand side to toggle the feature on (green)
- Select which type of reminder you wish to use from the dropdown for each rule
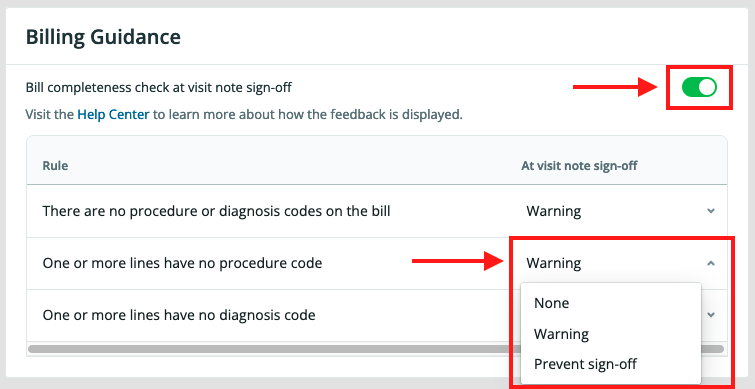
The three options for Billing Guidance reminders are as follows:
- None = You would not see any reminders for that rule
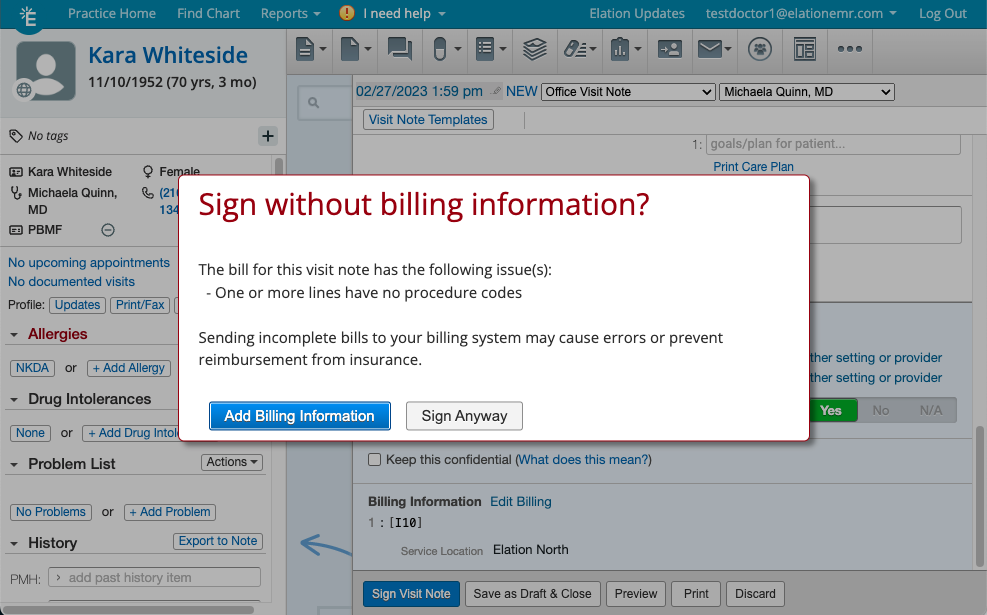
- Warning = You will see a reminder that suggests adding additional billing information prior to signing your visit note. You can then continue by clicking
- “Add Billing Information” to add additional codes
- “Sign Anyway” to sign the visit note without adding additional codes
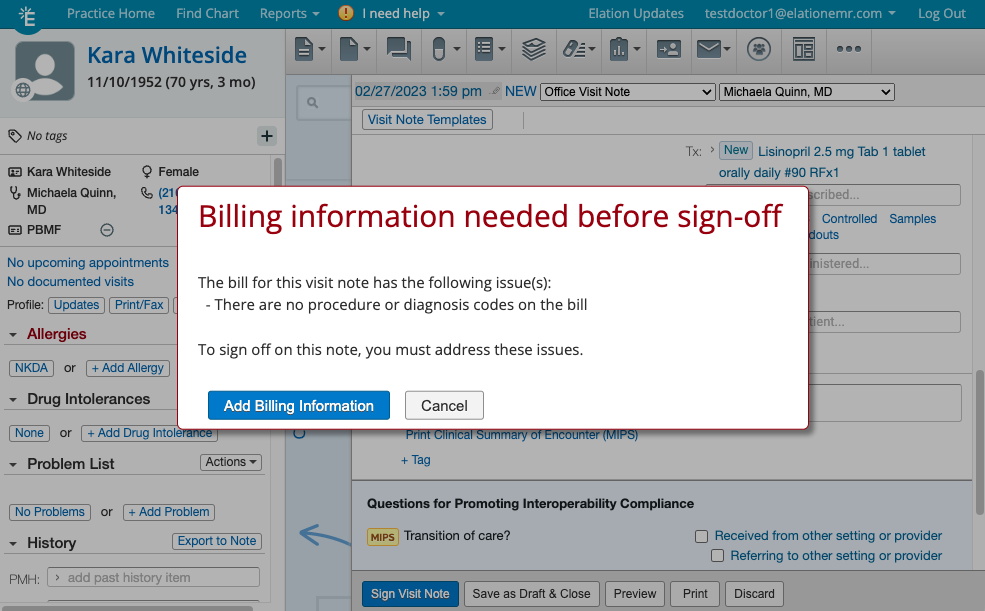
- Prevent sign-off = You will see a reminder that blocks you from signing your visit note until you add additional billing information. You can then continue by clicking
- “Add Billing Information” to add additional codes
- “Cancel” to return to your visit note draft
Reminder as a suggestion (warning) at sign-off:
Reminder as a blocker, prevents sign-off:
When billing for a visit, you can specify a practice/service location and corresponding Place of Service (POS) code in your Practice Locations Settings page.
- Go to "Settings" >> "Practice Locations"
- Click "+ Add Practice Location" to add a new place of service or click "Edit" to edit an existing location
- In the edit window, click on the POS code box to select the Place of Service code that corresponds to your practice location.
- Click "Save"
For more details see: Practice Locations Guide- Listing your service locations
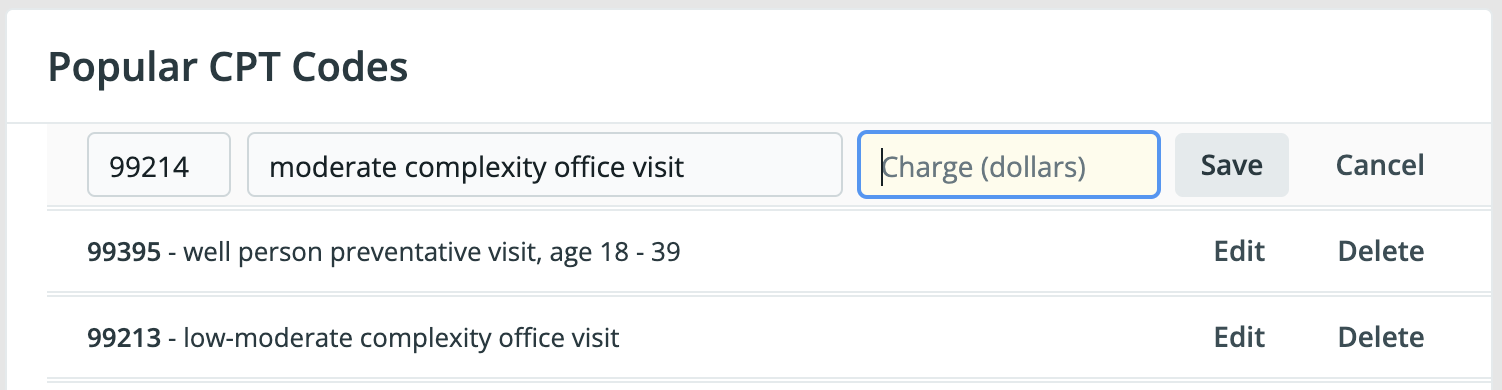
The list of CPT (procedure) codes (that will appear in the billing window) is stored under Billing settings. Each practice can freely add, edit, or remove codes from the list or change the order in which they appear.
Under Billing Settings, scroll down to the section called Popular CPT® codes. Click "+Add CPT codes" to add additional codes, "edit" to make changes to existing CPT codes, "Delete" to delete codes, or drag and drop codes to re-order them.
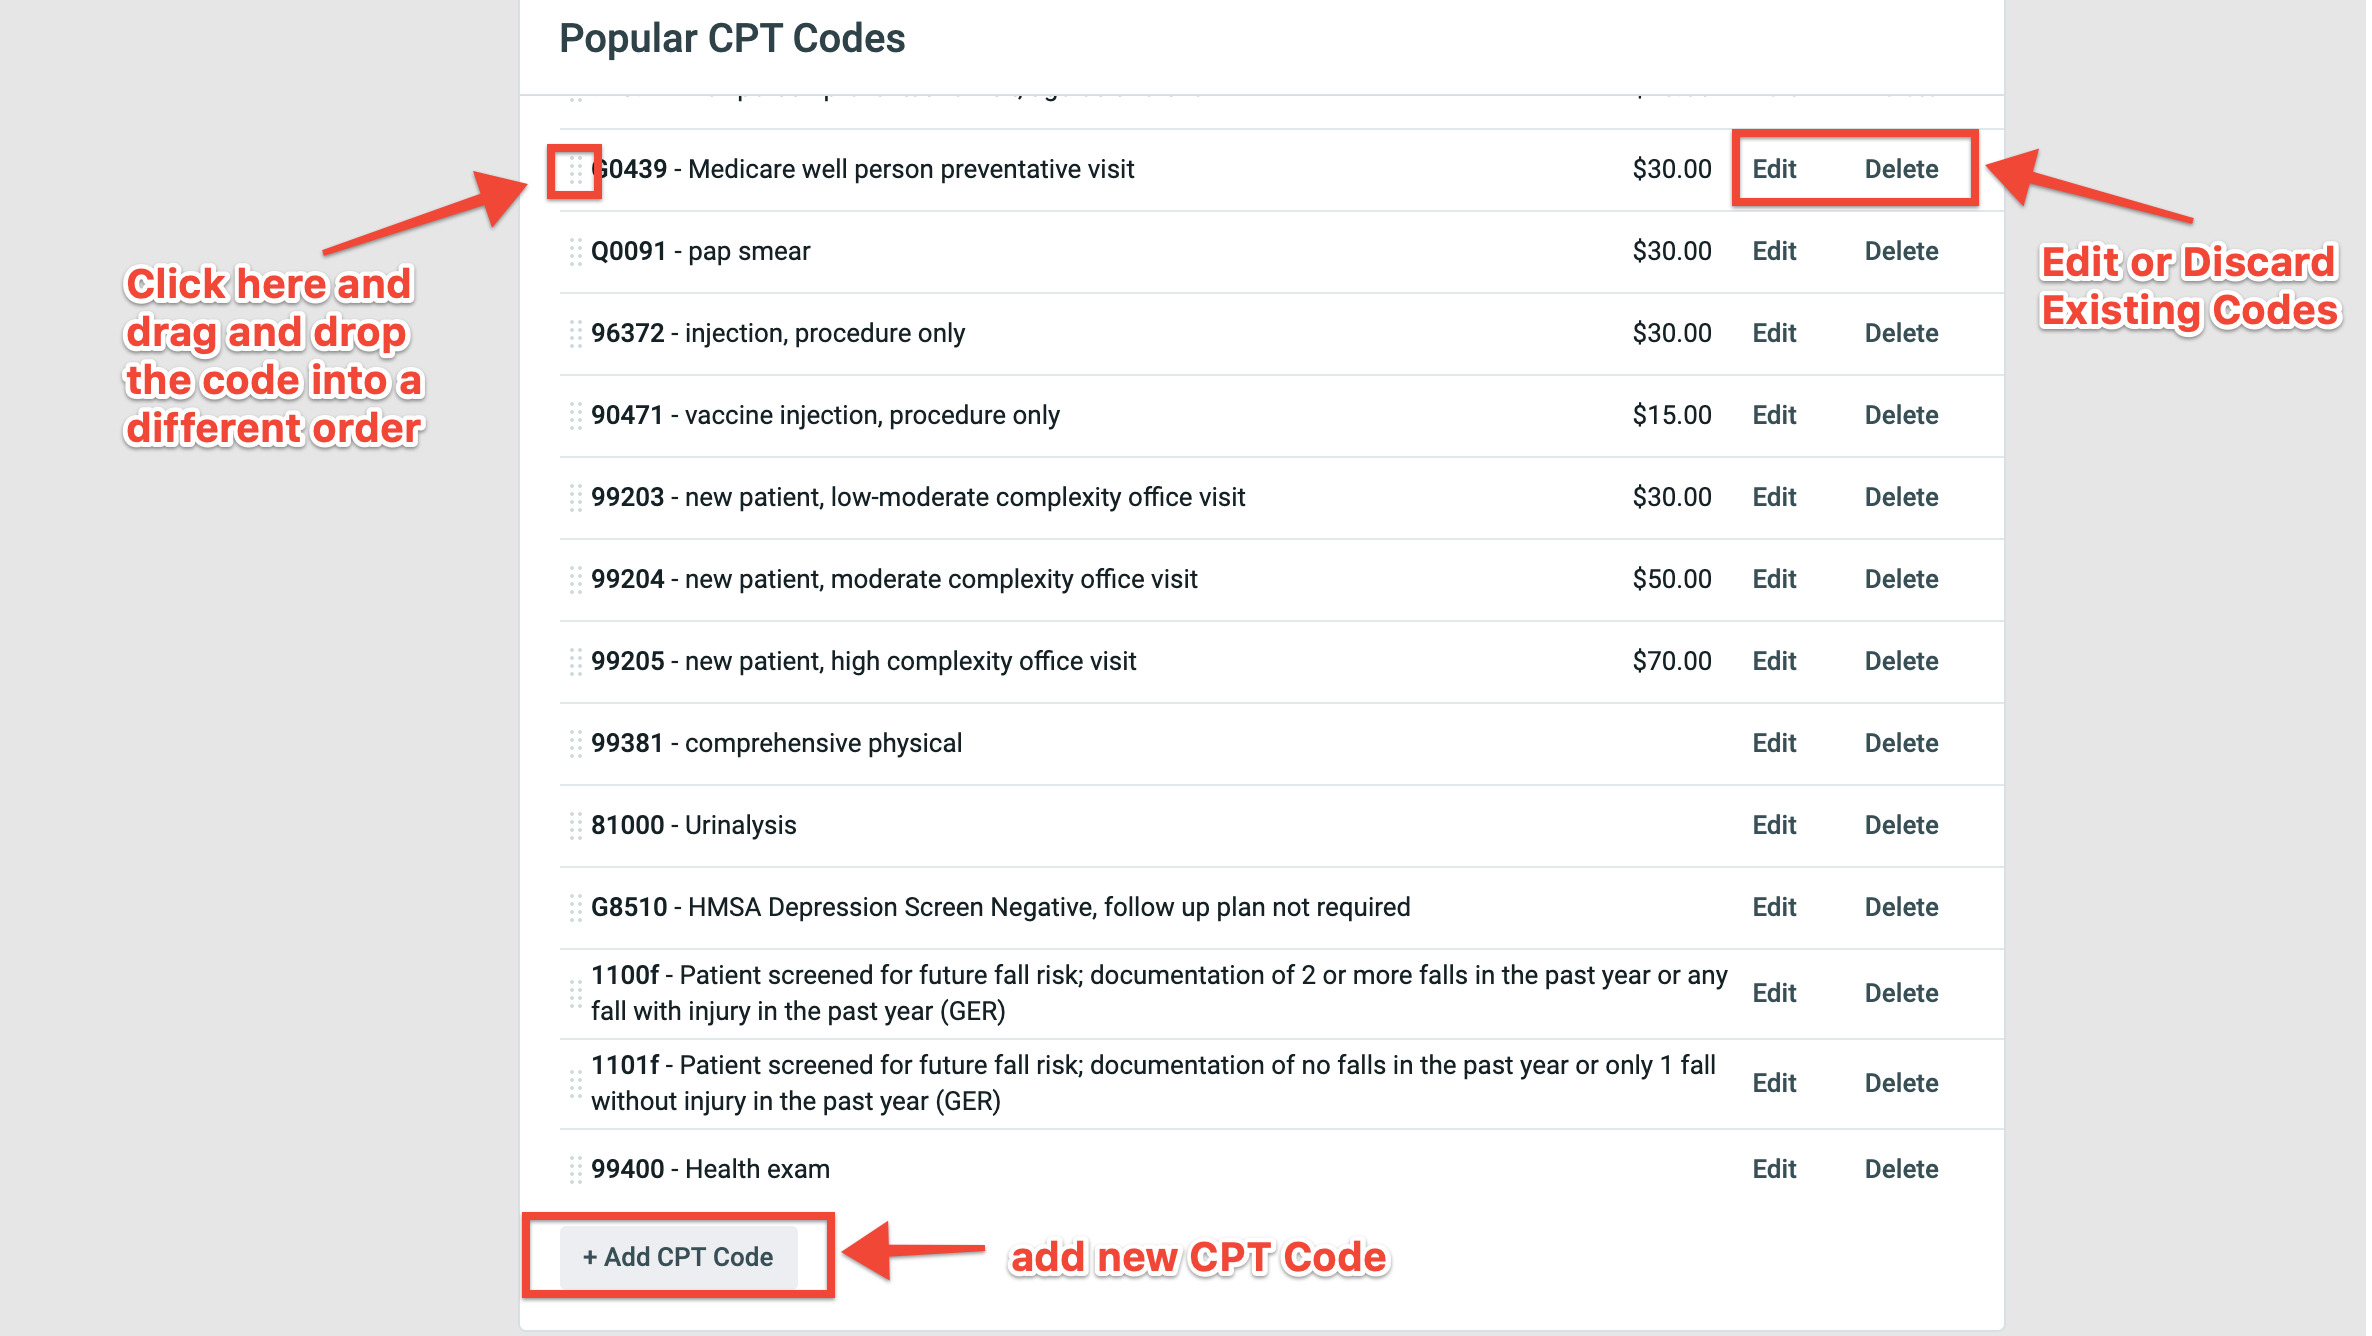
User Tips:
- You can store codes with up to 8 characters.
- Cater the description to one that you can easily remember. This will make it easier for your to find CPT Codes when entering billing information in our visit notes.
- If you already have a patient chart open in another tab while you make changes to your Procedure list in Settings you will need to refresh that patient chart in order to view the changes.
'Charge' field
If you have patient invoicing turned on, you can add default charges to each Procedure code in your list in Billing settings. Simply click "edit" and enter the charge amount. When you add a Procedure code with a default charge to your bill, the "Charge" field will automatically fill with the default charge value. Charges will then print on invoices when you generate an invoice for a patient.
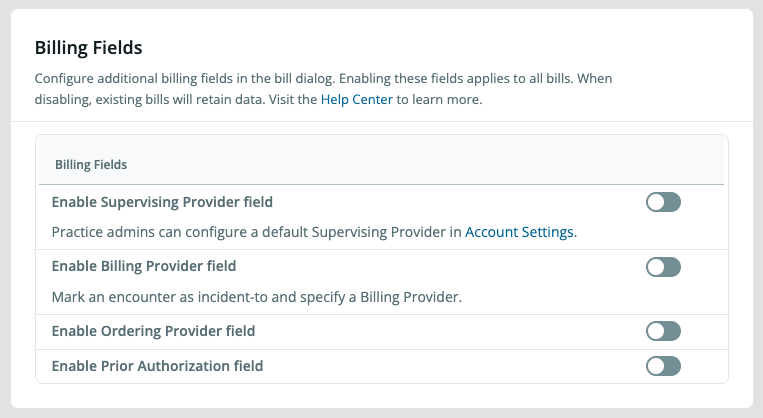
You can enable additional billing fields and synchronize these fields; some of which will come in handy for customers who bill incident-to encounters. The fields include Supervising Provider, Billing Provider, Ordering Provider and Prior Authorization. To enable any of these fields:
- Scroll down to the Billing Fields section
- Click on the toggle to configure the fields you want to include on your bills - green is ON (enabled) and gray is OFF (disabled)
- Supervising Provider
- This field is for the Rendering Provider to store the name of their Supervising Provider if required by their State regulations.
-
User Tip: Each Provider Level User can select a default Supervising Provider under
User Settings.
- Billing Provider
- This field is used to store the name of the Provider that the claim is to be billed under and is commonly used for incident-to billing.
-
User Tip: Each Provider Level User can select a default Supervising Provider under
User Settings.
- Ordering Provider
- This field is used when services provided require a referral or order from another healthcare provider such as diagnostic imaging, laboratory tests, specialist consultations, and certain medical procedures. This is not a common field for Primary Care.
- Prior Authorization
- This field is used to store the Prior Authorization number, if required, for any services rendered on the bill.
- Once a field is enabled, it will appear at the top of the bill in your EHR visit notes
Important Notes:
- For Elation Billing customers, data stored in enabled fields will also push to Elation Billing when you push the bill over.
- For customers using the Puredi integration, data stored in enabled fields will also push to Puredi when you push the bill over.
- **These fields do not sync with other integrated PMS at this time.
The following Settings will only be available (and visible) for certain Practice Management System (PMS) Integration Users.
Important Note: Always consult your Practice Management System (PMS) user manual for the full details around how bills are synchronized between Elation and your integrated PMS.
Delayed Billing is a special setting for customers who are utilizing certain Practice Management System (PMS) integrations with Elation.
Learn more about the Delayed Billing feature here.
The Billing Home - Bulk Send to PMS setting will allow you to enable or disable the “Bulk Send Bills to PMS” button in Billing Home. When toggled on, the “Bulk Send Bills to PMS” button allows you to bulk send all bills of a specific status to your integrated PMS. When toggled off the “Bulk Send Bills to PMS” button will not be available and each bill will need to be sent to your integrated PMS individually via the Actions Menu  . Note that bulk send actions impact ALL bills in the respective status you select.
You also have 3 options that you can configure along with the “Bulk Send Bills to PMS” button:
- Enable option to bulk send "Signed" bills
- This Setting requires the ‘Delayed Bills’ setting to also be enabled in your Billing Settings. A ”Send all Signed” action will be available under “Bulk Send Bills to PMS” to allow you to send all bills in the Signed status to your integrated PMS.
- Enable option to bulk resend "Failed to Send" bills
- A ”Resend all Failed to send” action will be available under “Bulk Send Bills to PMS” to allow you to send all bills in the Failed to Send status to your integrated PMS.
- Enable option to bulk resend "Sent to PMS" bills
- A ”Resend all Sent to PMS” action will be available under “Bulk Send Bills to PMS” to allow you to send all bills in the Sent to PMS status to your integrated PMS.

Certain PMS Integrations will allow you to send your bill to the PMS prior to signing the visit note. This feature is controlled by the Sent to PMS from Visit Note Setting. When toggled on, a "Send to PMS" button will appear in your visit note drafts and clicking on the button will immediately send the billing information entered over to your integrated PMS. When toggled off, the "Send to PMS" button will not be visit note in your visit note draft and the action of signing the Visit Note will push the billing information entered over to your integrated PMS (unless you have Delayed Billing turned on).
Next Step
Create your CPT Codes List and start utilizing it for billing today!
Related Articles
CPT copyright 1995 - 2022 American Medical Association. All rights reserved.

