Contents
Overview
What is user account management?
User account management in Elation allows practice administrators to control who has access to the EHR system. From the Manage Accounts settings page, Admin Level Users can invite new providers and staff, disable accounts when team members leave, re-enable or unlock accounts when needed, and manage administrative privileges.
Why is user account management important?
Proper user account management ensures:
- Security – Only authorized personnel can access patient data
- Compliance – Account access is properly documented and auditable
- Efficiency – New team members can be onboarded quickly with the right permissions
- Cost control – Provider licenses are assigned appropriately based on role and usage
Who controls user access?
ℹ️ PRACTICE ADMINS ONLY
Practice admins manage invites, deactivation, reactivation, and login unlocks; Elation Support only steps in when no active admin can perform these actions.
Your practice's Admin Level Users are the primary owners of account lifecycle decisions. They can:
- Invite new providers and staff
- Disable accounts when someone leaves or no longer needs access
- Re-enable accounts when someone returns
- Unlock accounts after failed login attempts
- Reset MFA for users who lose access to their authentication device(s)
Elation Support acts as a backup only when:
- No active Admin Level User exists in the practice
- An Admin is locked out and no other Admin can help
- Technical issues prevent admins from performing these actions
For most account access questions, start with your practice admin before contacting Elation Support.
Account lifecycle
User accounts in Elation follow a simple lifecycle:
| State | How it happens | Effect on login | Effect on Requiring Action queue | EPCS implications |
|---|
| Invited (Pending) | Admin sends invite from Manage Accounts Settings page. | Cannot log in until registration is complete | N/A | Cannot set up EPCS until account is active. |
| Active | User completes registration | Can log in normally | Items assigned to user appear in their queue | Can set up and use EPCS if eligible. |
| Locked | 10+ failed login attempts | Cannot log in for 1 hour (or until Admin unlocks) | Queue remains intact | EPCS access temporarily blocked. |
| Disabled | Admin disables account from Manage Accounts | Cannot log in | Queue is cleared; items must be reassigned before disabling | EPCS permissions revoked; see Best practices for disabling accounts. |
| Re-enabled | Admin enables account from Inactive Users list | Can log in normally | Queue resets to empty; items must be reassigned | EPCS permissions must be re-granted by Access Control Managers. |
ℹ️ NOTE Before disabling a provider account, review
Best practices for disabling accounts to ensure Requiring Action items, post-dated messages, appointments, and EPCS permissions are handled appropriately.
User account types
Elation offers you the ability to manage the user accounts in your practice straight from your Elation Settings. You can:
- Invite new physician/provider and staff users.
- Disable physician/provider and staff accounts.
- View the number of licenses assigned to Provider Level Users.
- Change users' Administrator privileges.
- Edit account details (name, email address, etc.) of existing physician and staff users.
The table below summarizes the differ types of user accounts offered by Elation.
| Account Type | Description |
|---|
| Regular Provider (i.e. full-time, prescribing) | A physician, physician assistant, nurse practitioner or other healthcare provider who is licensed to prescribe medications and using Elation for more than (3) days per week (full-time). |
| Non-Prescribing Provider | A provider who is not licensed to prescribe medications , including, but not limited to, registered nurses, acupuncturists, audiologists, health coaches, nutritionists, mid-wives, occupational therapists, physical therapists, respiratory therapists, registered dietitians, and social workers. |
| Limited Use Provider | A physician, physician assistant, nurse practitioner or other healthcare provider who is licensed to prescribe medications, and who logs into the Elation EHR less than three (3) days per week. |
| On Call Provider | Either a prescribing provider or a non-prescribing provider who needs limited, time-bound access to the Elation EHR and Elation Billing platforms due to practice-level coverage policies. Allowed for a maximum of two (2) months/year. |
| Supervising physician user | A physician who oversees the care being delivered by another provider, such as a resident, and as such needs limited access to the Elation EHR. |
| Office staff user | A non-provider user who accesses the Elation EHR to perform operational tasks on either a full-time or part-time basis. |
| Read-only user | Access to view historical Elation EHR data, made available to inactive (i.e., deactivated) practices only . |
Workflow Instructions
Accessing the Manage Accounts page
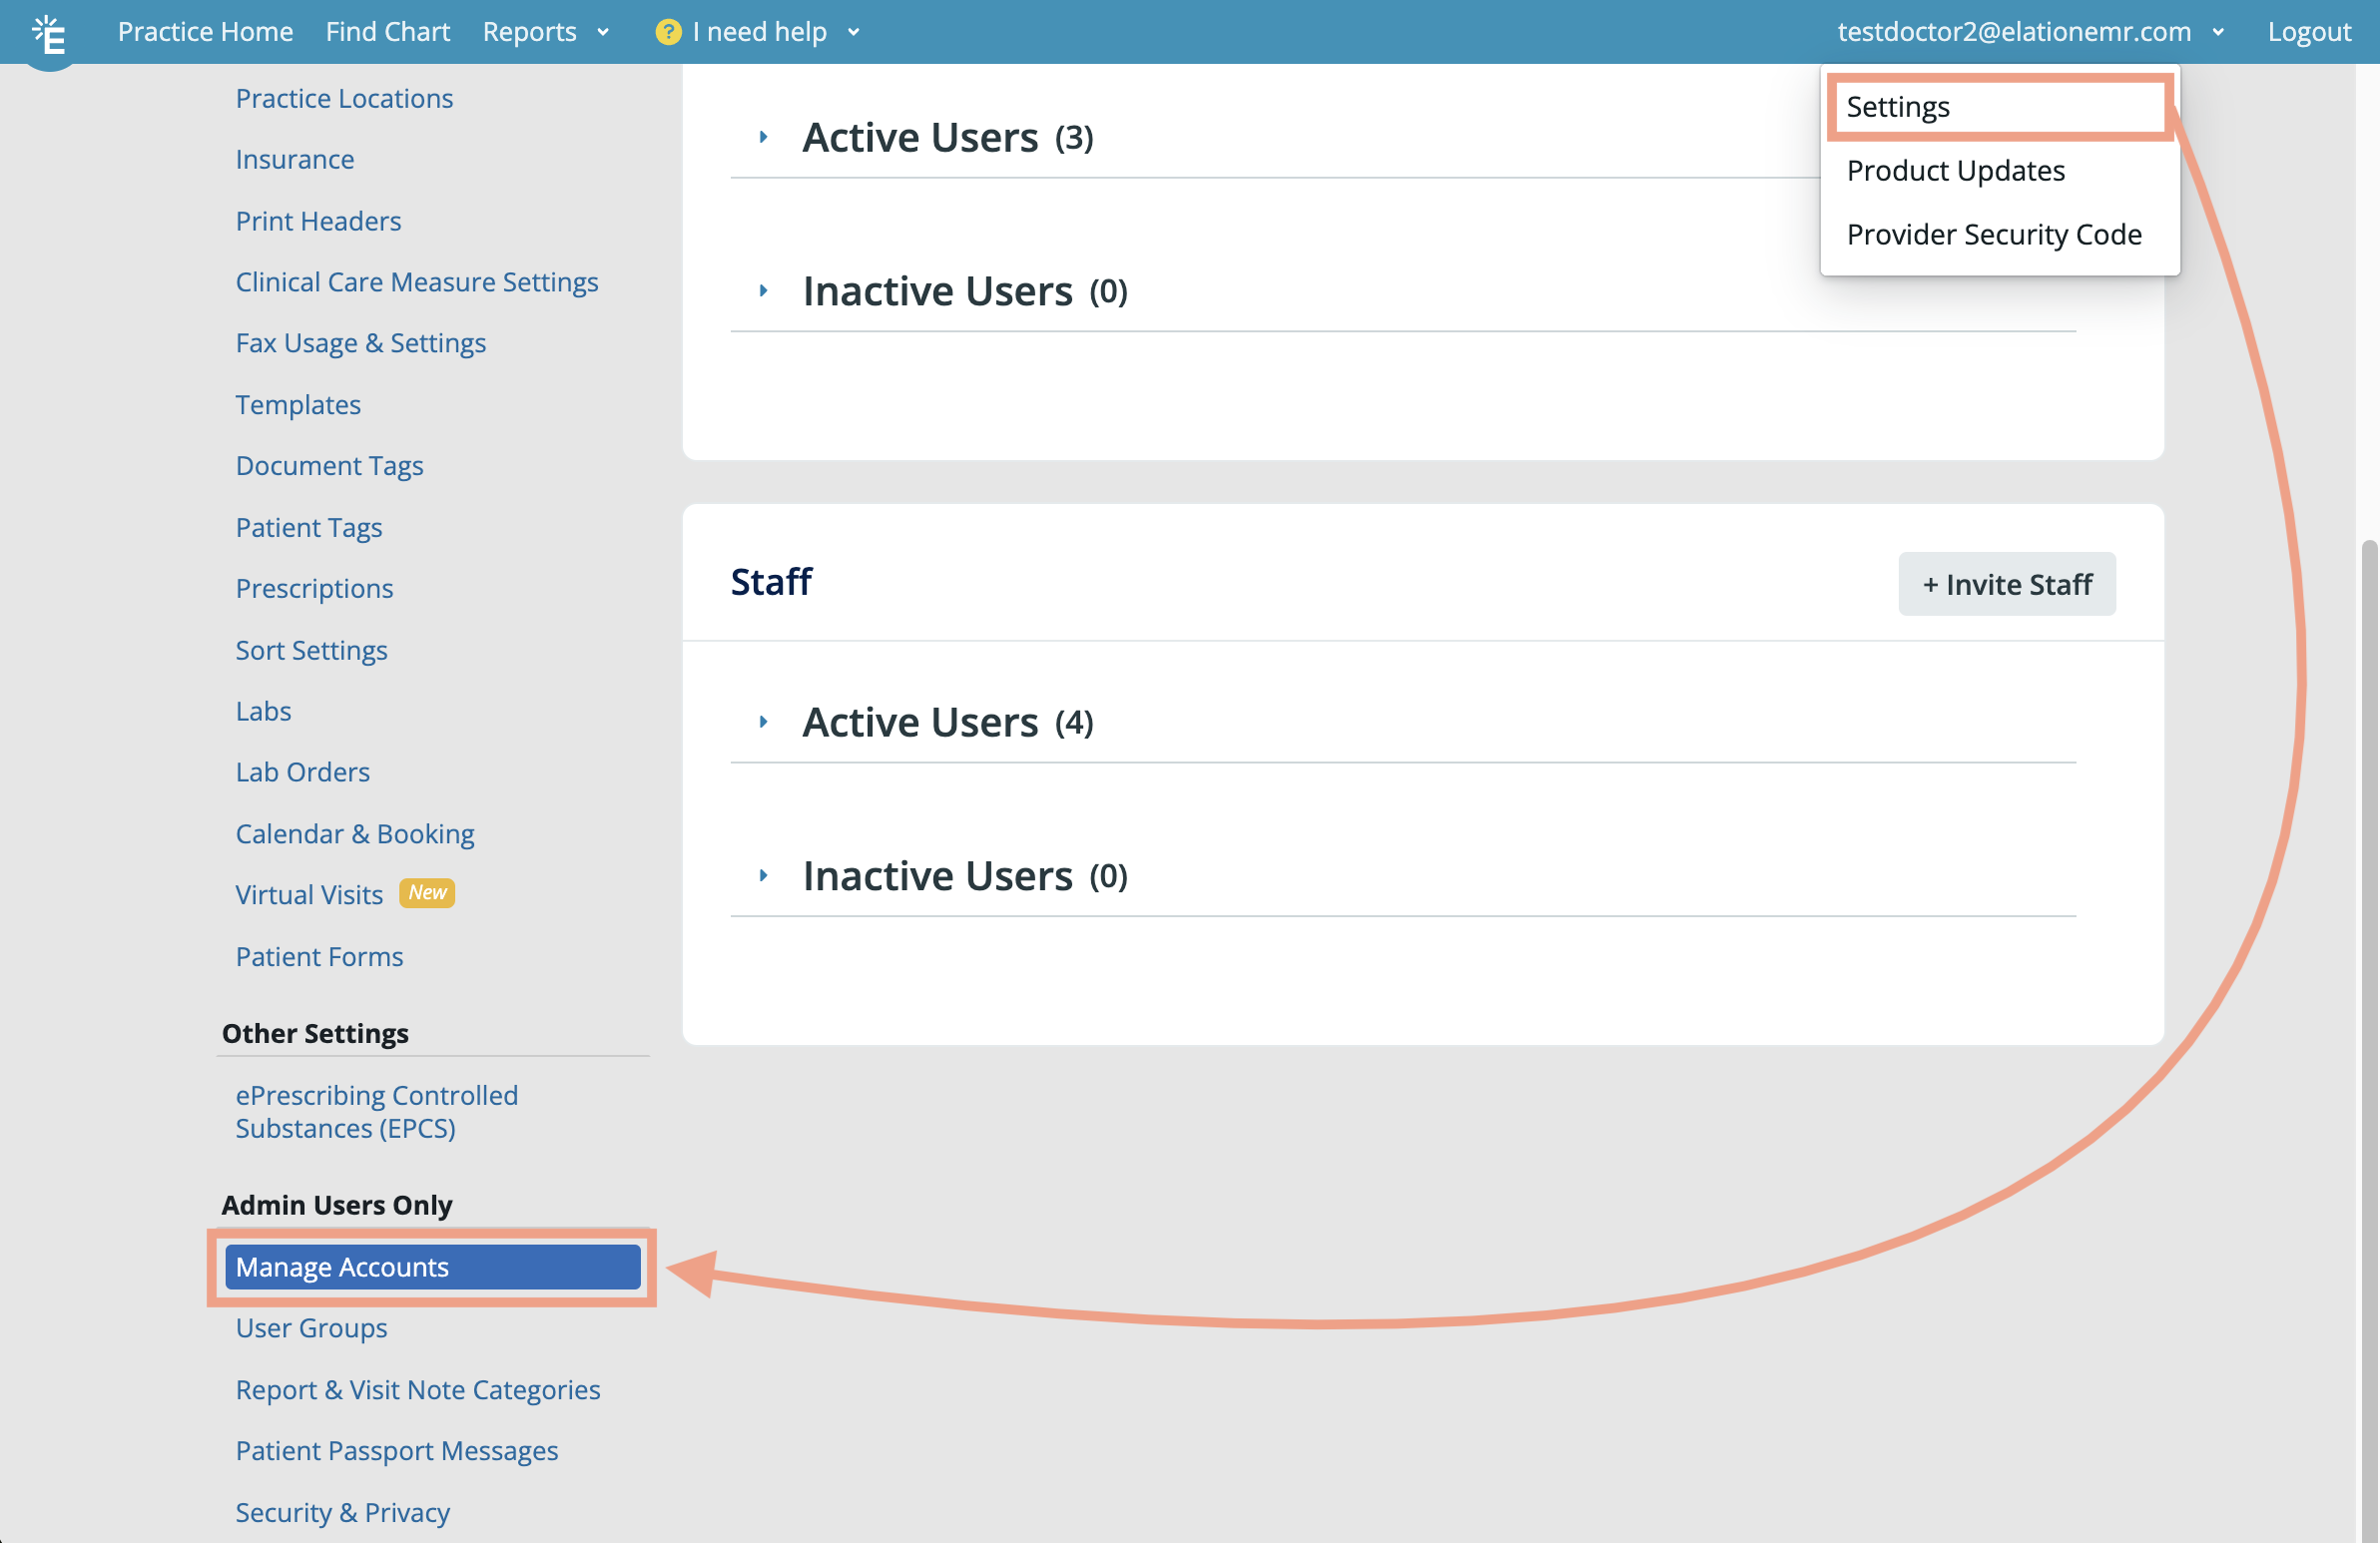
The Manage Accounts page in Elation Settings is under the Admin Users Only section. Provider Level and Staff Level accounts are kept separate on the page, and within each section, you can see separate lists of active and inactive users. When you disable a provider or staff account, the name of the user will move from the Active Users list to the Inactive Users list.
ℹ️ ADMIN USERS ONLY
To view the Manage Accounts settings page, you must have administrator (Admin) level privileges. If you do not see Manage Accounts in your Settings page, then you are not an Admin. To become an Admin, you must ask an existing Admin level user in your practice (most likely a primary provider level account holder) to grant you privileges via the Manage Accounts settings page highlighted below.
Managing user accounts in my practice
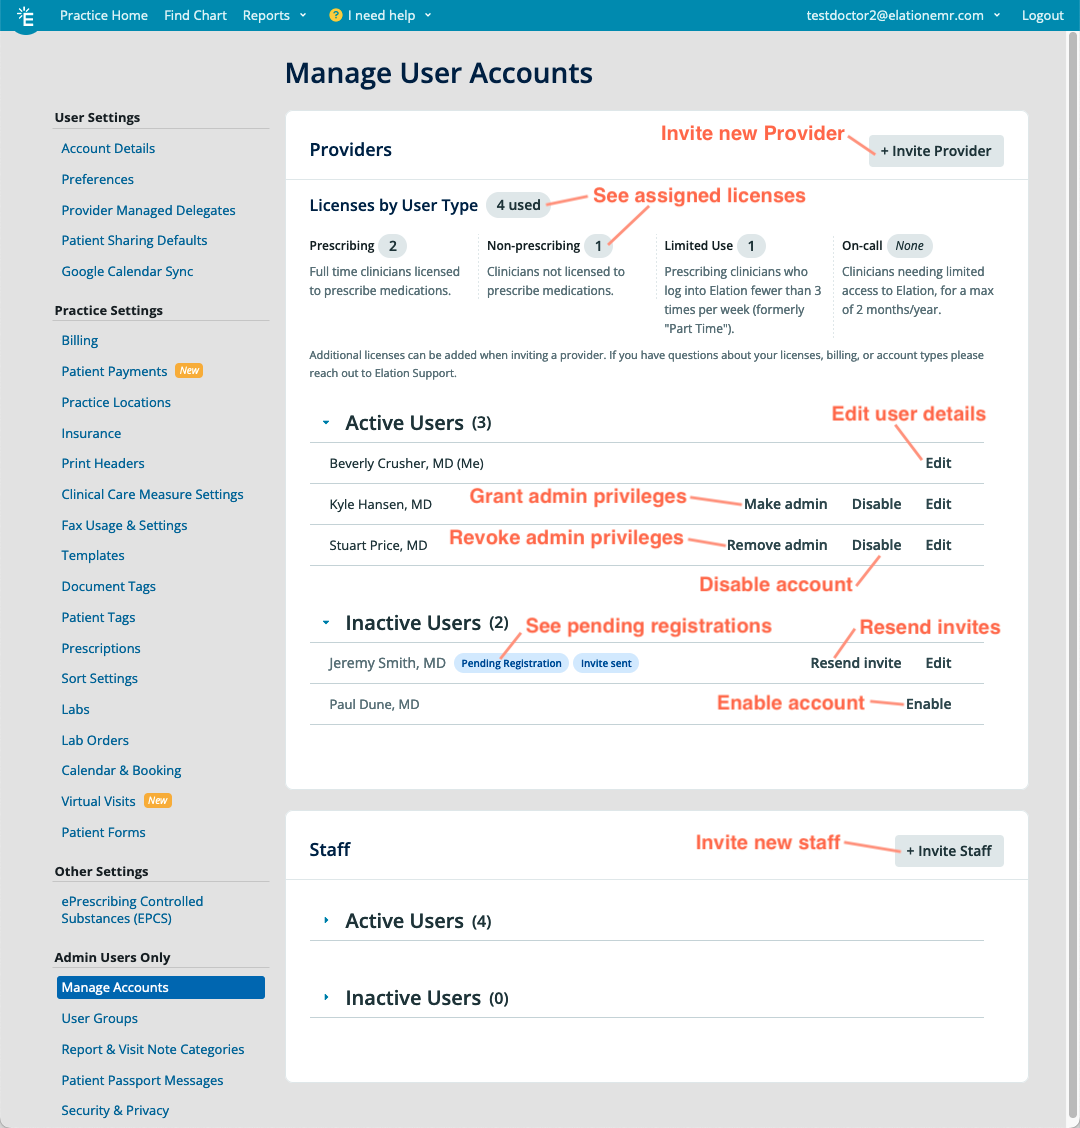
Here is a breakdown of the different options on the Manage Accounts settings page:
Inviting new physicians or providers
| Regular Provider(i.e. full-time, prescribing) | Non-Prescribing Provider | On Call Provider | Limited Use Provider |
|---|
| Standard Provider Privileges | ✓ | ✓ | ✓ | ✓ |
| ePrescribing Regular Substances | ✓ | Not able to ePrescribe any substances. | ✓ | Can ePrescribe any regular substances if their license allows. |
| ePrescribing Controlled Substances (EPCS) | ✓ | Not able to ePrescribe controlled substances. | Not able to ePrescribe controlled substances. | Can ePrescribe controlled substances if their license allows. |
| Telehealth Zoom Visits | ✓ | ✓ | Not able to activate the telehealth Zoom feature, but can start virtual visits from a Regular and Non-Prescribing Provider calendar. | ✓ |
ℹ️ NOTE
- For more details on functionality that's available to different Provider Level Users, please reference this article.
- For information on pricing for Provider Level Accounts, please reach out to Elation using I need help -> Contact Elation Support and then select Something else and a member of the Elation Team will reach out to assist you.
| 1 | Go to Settings -> Manage Accounts. |
| 2 | Click Invite Provider at the right hand side of the Providers section. |
| 3 | Follow the instructions detailed in our Provider Account Authentication Guide to fill out the required information and fields. |
| 4 | Click Invite to send the invitation. |
ℹ️ NOTES - You are not required to complete the non-required fields to send the invitation to the new Provider, but these steps must be completed before the new Provider's account can be fully activated. The provider will be prompted to upload necessary documents and forms to complete their account authentication as well as complete identity proofing. Read more about this process in the Provider Account Authentication Guide.
- Before you can send the invitation, you must agree and authorize Elation to charge an additional monthly subscription fee for the new Provider account, as outlined in your service agreement.
| 1 | In the Invite New Provider or Edit Profile box, go to the Credentials section. |
| 2 | In the Supervising Provider field, select the name of the Provider you are prescribing under. |
| 3 | Save your changes by clicking Invite / Save. |
After this is set up, printed prescriptions and e-prescriptions written by the Provider with Prescriptive Authority will contain two sets of identifiers: those of the prescribing Provider and those of his or her supervisor.
- The prescribing Provider and supervisor's information will also be indicated on the medication order record that appears in the patient's chart in Elation.
💡USER TIP Providers with a supervising physician can also assign staff prescription delegates. When a staff delegate executes a prescription order for a provider with a supervising physician, the staff delegate's name will appear alongside the prescriber's and supervisor's name in the medication order record in Elation. Learn more about delegates under
Staff Permissions / Staff Delegates.
You will see a summary of the assigned Provider licenses by User Type at the top of the Providers section of the Manage Accounts Settings page. The summary will list:
- The total number of licenses used
- The number of licenses assigned for each Provider User Type:
- Prescribing (Regular)
- Non-prescribing
- Limited Use
- On-call
ℹ️ NOTE - ‘Limited Use’ will not appear in the summary if no Provider Level Users have been assigned the ‘Limited Use’ User Type.
- Only enabled and ‘pending registration’ Provider Level Users are counted in the summary. Disabled Provider Level Users are not counted in the summary.
- After updating a Provider Level User’s User Type, refresh the Manage Accounts Settings page to see the updated summary.
Inviting new staff members
| 1 | Go to Settings -> Manage Accounts. |
| 2 | Click Invite Staff under the Staff section. |
| 3 | Fill out the staff invitation form. |
| 4 | Click Save to send the invitation. |
Staff Level User accounts can be added for free.
Viewing invite status
| 1 | Go to Settings -> Manage Accounts. |
| 2 | Expand the Inactive Users section for Providers or Staff. |
| 3 | Invite status badges will be shown next to the user's name
- Status messages include:
- 'Invite sent' - An invite email was sent to the user but they have not opened it yet.
- 'Pending Registration' - The user has open their registration email but has not yet registered.
- 'Invite expired' - The invite link has expired.
- 'Failed to deliver' - There was an issue delivering the invite email (email does not exist or bounced, email provider error, etc.).
|
| 4 | Click Resend invite if you wish to send another invitation to the user. A pop up will appear at the top of the page to confirm that the invite was resent. |
💡USER TIPIf a user reports that clicking
Get Started in their welcome email shows “this link is not valid,” check their invite status in the
Inactive Users section. Common causes include:
- Invite expired — The link is no longer active. Click Resend invite to send a fresh invitation.
- Account already active — The user may have already completed registration. Check the Active Users list. If their name appears there, they can log in directly at https://app.elationemr.com/login/ and reset their password if needed.
- Incorrect email address — Click Edit next to the user’s name to verify the email is correct. If you update the email and click Save, a new invitation will be sent automatically.
Resending invites to providers and staff
| 1 | Go to Settings -> Manage Accounts. |
| 2 | Expand the Inactive Users section for Providers or Staff. |
| 3 | Find the desired user invite to resend. |
| 4 | Click Resend invite. |
| 5 | A pop up will appear at the top of the page to confirm that the invite was resent. |
Receiving an Elation account invitation
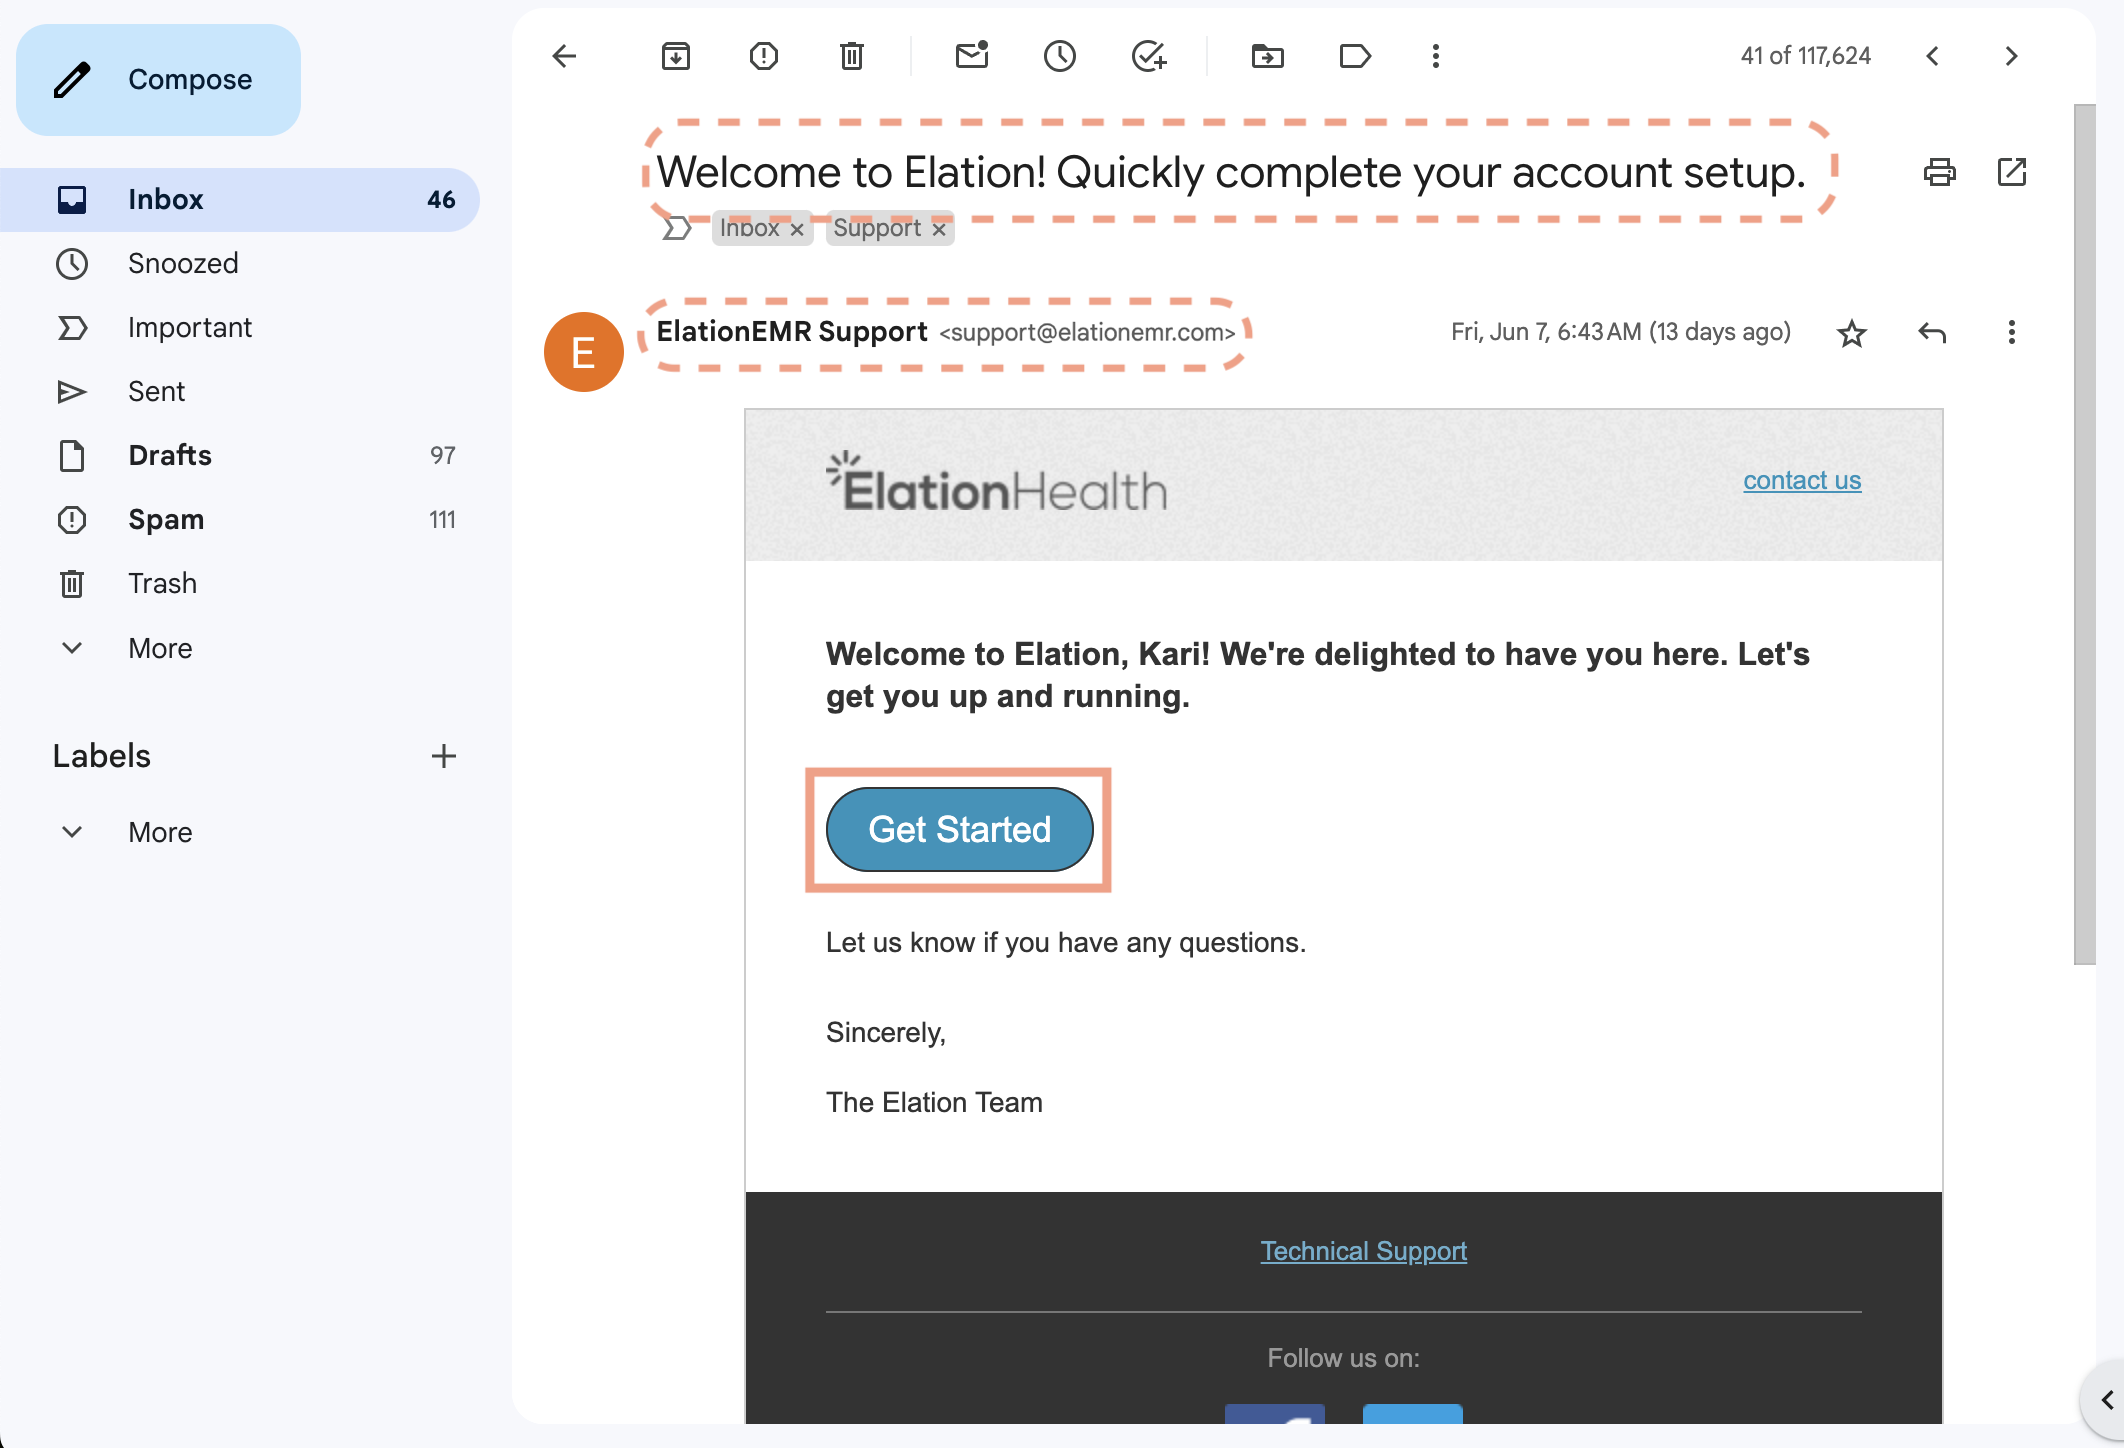
The Provider or staff member that you invited will receive an email from Elation with instructions explaining how to activate their new account and sign in to Elation. The invitation will come from support@elationemr.com and will have the subject 'Welcome to Elation! Quickly complete your account setup'. Users will click on the "Get Started" button to complete registration and access their new Elation account.
💡USER TIP
If the new user did not receive their invitation, check the email address entered for the account details by clicking Edit next to the user's name to make sure the email address is spelled correctly. If the email address was misspelled, correct the spelling and click Save. Afterwards, a new invitation will be sent to the new email address on file.
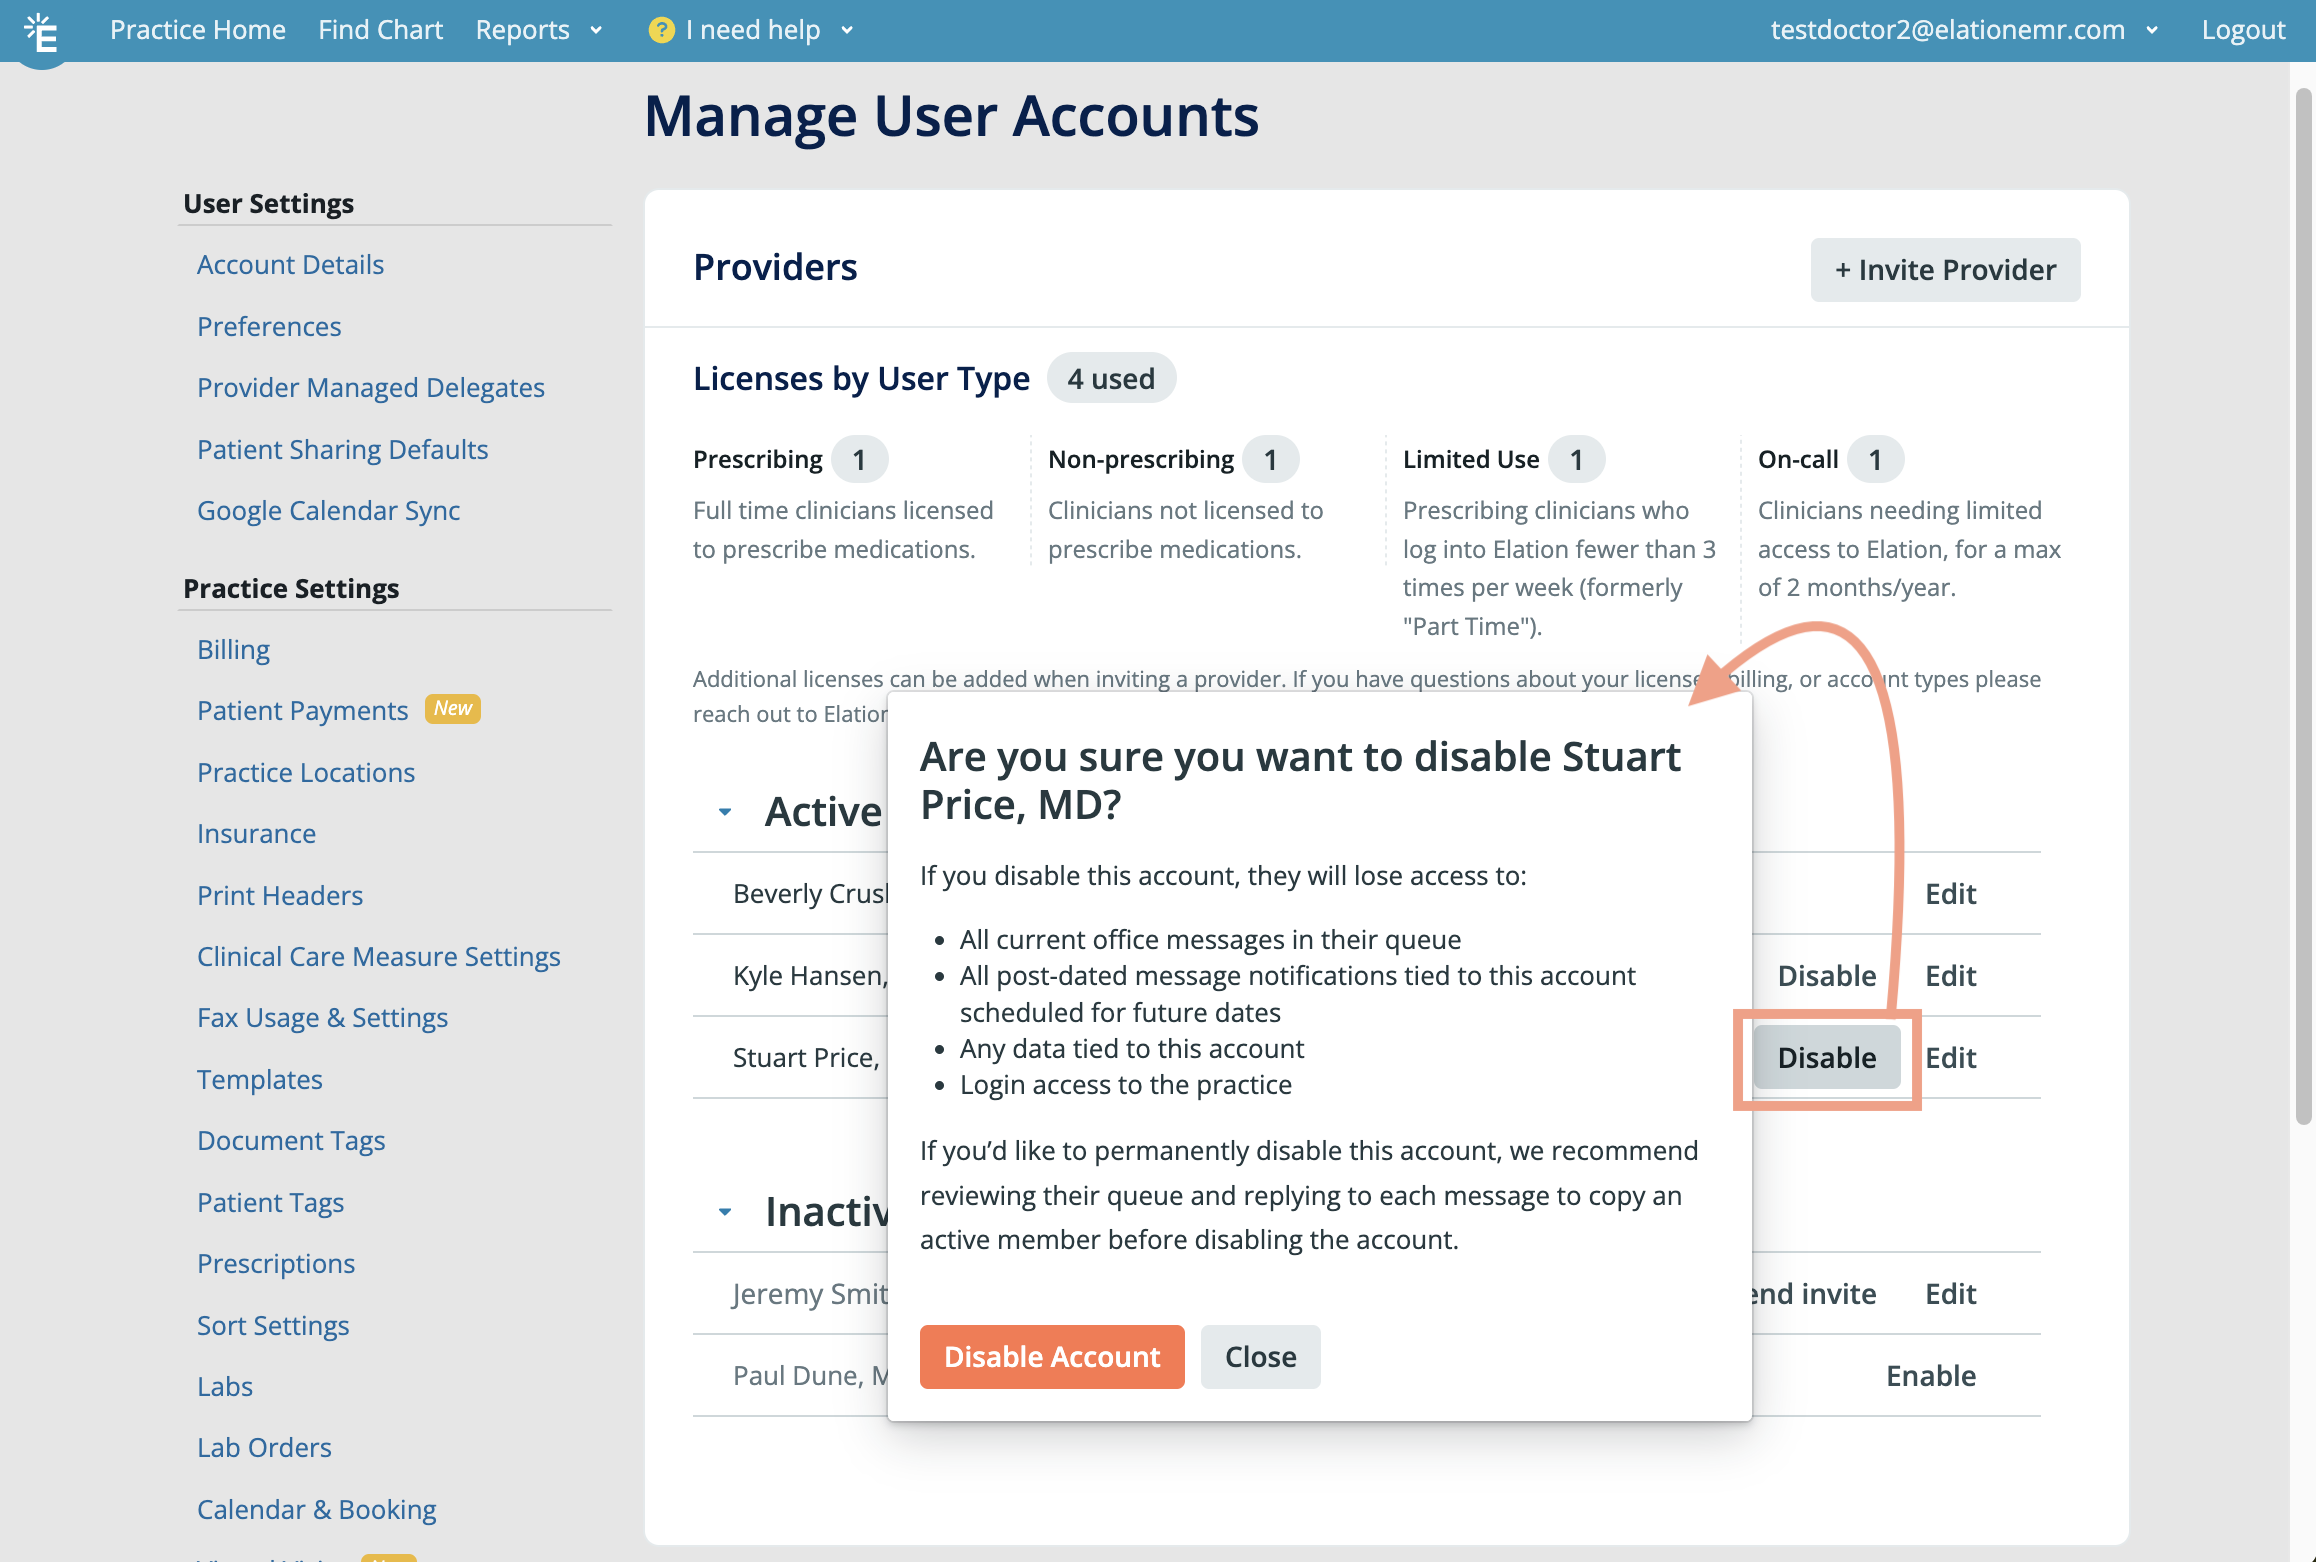
Disabling user accounts
Disabled accounts will appear in the Inactive Users section under Providers or Staff (depending on who the account belonged to). When an account is disabled, that user will not be able to log in to Elation.
To turn a disabled account back on, simply click the Enable button next to the user's name. The Requiring Action Queue will be reset and be empty when an account is re-enabled.
Unlocking User Accounts
Each Elation EHR Account has a fail-safe in case anyone maliciously tries to access the Elation account; an Elation account will be locked for 1 hour if there were 10 or more unsuccessful login attempts in a row. To unlock a user account, Admin Level Users can:
| 1 | Go to Settings -> Manage Accounts. |
| 2 | Click the Unlock... button next to the user's name at the top of the page. |
| 3 | Afterwards have the user check their email inbox for a password reset email and reset their password. |
Premium EHR features
ℹ️ IMPORTANT NOTE
- The features listed are part of Elation's Premium EHR offering. If you are already a Premium EHR user and you are interested in using any of these features, click I need help -> Contact Elation Support to notify Elation and a member of the Elation Team will activate the feature for you.
- If you are interested in upgrading to Premium EHR to use any of these features, click I need help -> Contact Elation Support and a member of the Elation team will assist you.
Premium EHR users have access to the following two features:
Premium EHR Users can prevent specific users from accessing any patient charts. Click here to learn more about this feature.
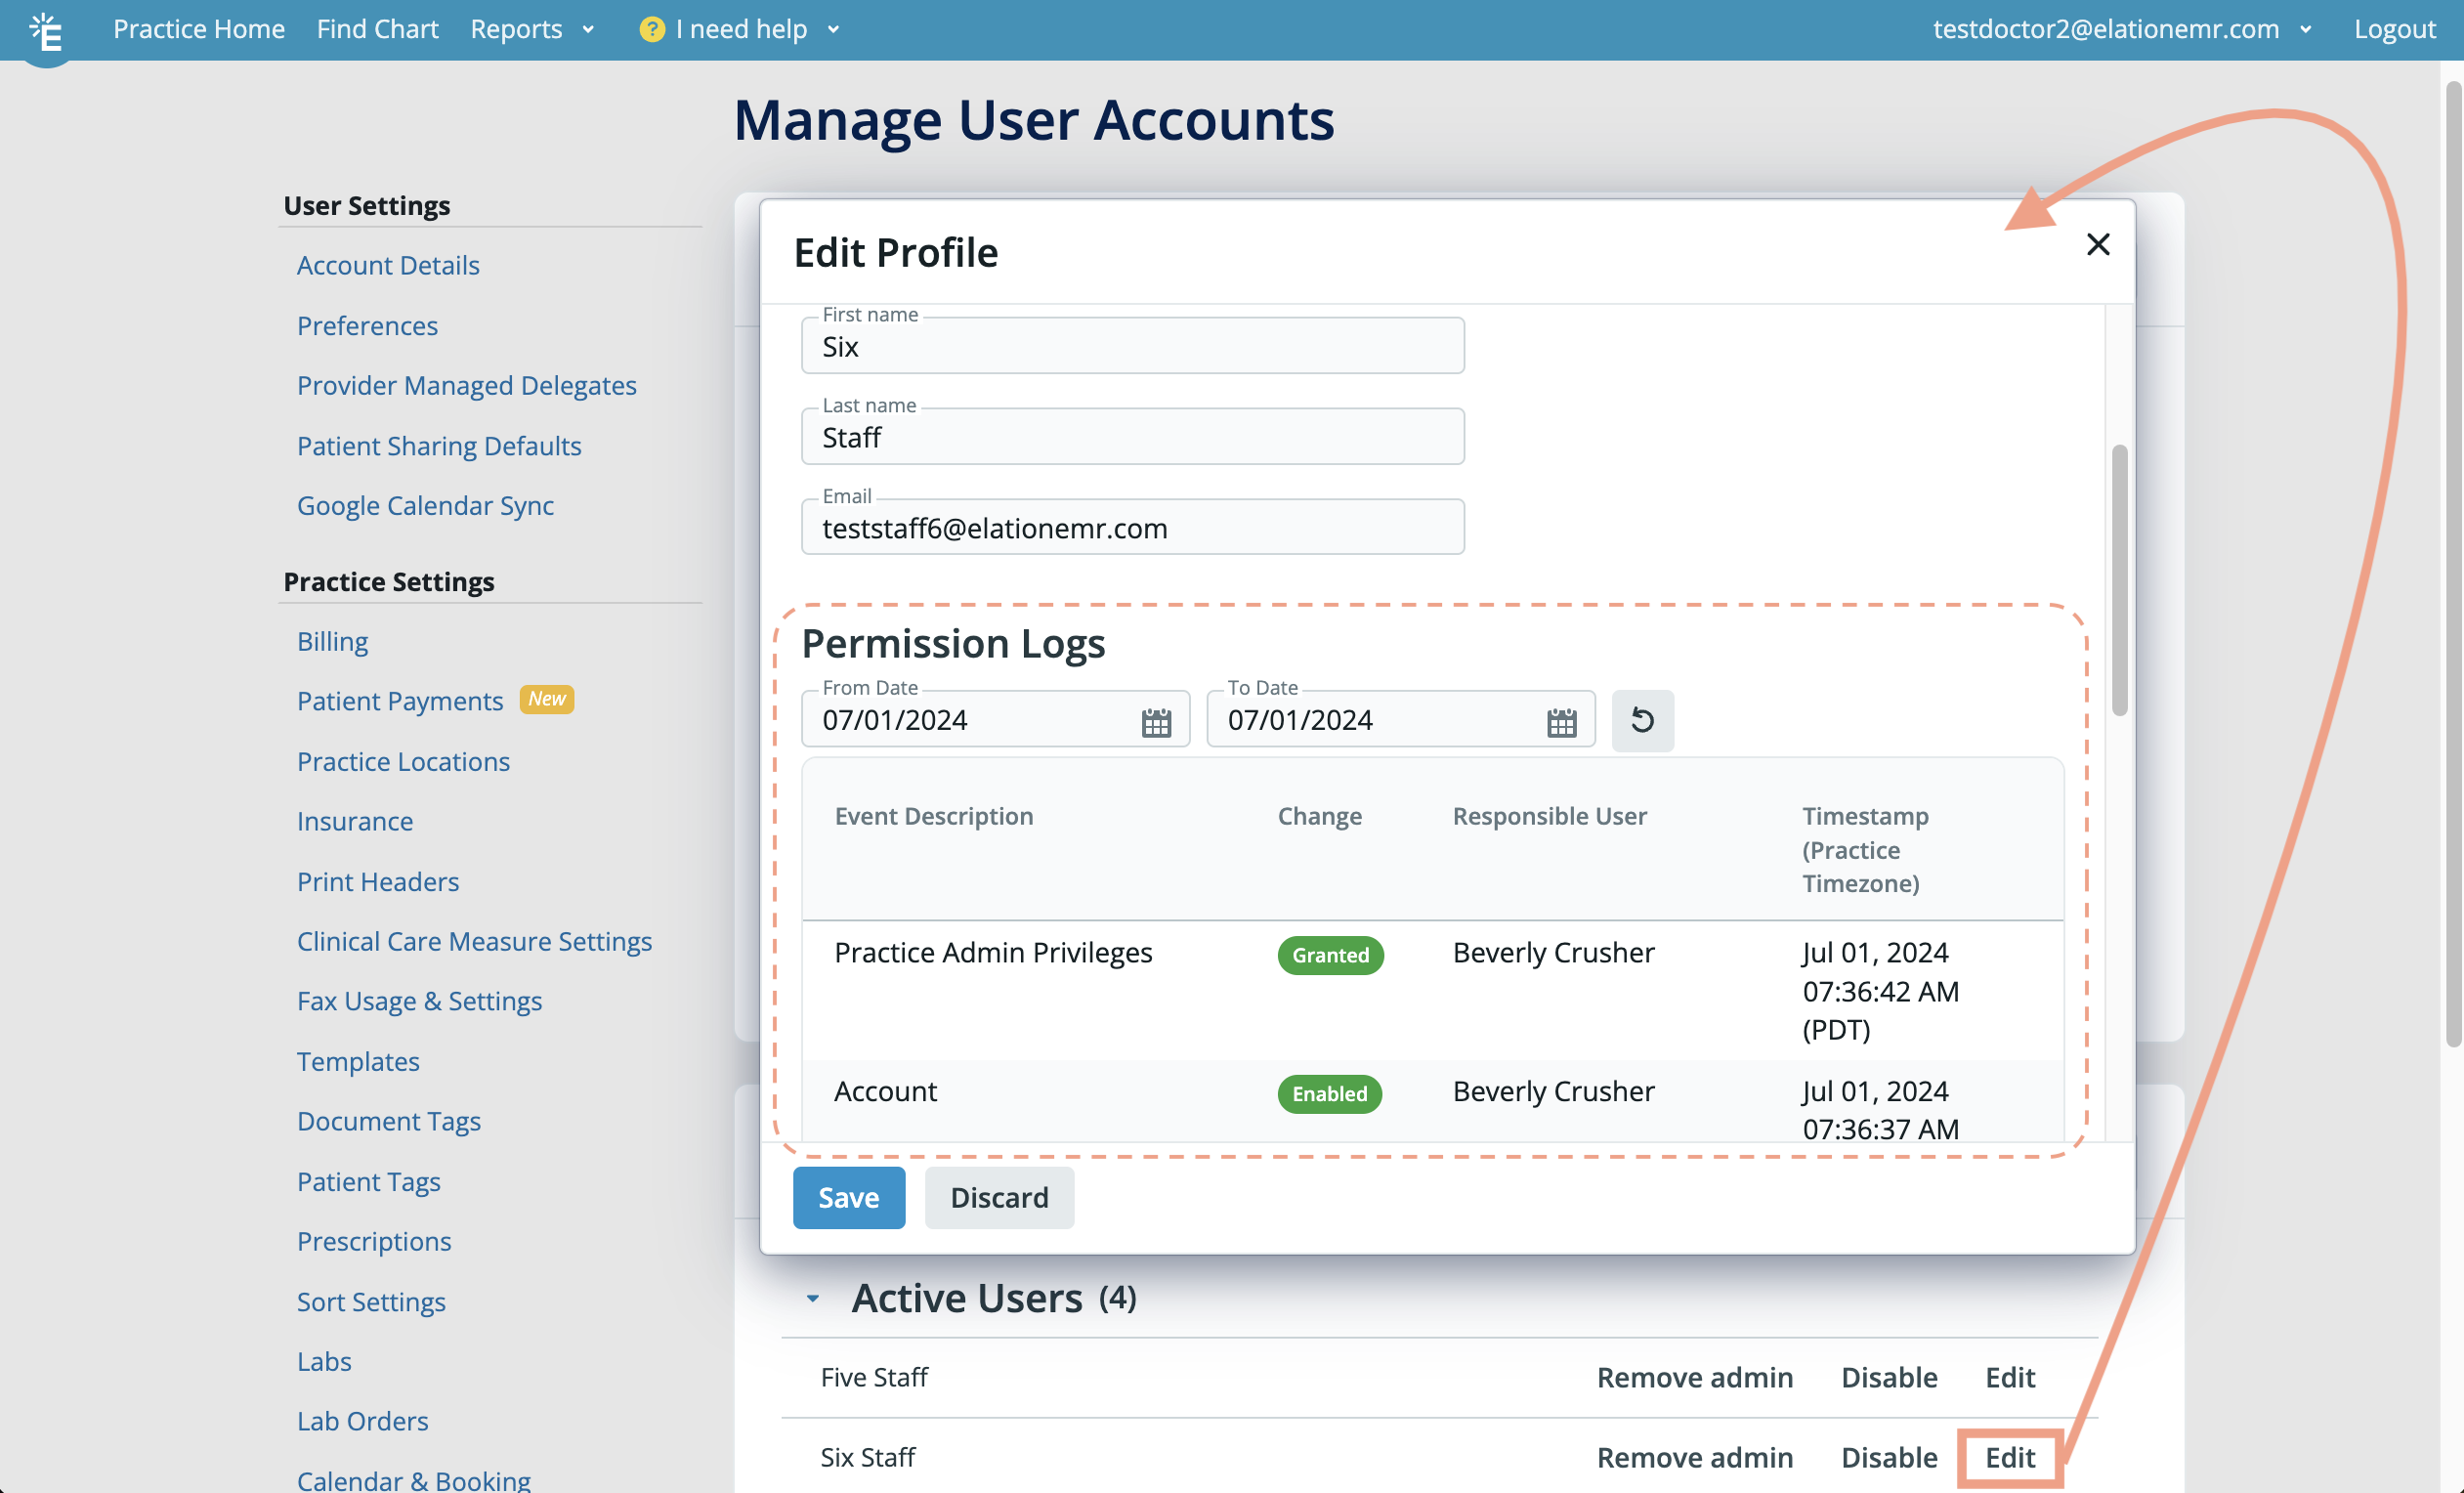
Premium EHR Users who are Admin Level Users can view a log of each user's account access and 'Admin' permission changes. To view a user's permission logs:
| 1 | Go to Settings -> Manage Accounts. |
| 2 | Click Edit next to a user's name.
- You will not be able to see the Permission Audit Logs for a disabled user because you will not be able click Edit next to the name of a disabled user.
|
| 3 | Click into the Permission Logs section. |
| 4 | You will see the following details
- Event Description = Which permission was changed
- Account = Elation account access
- Practice Admin Privileges = 'Admin' permission
- Change = What the change was
- Enabled = Elation account enabled
- Disabled = Elation account disabled
- Granted = 'Admin' permission granted
- Revoked = 'Admin' permission revoked
- Responsible User = Who adjusted the access or permission
- Timestamp = When the access or permission was changed by the Responsible User
- The timestamp will display in your practice's timezone.
|
Next Step
Review the accounts listed under your Manage Accounts settings page and make sure the correct administrative privileges are assigned!
Related Articles

