Contents
Elation Integrated Video is a HIPAA-compliant video integration, powered by Zoom ©, that allows you to see patients using two way, real-time, interactive audio and visual communication.
Copyright ©2022 Zoom Video Communications, Inc.
Elation Integrated Video allows you to easily add a HIPAA-compliant, virtual option to your existing in-person care model. With Elation integrated video, your practice can use one streamlined process for both in-person and virtual visits, without having to implement or maintain a separate technology solution. This will also allow you to meet the communication requirements for telehealth billing to maximize the payments you receive for services rendered to your patients.
| 1 | Go to Settings. |
| 2 | Select Virtual Visit in the Settings options.
|
| 3 | Click the Activate button to enable your integrated video.
- After activation, you will be prompted to update your custom virtual visit instructions. Select the Use this text button to ensure that your patients automatically receive the video link with their appointment reminders.
|
If the option to activate virtual visits is unavailable in your Virtual Visit settings, it may be because you are a staff account, an on-call provider, or the feature is already active. If none of these conditions apply, the Integrated Video feature may not be enabled for your account. Elation must enable this feature before you can activate it.
To request activation:
| 1 | Have an Admin level user in your practice click I need help at the top of your Elation account. |
| 2 | Select Contact Elation Support. |
| 3 | In your message, include:
- Confirmation that you would like to enable Elation Integrated Video
- If you are reaching out on behalf of another user, the name of the user that needs it enabled
|
| 4 | A member of the Elation team will enable the feature and follow up with next steps. |
ℹ️ NOTES:
- Only Admin level users can submit this request on behalf of the practice.
- Enabling Elation Integrated Video may come with additional fees. The Elation team will provide details when processing your request.
- Once the feature is enabled, the Integrated Video option will be available for activation in the Virtual Visit settings.
To set default text to appear in the Visit instructions for patients box in their appointments:
| 1 | Go to Settings. |
| 2 | Select Virtual Visit in the Settings options. |
| 3 | Go to the Virtual visit Preferences section and locate your name. |
| 4 | Adjust the Virtual visit instructions to your liking.
ℹ️ NOTES:
- If you activated your Zoom integration, DO NOT remove your Virtual visit instructions from the Virtual Visit Settings — this will remove your ability to start your video visits with your patients.
- If you activated your Zoom integration, do not remove your customized Zoom link from the Virtual visit instruction. Patients will not be able to connect with you without this link.
- Include additional instructions on how to connect to the virtual visit, as needed, to ensure patients can connect to their appointment.
- Example: "When prompted to join audio, select the Wifi or Cellular Data option if you are on a mobile device or select the Join Audio by Computer option if you are on a computer."
- Updating your Virtual visit Instructions in Settings will change your virtual visit instructions for all upcoming appointments (starting the next day).
|
| 5 | The instructions box automatically saves your changes. |
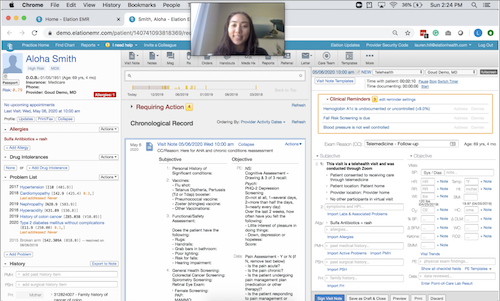
| 1 | To launch your video, go to Practice Home. |
| 2 | Click the Start Video button from any virtual visit appointment. You will be automatically logged into the virtual visit as the provider/host!
ℹ️ NOTE
The Start Video button will appear in any appointment where the place is set to Virtual and your Elation integrated video link is present in the Virtual Visit Instructions field.
|
ℹ️ NOTES
- Make sure you click the Start Video button and not the link in the virtual visit instructions which is meant for the patient! The Start Video button enables you to automatically login as the host of the visit, rather than as a patient.
- You can also launch video visits from your mobile device using Elation Go, our iOS app. Learn more here.
If you have a staff member or another collaborating physician that you would like to join the visit, feel free to have them click the Start Video button as well. They will be placed directly into the video visit, bypassing the waiting room!
The first user who clicks the Start Video button will be the host of the meeting, meaning that they will control the waiting room. You can reassign host privileges to another user by clicking More next to their name in the participant list and then clicking Make Host.
Patients will receive their virtual visit instructions, including the patient-facing Elation integrated video link, through Elation's automated appointment reminders. To join their virtual visit, patients will simply click on the link provided in the appointment reminder to be placed in the waiting room.
You can also manually send them the virtual visit instructions anytime by clicking on the Send button next to the virtual visit instructions in the appointment details popover. These will be sent by either text or email depending on whether the patient has an email or mobile phone number on file.
💡USER TIP This
patient-facing guide will show you how patients can join the virtual visit. You can share this with any patient by adding the guide to your virtual visit instructions under
Settings >>
Virtual Visits >>
Virtual Visit Preferences.
You can manage when visits start and end by admitting patients from and placing patients back into the waiting room. You will not need to 'Leave Meeting' or 'End Meeting for All' between patient visits!
| 1 | Once the patient clicks the video link and joins, you will be alerted in the integrated video window that the patient has entered the Waiting Room through an audio and visual cue. If you prefer to only be notified visually, you can turn off the sound upon entry in your video settings. |
| 2 | Click Admit next to the patient's name to move your patient from the Waiting Room into the video call and begin your visit!
- If there are multiple patients in the waiting room, you can choose to Admit only one of them and hold the other patient in the waiting room until you are ready to see them. For privacy reasons, patients in the waiting room are not able to see each other or chat with one another.
- Send patients back into the waiting room by clicking More next to their name and clicking Put in Waiting Room.
|
ℹ️ NOTE
Choosing to Remove a patient from a meeting will prevent a patient from being able to enter the Waiting Room again until you end your current video session and start a new one. We recommend against using Remove, unless you are sure that the patient does not need to come back into the video visit again.
Using Elation Integrated Video, you can easily document in Elation while hosting the video visit on the same device! We recommend turning on Minimal View so you can easily document in Elation while seeing your patient on video at the same time. This view minimizes your patient view and also ensures that your video window stays on top of all other windows/programs on your desktop (so you never lose sight of your patient).
Switch between Minimal View and Full Screen View as needed — Full Screen View allows you to focus on an enlarged patient video, which may be helpful for physical examinations.
💡USER TIP
- For Windows users: Click on the minimize icon in the top right.
- For Mac users: Use keyboard shortcuts to help you move between Minimal View (Command(⌘) + M) and Full Screen View (Shift + Command(⌘) + M). This will allow you to seamlessly increase and decrease the size of your patient's video.
To optimize your Elation integrated video experience, you can adjust your video session settings! Below are a few notable features that your practice can take advantage of:
- Share Screen — Control whether or not your patients can share their screen. By default, you and your patients will be able to share your device screens with one another, in case you want to share key pieces of information with one another during the visit — e.g. trends in lab values!
- Chat — As the video visit host, you will be able to chat with your patients as well as specify who your patients can chat with. You may choose to chat with — Everyone in the Waiting Room (in case you are running behind schedule and want to send a generic message to everyone in the waiting room!), Everyone in the Meeting, or individuals in the meeting. The default selection is set to chat with Everyone (In Meeting). We recommend allowing your patients to chat with the 'Host Only'.
ℹ️ NOTE
Most settings are session-specific, meaning that they will revert to the default once you relaunch the meeting. Participant chat settings are an exception to this rule. If you choose to limit your patients to chatting with the 'Host Only', this selection will hold across video sessions.
Next Step
Activate your Elation integrated video account today and start seeing your patients virtually

