Recommended Reading
Identity proofing is only one step in these two larger set up processes. Read the full articles below for more detailed information for these two set ups:
Contents
As part of the Elation
Provider Account Authentication process, Elation must verify your identity using secure identity proofing techniques. There are
two separate processes in Elation that require two different identity proofing workflows:
- For Elation Account Authentication
- This is required for all users who create an Elation account
- For Electronically Prescribing Controlled Substance Medications
- This is only for Provider Level Users who will utilize the EPCS feature
Elation works with
Stripe© to conduct identity verification online for Elation account authentication. Stripe builds technology that’s used by millions of companies around the world like Amazon, Google, and Zoom. They help with everything from accepting payments and managing subscriptions to verifying identities.
Please make sure other details and actions are completed for full Provider Account Authentication by following the steps listed in
this User Accounts Guide.
Stripe helps confirm your identity by conducting the following checks:
- Stripe will capture images of the front and back of your government-issued photo ID and review to ensure that the document is authentic. Stripe built an automated identity verification technology that looks for patterns to help determine if an ID document is real or fake. This process is like a bank teller checking your ID document to confirm that it’s real.
- Stripe will capture photos of your face and compare it against your photo ID to confirm that the photo ID belongs to you. Stripe built automated identity verification technology that uses distinctive physiological characteristics of your face (known as biometric identifiers) to match the photos of your face with the photo on the ID document. This process is similar to a bank teller confirming that the photo on your ID document is you based on the shape of your nose or eyes—but it is a more advanced technology and a more accurate way to identify you as a unique person.
- Stripe will collect your name, date of birth, and government ID number, and validate that it is real. They will check this information against a global set of databases to confirm that it exists.
Stripe will ask for your consent before collecting and using your information. They will only use your verification data in accordance with the permissions you grant before starting the verification process, and based on Stripe's Privacy Policy.
Learn more about how Stripe is storing and handling your data.
- Identity verification will begin after a Provider Level User creates a password during EHR account setup.
- Click on the "Verify Identity" button to begin verifying your identity.
- Choose whether you want to use your current device (select “Continue on this device”) to complete identity verification or select “Complete on mobile device” if you want to complete identity verification on a mobile device.
- If you select “Complete on mobile device” you will be provided a QR code you can scan to complete identity verification on a mobile device of your choice.
- Select how to verify your photo ID by selecting one of the 3 options on your screen. You can:
- take a picture of your photo ID with your phone
- take a picture of your photo ID with your webcam
- upload a copy of your photo ID already on your computer
- Accepted Photo IDs include:
- Passport
- Passport card
- Driver license
- State-issued ID card
- Resident permit ID / U.S. Green Card
- Border crossing card
- Child ID card
- NYC card
- U.S. visa card
- Click "Accept and continue" to give Stripe your consent to use your information for identity verification. Stripe will only use your verification data in accordance with the permissions you grant before starting the verification process, and based on Stripe's Privacy Policy.
- Submit your photo ID document based on the method selected in step #3.
- Allow access to the Camera device on your computer (if applicable) to allow Stripe to take a picture of your face to compare it against your photo ID.
- Click "Allow" to allow Stripe to store your images to improve their biometric verification technology. You must allow this to proceed with identity verification but you can remove Stripe's permissions afterwards at any time by contacting Stripe.
- Next, click “Continue” to proceed with taking a photo of your face. Stripe will automatically take 3 photos of your face to compare them to your photo ID.
- Once the photos are taken you will automatically see a ‘Verification submitted’ notification. Click "Done" to close the identity verification window.
- Once you pass identity verification, you will see an "Identity verified by Stripe" notification in your profile.
If your identity verification was rejected, Elation will reach and work with you to go through the verification process again.
Important Note: Are you seeing a different experience? A subset of customers may still seeing the
legacy identity proofing workflow. Both workflows will allow you to complete identity proofing. If you have any questions about the experience you are seeing,
click here to contact Elation Support.
Before starting the verification process, here’s what you need:
- A valid government-issued photo ID document. Not a photocopy or a picture of an ID document. Ensure that the ID document is not expired. See a full list of acceptable forms of verification documents here.
- A device with a camera (if possible, use a mobile device). Cameras on mobile devices typically take higher-quality photos than a webcam does.
The quality of the images captured affects success rates dramatically. Below are a few best practices to help ensure that your verification succeeds:
- Capture a clear image of the original document. Make sure that the images are not too dark or bright, and don’t have a glare. Hold steady and allow your camera to focus to avoid blurry photos.
- Do not block any part of your ID document in the image. Ideally you can lay it flat to take the photo.
- Do not block any part of your face. Remove sunglasses, masks, or other accessories.
- Find a location with ambient lighting. Avoid spaces with strong overhead lights that cast a shadow on your face or ID document. Avoid sitting directly in front of a bright light which can wash out your face and add a glare to your ID document.
Stripe Identity may not be able to verify all users. For example, this may occur if you decline to be verified using biometric technology or attempt to verify with an unsupported document type.
See the Best practices for a successful verification section for more information. If your identity verification was rejected, Elation will reach and work with you to go through the verification process again.
Both Elation and Stripe will have access to the information that you submit through the verification workflow. We rely on Stripe to help store your verification data. Stripe uses access controls and security standards that are at least as stringent as those used to handle their own Know Your Customer (KYC) and payments compliance data.
Learn more about how Stripe handles and stores your data.
Any verification data accessible to Elation staff will be treated in accordance with our Privacy Policy. Verification data will not be used for any purpose other than verifying the legal identity of the user. All access to verification data is logged and periodically reviewed.
We use Stripe for identity document verification. Stripe retains a copy of all the data provided as part of the verification workflow. The consent may also allow Stripe to use your data to improve their technology. You can delete your information from Stripe’s servers or revoke your consent by emailing privacy@stripe.com.
- When you reach the identity proofing step of the EPCS sign up process (see Step 3: Accessing EPCS Set Up), you will be prompted to confirm your personal identifying information through Experian©. This information will be used to generate your identity proofing questions based on your Experian credit report.
- User Tips:
- If your name appears differently in your credit report, you will need to change your name in Elation to the name that appears on your credit report before continuing the MDToolbox sign up process as your identity proofing is based on the details of your credit report. Go to "Settings >> Account Details >> Edit Profile". Revert your name back to the desired name in your Elation Settings once you have completed EPCS Sign Up and that will be the name that displays to the pharmacy and on printed prescription forms.
- Please enter your home information. If you have recently moved and run into issues with the subsequent steps, enter your former address and try again
- Please enter a personal cell phone number
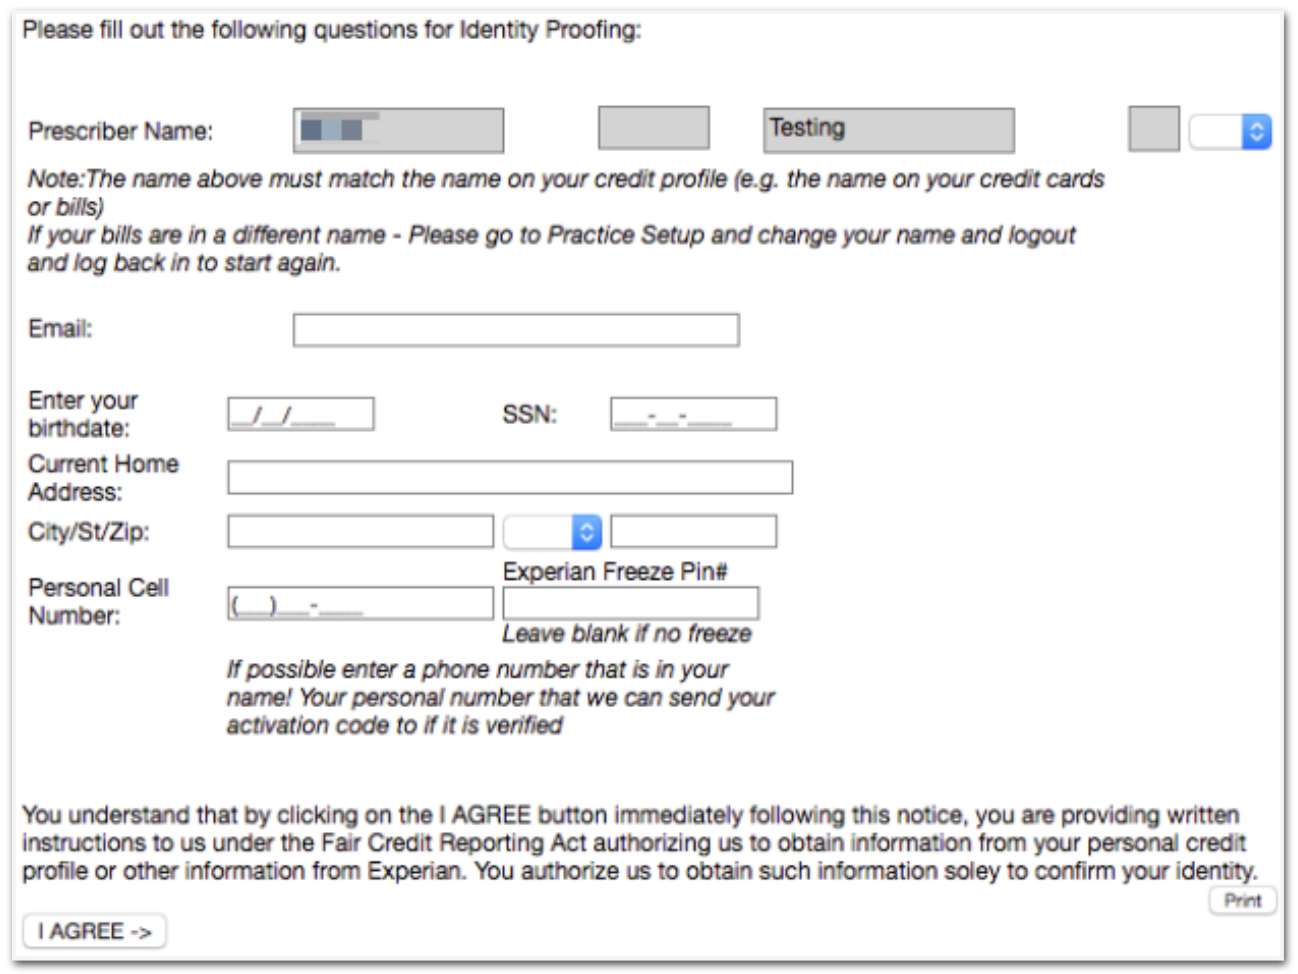
- Click "I AGREE ->" and you will be prompted to answer a series of questions based on your personal credit history. You have 5 minutes to answer these questions, and are given 3 attempts every 24 hours.
- User Tips:
- The questions will be based off your credit history according to the Experian database. Please take the time you need to think about the answers to each question. The questions will be very specific and may involve details from your early credit history (as far as 20 years ago)
- Each attempt will have different questions.
- If you have failed all 3 attempts, you must wait 24 hours before you are allowed to try again. There are no exceptions.
- If you need a copy of your credit report to assist with answering the questions, you can request one here or call Experian at 888-397-3742.
How can I answer the Experian questions more effectively?
-
You can request a copy of your credit report to assist with answering the questions by requesting one here or calling Experian at 888-397-3742.
-
The questions are based on your personal credit history and may involve details from your early credit history (as far as 20 years ago)
Why am I only allowed 3 attempts every 24 hours to complete identity proofing for EPCS?
© 2023 Experian. All rights reserved.
© 2023 Stripe, Inc.
Related Articles

