In order to electronically prescribe controlled substance medications in Elation, you must complete a series of registration steps via our third party EPCS provider, MDToolbox. Each prescriber is required to complete the signup process individually, as the Identity Proofing (IDP) is designed exclusively for the one prescribing, and the Two-Factor Authentication is unique and individual to each provider.
This process usually takes a total of 20 minutes of your time and involves going through Identity Proofing (IDP) with Experian, setting up 2-Factor Authentication Credentials, and setting up Access Controls. This article walks you through the entire sign up process in Elation and MDToolbox.
ℹ️
NOTE
Depending on what information is used to share your one-time 2-Factor Authentication code with you, this process may take 2-5 business days to complete. Please see
Step 3: Enter 2-Factor Activation Code for more information.
Additionally, other users in your practice may need to be involved for the final step, Access Control Permissions, depending on how many providers there are in your practice.
Before starting the EPCS Sign Up process, complete the following prerequisites:
| 1 | Confirm your name in Elation matches your legal name in your credit profile (e.g., personal credit cards and bills). If your name appears differently in your credit report, you will need to change your name in Elation to the name that appears on your credit report before proceeding with the MDToolbox sign up process, as identity proofing is based on the details of your credit report. After you complete EPCS Sign Up, you can change your name back to your preferred name.
To update your name in Elation:
| 1 | Sign in to your Elation account. | | 2 | Click on your email address at the top of your account and click Settings. | | 3 | Go to the Account Details section and click Edit Profile. | | 4 | Update your first, middle, and last name to the name that would appear on your credit report. | | 5 | Click Save to save your changes. | | 6 | Access the EPCS Sign Up window to push your updated name to MDToolbox. | | 7 | Complete EPCS Sign Up. | | 8 | Revert your name back to your preferred name in your Elation Settings once you have completed EPCS Sign Up. |
|
| 2 | Download the free VIP Access app from your smartphone’s app store (App Store, Google Play, etc.) to use as a software token for 2-Factor Authentication. It is the most convenient token option for providers who carry their smartphone daily. Search for “VIP Access” in your app store. The correct app has the following icon:

💡 USER TIPS
- To assist with security code entry when prescribing controlled substance medications in Elation, allow notifications in the VIP Access app to push notifications to your phone.
- If you prefer to use a key fob (hardware token), you do not need to download the VIP Access mobile app.
|
| 1 | Navigate to the top of your Elation account, click on your email address, and then click Settings. |
| 2 | On the left side of the settings page, click into the ePrescribing Controlled Substances (EPCS) section, and then click the Sign Up button.
 |
| 3 | A new tab will open in your web browser to bring you to the EPCS Sign Up window via MDToolbox, Elation’s third-party EPCS provider.
ℹ️ NOTE
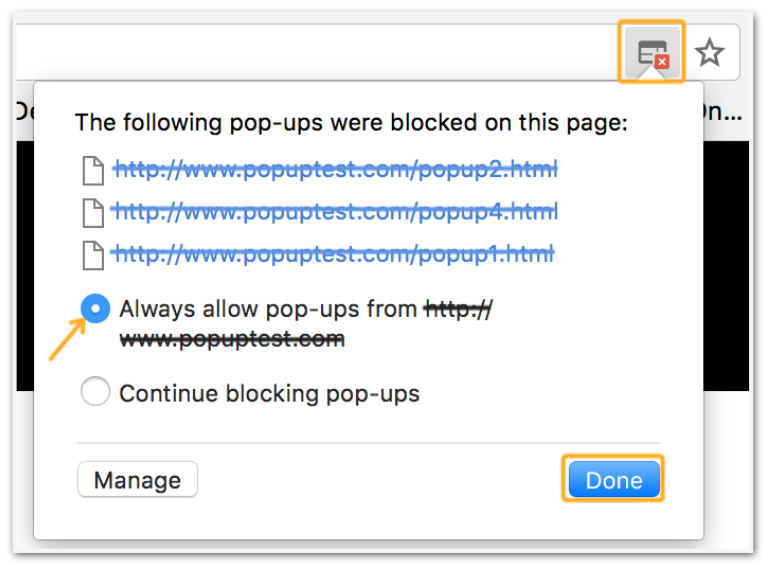
If a new tab does not open in your browser, it is most likely due to a Pop-up Blocker. If you see the icon with the little red X, click on the icon and select the Always allow pop-ups from... option.
 |
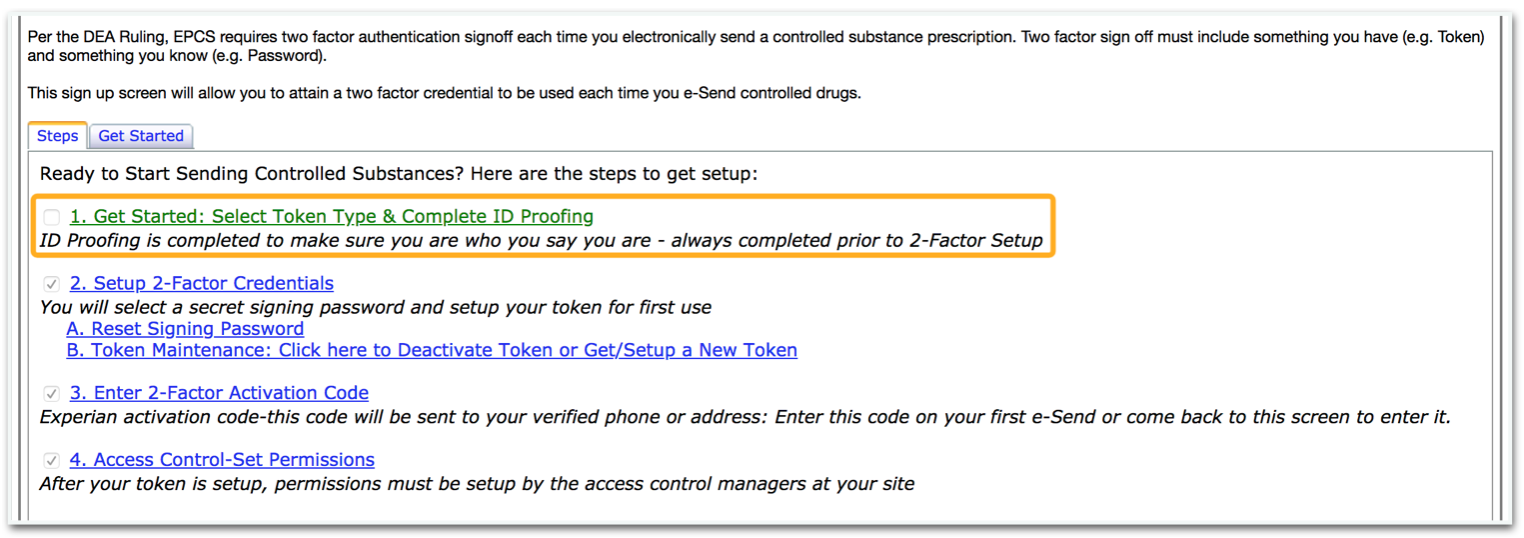
The EPCS Sign Up process consists of four steps. Complete them in order:
- Step 1: Get Started: Select Token Type & Complete ID Proofing
- Step 2: Setup 2-Factor Credentials
- Step 3: Enter 2-Factor Activation Code
- Step 4: Access Control: Set Permissions
Once you arrive on the EPCS Sign Up page, click Get Started: Select Token Type & Complete ID Proofing to proceed with the first step.
| 1 | Choose your preferred method of 2-Factor Authentication:
- If you prefer to use a smartphone app, select Software Token (VIP Access app). Elation recommends this option for easier access.
- If you prefer to use a physical Key Fob that will be mailed to your office, select Hardware Token.
- If you already have an existing approved token from a previous system, click I already have an approved token - ID Proof and Set it up to register it to your Elation EPCS account.
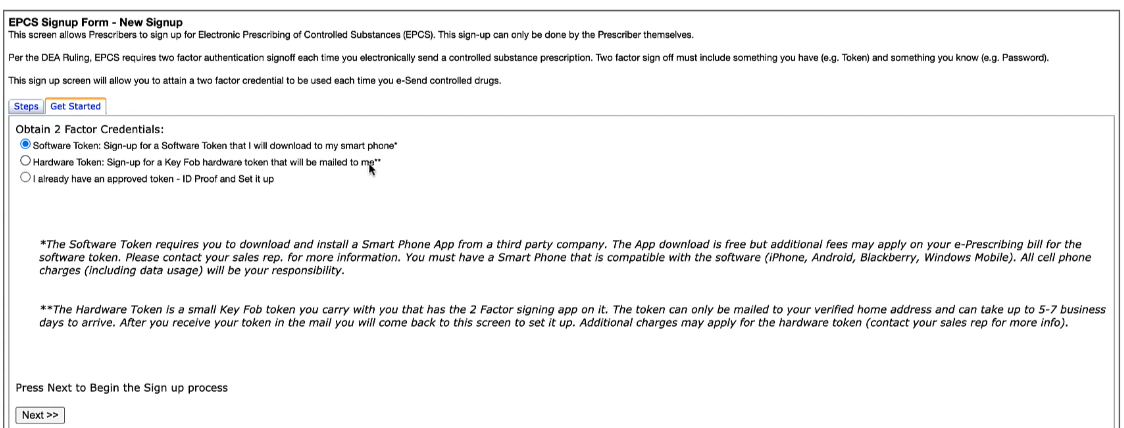 |
| 2 | After making a selection, click Next >> at the bottom of the page. |
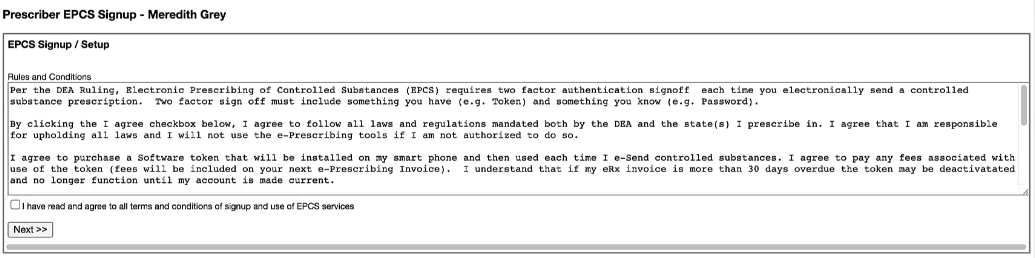
| 3 | The following page will ask you to read the terms of use for EPCS. Please read through the Rules and Conditions, select the I have read and agree... checkbox at the bottom, and click Next >>.
 |
After agreeing to the terms above, you will begin the Identity Proofing (IDP) process.
| 1 | Click Next >> on the ID Proof page to begin the identity proofing process and confirm your identity. |
| 2 | Complete Photo ID Verification. You will need to upload a valid driver’s license or passport and take a selfie to complete this step.
| a | Enter your birthdate in the birthdate field in the following format: MM/DD/YYYY. | | b | Select one of two options for what device you will be using to complete Photo ID Verification. Elation providers will generally select option A as they are completing EPCS sign up via their laptop/computer.
- A. ‘I am using a laptop/computer, give me a link I can open on my phone for taking pics’
- B. ‘I am logged in with my mobile device now (open camera)’
| | c | Click Next >>. | | d | Follow the instructions on the page to use your phone or other camera-enabled mobile device to take pictures of your driver’s license or passport and your face. An application called ‘docupass’ will load on your phone or mobile device to assist you. (If you need assistance with this step, reference the 3:20 to 5:12 timeframe in this video — the screen with the QR code will look slightly different but the instructions will be the same.)
On your phone or mobile device, complete the following steps in the docupass application:
| 1 | Tap Start Verification on your phone or mobile device. | | 2 | Tap Grant Permission to allow ‘docupass’ to access your camera.
💡 USER TIP Camera not working? If your camera does not activate or the docupass application cannot access your camera, try the following troubleshooting steps: On your mobile device (phone or tablet):
| 1 | Close your mobile browser completely. | | 2 | Go to your device’s Settings > Apps (or Applications) > select your browser > Permissions > enable Camera. | | 3 | If prompted by the browser, tap Allow when asked to grant camera access. | | 4 | Try a different browser (Chrome, Safari, or Firefox). | | 5 | Restart your device. | | 6 | Reopen your mobile browser and try again. |
On your computer (if using webcam):
| 1 | Check that your browser has camera permissions enabled:
- Chrome: Click the lock icon in the address bar > Site settings > set Camera to Allow.
- Safari: Go to Safari > Settings > Websites > Camera > Allow for the site.
- Firefox: Click the lock icon in the address bar > Connection secure > More Information > Permissions > Allow Camera.
| | 2 | Ensure no other application is using your camera. | | 3 | Try a different browser. |
If the issue persists after trying these steps, use a different mobile device to complete Photo ID Verification.
| | 3 | A preview window displaying your rear-facing camera will appear. Make sure you have good lighting and frame your ID. The app will automatically take a picture once it detects the ID. | | 4 | After the app takes a picture of your ID, confirm the information pulled from your ID:
- If the information matches your ID, tap Accept to continue.
- If the information does not match your ID, tap Back to scan your ID again.
| | 5 | A preview of your front-facing camera will appear. Place your face in the circle and follow the prompts at the bottom of the screen. The app will automatically take a picture once it detects your face. | | 6 | Once the selfie is taken, the app will confirm that all documentation has been accepted. You will see a message: ‘You have successfully completed identity verification process, you may now close this window.’ Tap OK to close the window.
💡USER TIP
If there were issues validating your documentation, you will see an ‘Oops... name verification failed’ message on your device. Tap Try Again to attempt Photo ID Verification again. You will need to get a new QR code by logging out of Elation and then logging back in to restart the EPCS Sign Up process.
|
| | e | Once you have successfully completed Photo ID Verification, go back to your laptop/computer and click I have completed PhotoCheck on my phone - NEXT >> to continue with the next steps of identity proofing. |
|
| 3 | Enter your personal information (not your business information) when filling out your personal details. The information entered will be used to generate your identity proofing questions based on your personal credit report from Experian.
💡 USER TIP Enter your home information. If you have recently moved and run into issues with the subsequent steps, enter your former address and try again. 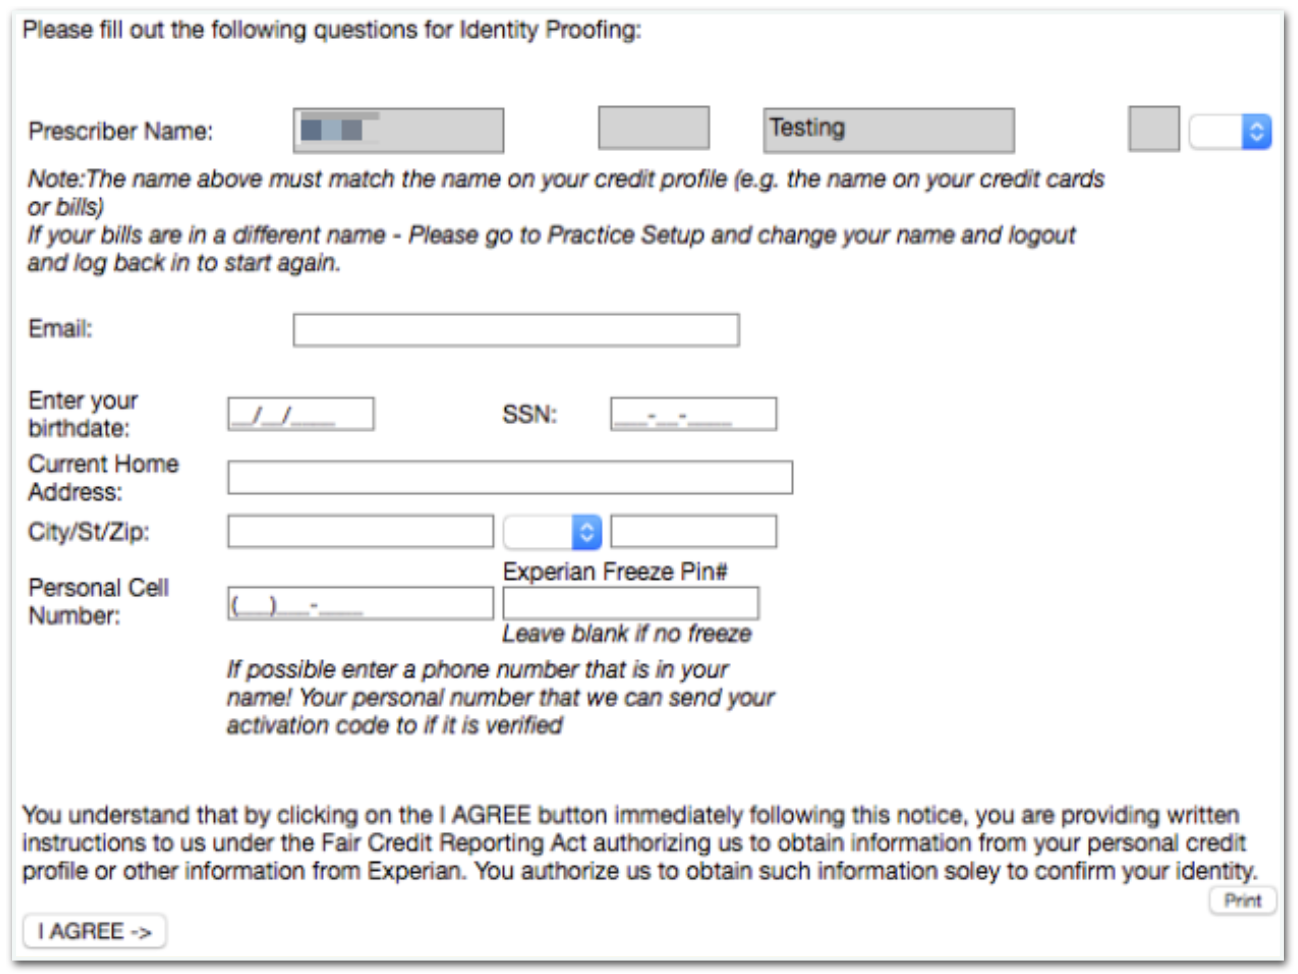
|
| 4 | Click I AGREE -> and you will be prompted to answer a series of questions based on your personal credit history. You have 5 minutes to answer these questions, and are given 3 attempts every 24 hours.
💡USER TIP
The questions will be based on your credit history according to the Experian database. If you need a copy of your credit report, you can request one here or call Experian at 888-397-3742. Once you have correctly answered all of the questions, click Submit to submit your answers. Here is an example of what the questions look like: 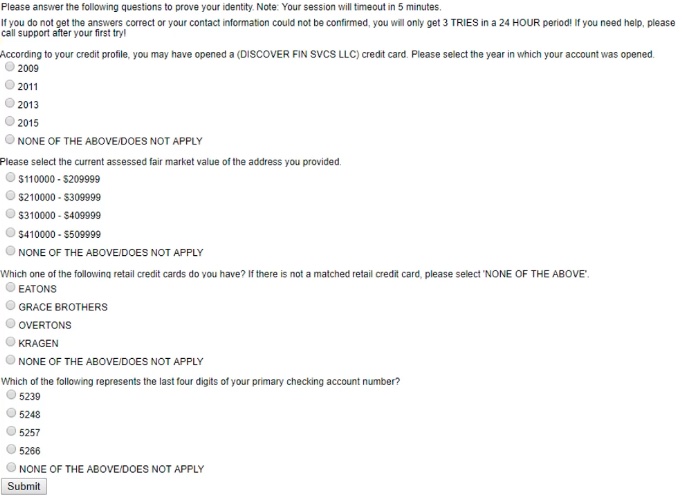
|
| 5 | (Conditional) You may be asked to answer a second set of questions based on your personal credit history. |
| 6 | Click Submit to submit your answers. After you have passed identity proofing, proceed to Step 2 to set up your 2-Factor Authentication. |
The DEA requires 2-Factor Authentication to ePrescribe each controlled substance. The first factor is a personal password (created during this step and referred to as a Token Password), and the second is a security code generated within the VIP Access App on your smartphone (software token) or on the key fob (hardware token). Follow the instructions below to set up both factors.
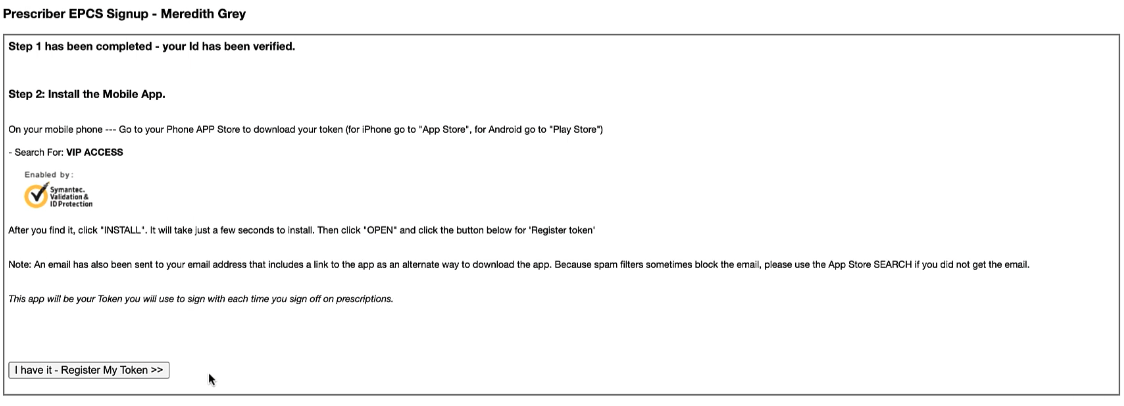
| 1 | Download the free VIP Access app from your smartphone’s app store (App Store, Google Play, etc.) if you chose to use a software token in Step 1. Search for “VIP Access” in your app store.
- The correct app has the following icon:
|
| 2 | After successfully downloading the app to your phone, click I have it - Register My Token on the EPCS Sign Up page to continue.
 |
| 3 | Enter a personal password in the Select a Token Password field that you can easily remember, as this will be used every time you ePrescribe a controlled substance. The password must be 6+ characters with at least one number or one symbol. |
| 4 | Enter the same password again in the Re-type your password field. |
| 5 | Open the VIP Access app on your smartphone. |
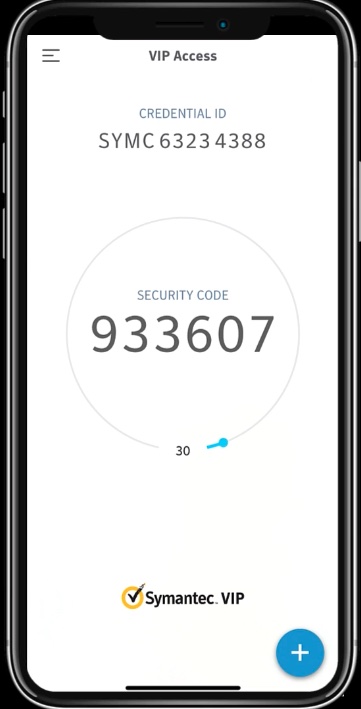
| 6 | Enter the Credential ID (including the four letters at the front of the ID) at the top of the app in the Credential ID field. |
| 7 | Enter the 6-digit Security Code that displays inside the circle on the VIP Access app in the Security Code field.
 |
| 8 | Click Register >>. |
| 9 | Click Finish/Close. |
Please reference this article from MDToolbox for more detail on how to set up your key fob.
| 1 | Once you have received your key fob, click Setup 2-Factor credentials to pick up where you left off in the sign up process. If you have left the session, you will need to complete ID Proofing again. |
| 2 | Click I have it – Register My Token to begin the key fob registration. |
| 3 | Enter a personal password in the Select a Token Password field that you can easily remember, as this will be used every time you ePrescribe a controlled substance. The password must be 6+ characters with at least one number or one symbol. |
| 4 | Enter the same password again in the Re-type your password field. |
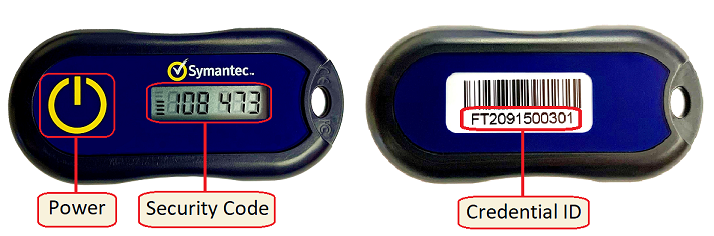
| 5 | Enter the Credential ID from the back of your key fob in box 3. |
| 6 | Enter the Security Code shown on the front of your key fob in box 4. To generate a code, press the Power button on the front of the key fob device. |
| 7 | Click Register >>. |
| 8 | Click Finish/Close. |

Experian will send a final one-time activation code to complete the prescriber verification process. This will be sent as an automated voice message to the Experian-verified phone number (home or smartphone) they have on file for you, OR by mail to your Experian-verified home address within 2 to 5 business days if they cannot reach you by phone.
If you are expecting a call and do not receive it within 5 minutes, please click I need help -> Contact Elation Support at the top of your Elation account, or fill out this form and a member of the Elation Team will reach out to MDToolbox to verify which method was used to deliver the activation code.
ℹ️
NOTE
MDToolbox can only call the Experian-verified phone number on file for you to supply the activation code. MDToolbox will not be able to tell us the exact phone number they called. If you need a copy of your credit report to verify which phone number MDToolbox has on file, you can request one
here or call Experian at 888-397-3742.
Once you receive your 7-digit activation code, enter it under step 3. Enter Your 2-Factor Activation Code and click Activate.
If you need to return to the EPCS Sign Up screen:
| 1 | Go to Settings >> ePrescribing Controlled Substances (EPCS) within Elation. |
| 2 | Click the Sign Up button to return to the EPCS Sign Up page. |
The Access Control Permissions setup workflow differs depending on your situation:
- Setting up Access Controls for the first time as the first provider
- Setting up Access Controls after the first provider
ℹ️
NOTEThe DEA requires that two users—a Provider Level User and a second Provider Level User or an Admin Level Staff User—are present in order to enable EPCS within Elation. This is a checks-and-balances system to ensure that any provider who is given EPCS permissions can legally prescribe controlled substance medications.
- Multi-provider practices: Best practice is to have the second person be another Provider Level User in your practice. You will need to assign them “Admin” level privileges, but this can be one-time only for purposes of completing EPCS sign up. You can revoke the “Admin” level privileges once you have completed EPCS sign up.
- Single-provider practices: We recommend one of the following:
- Use an existing staff user in your office as the second person. You will need to assign them “Admin” level privileges temporarily.
- If you do not have any existing Staff Level Users, ask a trusted friend or family member. Invite them to register for an Elation account and assign them “Admin” level privileges temporarily. You can disable their account immediately after completing EPCS sign up.
The steps in this section apply if your entire practice is new to Elation and this is the first time a provider in the practice is signing up for EPCS. Each provider should always complete Steps 1–3 in the EPCS Sign Up Process Guide first before setting up Access Control Permissions.
ℹ️
NOTE
Please note the user definitions for the workflow detailed in this section:
- First user = Provider signing up for EPCS
- Second user = Provider Level User who is assisting with sign up
- Must be an Admin Level User at the practice
- Will become an Access Control Manager by assisting with sign up
| 1 | Assign Admin level privileges to the second user (Provider Level User assisting with sign up) if they do not already have this permission.
- Go to Manage Accounts and click Make Admin next to the second user’s name.
|
| 2 | Ask the second user to log in to their Elation account. |
| 3 | Ask the second user to click on their email at the top of their Elation account and click Settings. |
| 4 | Ask the second user to click into the ePrescribing Controlled Substance (EPCS) settings section and click Access Controls. |
| 5 | The second user will then be brought to a page called EPCS Permissions— Logical Access Control Setup. |
| 6 | Under Grant Permissions, ask the second user to check off all of the following boxes next to your name:
- Access Control Manager?
- Authorization Verifier?
- Can Approve EPCS?
- Can Sign & Send?
|
| 7 | Under Grant Permissions, ask the second user to check off the following boxes next to their own name:
- Access Control Manager?
- Authorization Verifier?
|
| 8 | If the second user plans on signing up for EPCS at a later time, have them also check off the following boxes next to their own name:
- Can Approve EPCS?
- Can Sign & Send?
|
| 9 | Under Signoff & Save Permissions:
ℹ️ NOTE
Please note the following definitions for the Signoff & Save Permissions fields on the “EPCS Permissions— Logical Access Control Setup” page:
- First User (Prescriber w/ Token) = Provider signing up for EPCS
- Ask the second user to select your name in the dropdown for this field.
- Second User (Prescriber or Admin) = Access Control Manager (Admin Level User) assisting with sign up
- The second user’s name should already be filled in the dropdown for this field.
|
| 10 | Have the second user click Save and a new box will appear under the Second User (Prescriber or Admin) field prompting the second user to enter their email address. |
| 11 | Have the second user enter their email address and click Save. A box will pop up with a message: “Second User approval code has been sent to their email....” |
| 12 | Have the second user check their email inbox for an email with the subject line “EPCS Permission Request” from noreply@mdnotification.net. The body of the email will contain a 7-digit approval code. |
| 13 | Have the second user enter the 7-digit code in the Approval Code box that now appears under the Second User (Prescriber or Admin) field. |
| 14 | Have the second user click Save to save the approval code. |
| 15 | A box will pop up asking you (First User / the provider completing EPCS Sign Up) to enter your EPCS Token Password and Security Code. Enter this information and click Sign and Authorize to complete the final step. |
Congratulations on completing EPCS Sign Up! You can now close the MDToolbox tab in your web browser.
To ensure that everything has been set up properly, go to a patient’s chart and click Rx >> Controlled Substance Form. If the blue button now says ePrescribe, you’re good to go! Click here to view our how to e-Prescribe controlled substance guide.
| 1 | If you have a staff member with a Staff Level Elation account, assign them Admin level privileges if they do not already have this permission.
- Go to Manage Accounts and click Make Admin next to the user’s name.
|
| 2 | If you do not have any staff, ask a trusted friend or family member to assist you.
- Invite them to Elation by going to Manage Accounts >> + Invite Staff.
- Enter their name and email and then click Invite.
- Ask them to find the invitation in their email inbox and click Click here to complete your Registration.
- The invitation email will come from support@elationemr.com and will have the subject line ‘Your Elation Account is Ready!’
- Supply them with your practice’s fax number to complete registration.
|
| 3 | After registration, ask them to click on their email at the top of their account and click Settings. |
| 4 | Ask them to click into the ePrescribing Controlled Substance (EPCS) section and click Access Controls. |
| 5 | The Admin Level Staff User will then be brought to a page called EPCS Permissions— Logical Access Control Setup. |
| 6 | Under Grant Permissions, ask the Admin Level Staff User to check off all of the following boxes next to your name:
- Access Control Manager?
- Authorization Verifier?
- Can Approve EPCS?
- Can Sign & Send?
|
| 7 | Under Grant Permissions, ask the Admin Level Staff User to check off all of the following boxes next to their own name:
- Access Control Manager?
- Authorization Verifier?
|
| 8 | Under Signoff & Save Permissions:
ℹ️ NOTE Please note the following definitions for the Signoff & Save Permissions fields on the “EPCS Permissions— Logical Access Control Setup” page:
- First User (Prescriber w/ Token) = Provider signing up for EPCS
- Ask the second user to select your name in the dropdown for this field.
- Second User (Prescriber or Admin) = Admin Level Staff User assisting with sign up
- The second user’s name should already be filled in the dropdown for this field.
|
| 9 | Click Save and a new box will appear under the Second User (Prescriber or Admin) field prompting the Admin Level Staff User to enter their email address. |
| 10 | Have the Admin Level Staff User enter their email address and click Save. A box will pop up with a message: “Second User approval code has been sent to their email....” |
| 11 | Have the Admin Level Staff User check their email inbox for an email with the subject line “EPCS Permission Request” from noreply@mdnotification.net. The body of the email will contain a 7-digit approval code. |
| 12 | Have the Admin Level Staff User enter the 7-digit code in the Approval Code box that now appears under the Second User (Prescriber or Admin) field. |
| 13 | Have the Admin Level Staff User click Save to save the approval code. |
| 14 | A box will pop up asking you (the provider completing EPCS Sign Up / First User) to enter your EPCS Token Password and Security Code. Enter this information and click Sign and Authorize to complete the final step. |
Congratulations on completing EPCS Sign Up! You can now close the MDToolbox tab in your web browser.
To ensure that everything has been set up properly, go to a patient’s chart and click Rx >> Controlled Substance Form. If the blue button now says ePrescribe, you’re good to go! Click here to view our how to e-Prescribe controlled substance guide.
The steps in this section apply if another Provider Level User in the practice has already completed EPCS Sign Up. Each provider should always complete Steps 1–3 in the EPCS Sign Up Process Guide first before setting up Access Control Permissions.
There are three options available for necessary users present when setting up Access Controls when there are already two established Access Control Managers at a practice (one being a Provider Level User):
| Option 1 | Option 2 | Option 3 |
|---|
- One Provider Level User/established Access Control Manager
- One Staff Level User/established Access Control Manager
|
- Two Provider Level Users/established Access Control Managers
|
- Provider Level User signing up for EPCS
- Provider or Staff Level User/established Access Control Manager
|
| *Utilize the steps detailed below. | *Utilize the steps detailed below. | *Utilize the steps detailed for setting up a Provider Level User for the first time in a multi-provider practice if only these users are present. |
| 1 | Ask any established Access Control Manager to log in to their Elation account. |
| 2 | Ask the Access Control Manager to click on their email at the top of their Elation account and click Settings. |
| 3 | Ask the Access Control Manager to click into the ePrescribing Controlled Substance (EPCS) settings section and click Access Controls. |
| 4 | The Access Control Manager will then be brought to a page called EPCS Permissions— Logical Access Control Setup. |
| 5 | Under Grant Permissions, ask the Access Control Manager to check off all applicable boxes next to your name. (At a minimum, Provider Level Users must have ‘Can Approve EPCS?’ and ‘Can Sign & Send’ checked off in order to send electronic controlled substance medications via Elation.)
- Access Control Manager?
- Authorization Verifier?
- Can Approve EPCS?
- Can Sign & Send?
|
| 6 | Under Signoff & Save Permissions:
- For the First User (Prescriber w/ Token) field, ask the Access Control Manager to select the name of the other Access Control Manager (must be a Provider Level User, usually already signed up for EPCS).
- For the Second User (Prescriber or Admin) field, the original Access Control Manager’s own name should already be filled in.
|
| 7 | Have the Access Control Manager click Save. A prompt will appear asking the Access Control Manager to approve their own changes. Have the Access Control Manager click OK to continue. |
| 8 | A box will pop up for the First User (the other Access Control Manager / Provider Level User) to enter their EPCS Token Password and Security Code. Have the First User enter this information and click Sign and Authorize to complete the final step. |
Congratulations on completing EPCS Sign Up! You can now close the MDToolbox tab in your web browser.
To ensure that everything has been set up properly, go to a patient’s chart and click Rx >> Controlled Substance Form. If the blue button now says ePrescribe, you’re good to go! Click here to view our how to e-Prescribe controlled substance guide.
If you are the only provider in your practice and you do not have any staff, we recommend asking a trusted friend or family member to be a temporary Access Control Manager. You will need to invite them to register for an Elation account and assign them “Admin” level privileges, but this will only be temporary and you can disable their account (and access) immediately after you have completed EPCS Sign Up.
If your name appears differently in your credit report, you will need to change your name in Elation to the name that appears on your credit report before proceeding with the MDToolbox sign up process, as identity proofing is based on the details of your credit report. After you complete EPCS Sign Up, you can change your name in Elation back to your preferred name.
To update your name in Elation:
| 1 | Sign in to your Elation account. |
| 2 | Click on your email address at the top of your account and click Settings. |
| 3 | Go to the Account Details section and click Edit Profile. |
| 4 | Update your first, middle, and last name to the name that would appear on your credit report. |
| 5 | Click Save to save your changes. |
| 6 | Access the EPCS Sign Up window to push your updated name to MDToolbox. |
| 7 | Complete EPCS Sign Up. |
| 8 | Revert your name back to your preferred name in your Elation Settings once you have completed EPCS Sign Up. |
I did not receive a phone call with my activation code. What should I do?
If you are expecting a call and do not receive it within 5 minutes, please click I need help -> Contact Elation Support at the top of your Elation account, or fill out this form and a member of the Elation Team will reach out to MDToolbox to verify which method was used to share the activation code with you. If the activation was shared via a phone call, we will ask them to call you again.
ℹ️
NOTE
MDToolbox can only call the Experian-verified phone number on file for you to supply the activation code. MDToolbox will not be able to tell us the exact phone number they called. If you need a copy of your credit report to verify which phone number MDToolbox has on file, you can request one
here or call Experian at 888-397-3742.
Make sure to include the four letters ahead of the Credential ID. In the example below, the Credential ID is SYMC63234388.
What should I do if I see an EPCS code mismatch error when prescribing?
If you see an EPCS code mismatch when attempting to prescribe controlled substances, this may mean the Credential ID registered in your EPCS account does not match the Credential ID on your current token (VIP Access App or key fob).
To resolve this issue:
| 1 | Go to Settings → ePrescribing Controlled Substances (EPCS) → Update Token/Password. |
| 2 | Confirm the Credential ID displayed in your VIP Access App (including the four letters before the numbers) or on the back of your key fob matches what is registered in your EPCS account. |
| 3 | If the Credential IDs do not match, update your token registration. Follow the steps in the EPCS Guide - Updating your EPCS Token or password article to register your current token. |
| 4 | If you recently changed phones or devices, deactivate the token on your old device and register the token on your new device by following the steps under Setup a New Phone in the Update Token/Password workflow. |
If the issue persists after updating your token:
Contact Elation Support by clicking I need help → Contact Elation Support at the top of your Elation account. When reaching out, please provide:
- The name of the provider experiencing the issue
- The exact error message text you are seeing
- A screenshot of the error (do not include any patient information in the screenshot)
- If possible, the Credential ID in settings and your VIP Access App or key fob
The Support team will verify your account configuration and follow up with next steps, which may include scheduling a screenshare to troubleshoot further.

