Contents
Important Note: The Workspaces feature is a product for Premium EHR customers only. If you are interested in upgrading to the Premium EHR subscription to use this feature, click the "I need help" button to notify Elation and a member of the Elation Team will reach out to assist you.
The Workspace feature allows a single Elation practice/organization to utilize a single Elation instance (login) to house specific teams and/or relevant resources across the organization. Customers within a single practice can add a flexible organizational layer (known as Workspaces in Elation) to the Elation ‘practice’ concept enabling them to deploy specific settings, resources, and configurations to different members of their organization based on different operational scenarios such as practice locations, clinical focus or role-specific responsibilities.
With the Workspaces feature, customers can create a Workspace and utilize Elation’s User Group functionality to segment users by designated operational scenarios. Afterwards you can specify which User Groups can access which Workspace and customize the following settings & resources for each Workspace:
- Settings
- Resources
- People List
- Practice Locations
- Print Headers
- Lab Accounts
- Fax Lines
- Templates
- Physical Exam (PE)
- Review of Systems (ROS)
- Letter & Referral
- Visit Note
The Workspaces feature is valuable for practices that:
- have multiple practice locations (or time zones) where patients, clinical providers and staff are shared
- have various clinical focuses that involve different resources such as Lab Accounts and Templates
- have segmented responsibilities across different teams
With the Workspaces feature, each user is allocated the resources and configurations that are relevant to their day to day needs. As your organization continues to grow and scale, you can easily add new individuals to existing Workspaces and individuals can continue to keep their focus centered on the relevant needs for their role.
Important Notes:
- Providers will always have access to their Calendars
- Users will always have access to their preferred Print Header if one is selected
The Workspaces feature is a product for Premium EHR customers only. If you are interested in upgrading to the Premium EHR subscription to use this feature, click the "I need help" button to notify Elation and a member of the Elation Team will reach out to assist you.
Once the Workspaces feature is enabled, the feature will be available for configuration for Admin Level Users in the Elation Settings under “Workspaces”.
Only Admin Level Users in Elation can configure Workspaces and User Groups (another essential feature for Workspaces). Admin level users do not need to be a member of any Workspace in order to configure its settings and resources.
Follow the instructions in the different sections below to configure your Workspace.
To create a Workspace, Admin level users can
- Go to “Settings” -> “Workspaces”
- Click the “+ Add Workspace” button
- Enter a name for the “Workspace”
- Click “Save”
Once a workspace has been created, you can configure the following settings & resources below.
Each Workspace can have its time stamps displayed based on one specific Time Zone. Select the Time Zone for a Workspace by clicking on the Time Zone dropdown. The selected time stamp displays on the Elation Calendar and on all records in the Workspace, such as visit notes, lab orders, provider letters, and more.
Each Workspace must be allocated towards specific members of the practice. The Workspace feature uses Elation’s existing User Group feature to allow you to separate specific members of your practices into groups and assign specific groups to specific Workspaces. Only members of the User Group(s) selected will see the allocated resources as assigned to that Workspace. To create additional User Groups, follow the instructions in this article.
To add a User Group to a Workspace:
- Click the “+ Add User Group” button
- Search for and select the User Group(s) you want to add to the Workspace
Important Note: To add new users to an existing Workspace, all you have to do is add them to one of the User Groups that is already assigned to the Workspace.
The People List resource uses Elation’s User Group feature to separate users into groups. The People List resource allows you to select which Provider Level Users will appear for selection when Workspace users view Provider Calendars and schedule appointments or select Provider Level Users in demographics or visit notes. The People List resource allows you to configure which User Groups and associated individual users (both Provider Level and Staff Level) would be available as contacts for Office Messages within the Workspace. By default, all Provider Level Users will appear in the Calendar, appointments, demographics, visit notes and Office Messages and all users will appear for Office Messages unless a User Group is selected.
-
Important Notes:
- Certain Workspace users may only have access to a Provider List setting in this section. This was the initial form of this feature when the Workspace feature was first created. The Provider List setting only controls which Provider Level Users appear in the Provider menu in the Calendar and in appointments. If you do not see the People List setting, click the "I need help" button to notify us and a member of the Support team will enable the People List setting for you.
- Once the People List setting is enabled for you, please review your User Groups and People List settings to ensure the correct users appear for selection for Calendars, and appointments, demographics, visit notes and Office Messages.
- If you are using the newest Office Messages features, it is especially important to make sure the correct users appear in your Workspace User Groups so that the appropriate recipients appear for selection when writing Office Messages.
To allocate specific users:
- Click the “Only show 0 of…” option
- Click the “+ Add User Group” button
- Search for and select the User Group(s) you want to add to the People List resource
The Locations resource allows you to set which Practice Locations will be visible within the Workspace. By default, all Practice Locations will be allocated to a Workspace.
To allocate specific Practice Locations:
- Click the “Only show 0 of…” option
- Click “ + Add Service Location”
- Search for and select the Practice Location(s) you want to add to the Workspace
The Print Headers resource allows you to set which Print Headers are visible within the Workspace. If you have selected a default Print Header prior to being added to a Workspace, that default Print Header will appear for selection along with the Workspace allocated Print Headers. By default, all Print Headers are allocated to a Workspace.
To allocate specific Print Headers:
- Click the “Only show 0 of…” option
- Click “+ Print Headers”
- Search for and select the Print Header(s) you want to add to the Workspace
Important Note: Users will always have access to their preferred Print Header if one is selected, even if the Print Header is not allocated to the Workspace they are in.
The Lab Accounts resource allows you to specify which Lab Accounts can be selected when creating Lab Orders. By default, all Lab Accounts are allocated to a Workspace.
To allocate specific Lab Accounts:
- Click the “Only show 0 of…” option
- Click “+ Lab Account”
- Search for and select the Lab Account(s) you want to add to the Workspace
Fax Lines The Fax Lines resource allows you specify which Fax Inboxes (tied to fax lines) are allocated to a Workspace. By default, all Fax Inboxes are allocated to a Workspace. To allocate specific Fax Inboxes,
- Click the “Only show 0 of…” option
- Click “+ Fax Line”
- Search for and select the Fax Line you want to add to the Workspace
You can allocate the following templates to Workspaces:
- Letter & Referral
- Visit Note
- Physical Exam (PE)
- Review of Systems (ROS)
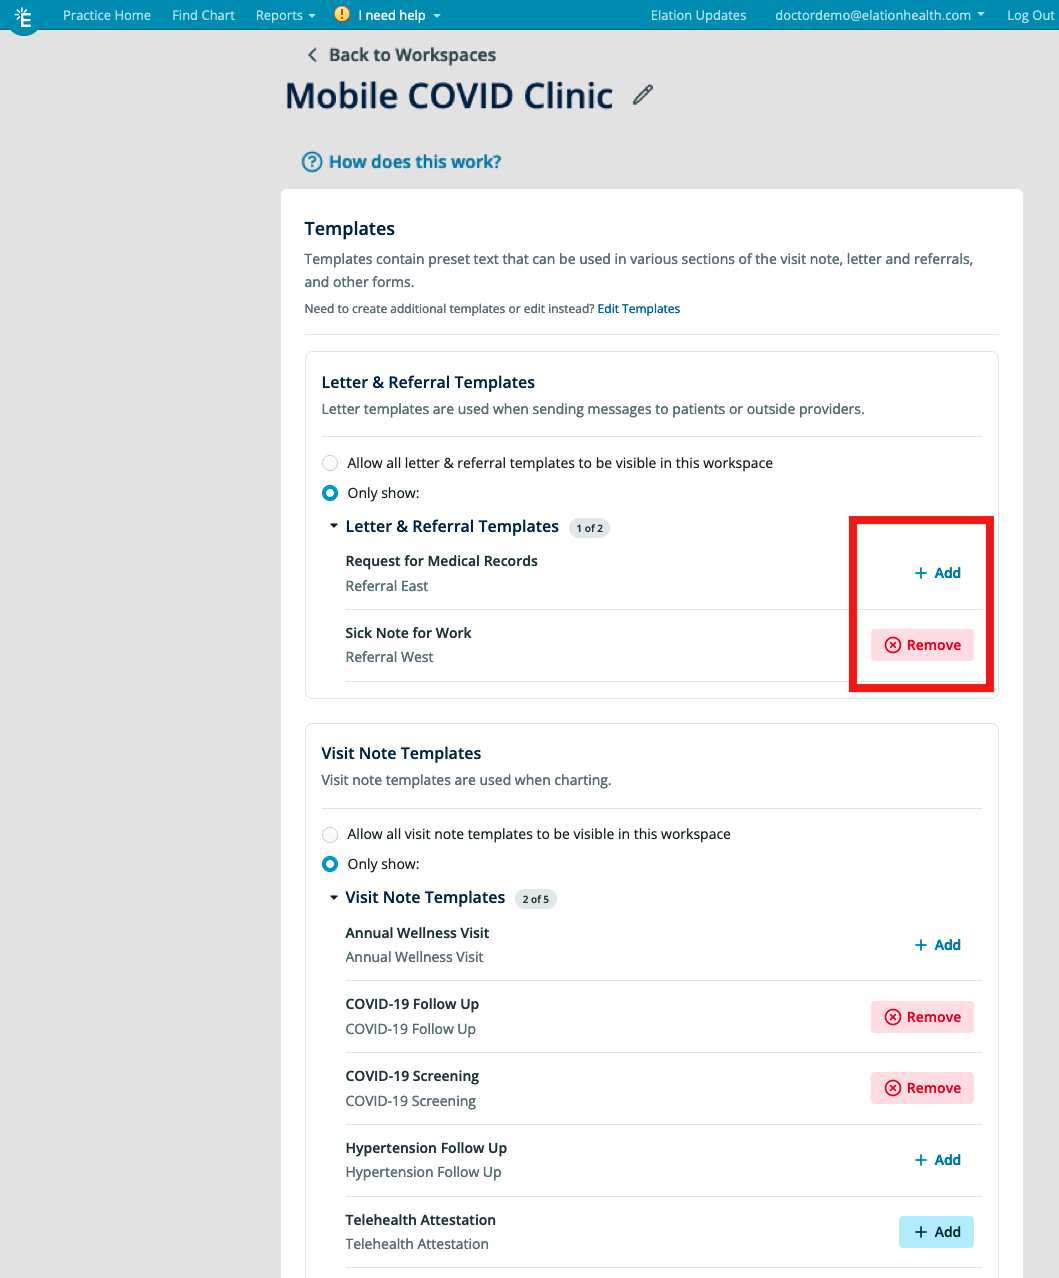
By default, all templates in each category are allocated to a Workspace. To allocate specific templates:
- Click the “Only show:” option next to the category you want to limit
- Click the “+ Add” button next to the template name to allocate it the Workspace
To add new users to an existing Workspace, all you have to do is add them to one of the User Groups assigned to the Workspace. To add new users to a User Group:
- Have an Admin level user go to “Settings” -> “User Groups”
- Click the “edit” button next to the User Group
- Search for the name of the new user & select their name from the dropdown to add them to the User Group
- Click “Save” to save your changes
Important Note: Take caution when modifying active Workspaces. If you make any adjustments to resources within a Workspace, the change will take effect the next time any user in the Workspace reloads the Practice Home, reloads a patient chart or prints any records.
To modify a Workspace:
- Have an Admin level user go to “Settings” -> “Workspaces”
- Click the “pencil” icon next to the name of the Workspace
- Click the “X” button next to resources to remove them from the Workspace
- Click the “+ Add” buttons to add resources to Workspaces
Important Note: Take caution when removing users from a Workspace, especially if the user is logged in to Elation. When you remove a user from a Workspace, the change will take effect the next time the user reloads the Practice Home, reloads a patient chart or prints any records.
To remove users from an existing Workspace, all you have to do is remove the user from the User Group they are in that is assigned to the Workspace or remove the entire User Group from the Workspace.
To remove users from a User Group:
- Have an Admin level user go to “Settings” -> “User Groups”
- Click the “edit” button next to the User Group
- Click the “X” button next to the user’s name
- Click “Save” to save your changes
To remove a User Group from a Workspace:
- Have an Admin level user go to “Settings” -> “Workspaces”
- Click the “pencil” icon next to the name of the Workspace
- Go to the User Access resource setting
- Click the “X” button next to the User Group you want to remove
Important Note: Take caution when deleting a Workspace. When you remove a Workspace, the change will take effect the next time the user reloads the Practice Home, reloads a patient chart or prints any records.
To delete a Workspace
- Have an Admin level user go to “Settings” -> “Workspaces”
- Click the “delete” icon next to the name of the Workspace you want to delete
- Click “Yes” once you are ready to delete the Workspace
When a user is added to a workspace, they will immediately be brought into the Workspace, whenever they reload their Practice Home page or a Patient Chart, and will be able to see all Workspace specific settings & resources.
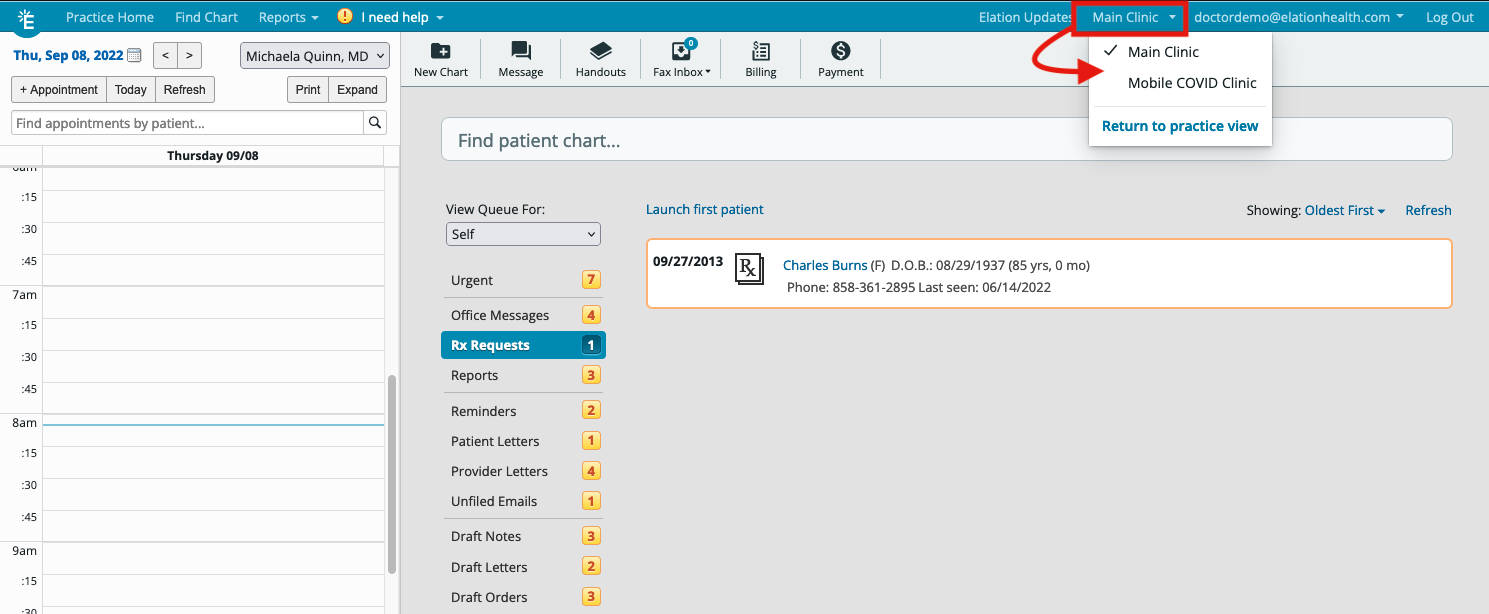
If a user is in multiple Workspaces, they can click on the Workspace dropdown next to their email in the blue navigation bar at the top of Elation to switch between Workspaces.
-
Important Note: The "Return to practice view" option allows users to see all resources within their EHR regardless of which Workspace(s) they belong to. The "Return to practice view" option is only available for
Admin Level Users.
The following article lists a few common use cases for Workspaces and guides you on how to set up your Workspaces based on the use case: Workspaces Guide- Common Use Cases
Will I see all patients after being added to a Workspace or only a subset of patients?
Patients are not tied to the Workspaces feature. This means that all users in all Workspaces will see the entire patient panel.
I am not seeing the correct resources in my Elation account after being added to a Workspace. What should I do?
If you are not seeing the correct resources in your Elation account after being added to a Workspace, this usually means one of two things:
- The correct resources were not allocated to the Workspace you are in. If you are an Admin for the Workspace (or you can ask the Admin for assistance), adjust the resources for the Workspace by following these steps:
- Go to “Settings” -> “Workspaces”
- Click the “pencil” icon next to the name of the Workspace
- Click the “X” button next to resources to remove them from the Workspace
- Click the “+ Add” buttons to add resources to Workspaces
- You were added to the wrong Workspace. If you are an Admin (or you can ask the Admin for assistance), adjust the User Group(s) you belong to that is tied to the Workspace you should be in by following these steps:
- Go to “Settings” -> “User Groups”
- Click the “edit” button next to the User Group you do not belong to
- Click the “X” button next to your name to remove yourself from the User Group
- Click “Save” to save your changes
- Click the “edit” button next to the User Group you should belong to
- Search for your name and select your name from the dropdown to add yourself to the User Group
- Click “Save” to save your changes
Will I be able to allocate other resources to Workspaces in the future (i.e. Rx Templates, Lab Order Sets, etc)?
Yes, Elation plans to continuously add additional resources to Workspaces as we expand on the feature. Elation will notify you as additional settings or resources become available.
I want my staff to have access to all items available within a resource. What is the difference between using "Allow all" versus select "Only show" and I select everything?
When using "Allow all", any items added to the resource in the future will also automatically be shared with members of the Workspace.
If you choose "Only show", new items added to the resource in the future will not be shared with members of the Workspace.
Related Articles

