Contents
The Fax Inbox is a repository of
- all faxes that are received by your assigned electronic Elation fax number
- any documents you upload to your Fax Inbox
- any reports that are re-filed from a patient's chart in Elation
As a medical practice, you receive a lot of reports and records for various patients. To assist you with keeping all of your patients' records as electronic records, Elation provides each customer with their own electronic Elation fax number when they begin using Elation EHR. As best practice, we recommend routing all your faxes to your Elation fax number. This will convert all your faxes to electronic records that can then be filed into your patients' charts and will eliminate any physical paperwork.
Elation provides each customer with their own electronic Elation fax number when they begin using Elation EHR. You can reference your Elation fax number at any time by clicking on the "Fax Inbox" button at the top of your Practice Home. The 10 digit number is your practice's Elation fax number.
 Automatic options
There are two options for converting your paper faxes into electronic records. With either option, all faxes to your practice will route to your Fax Inbox.
- Setting up fax forwarding from your landline fax number to forward faxes to the electronic Elation fax number.
- Updating your business details to advertise the Elation fax number as your new business fax number.
Important Note: Elation can port your existing landline fax number to Elation's ownership so that your existing landline fax number becomes your Elation fax number. If you are interested in porting your fax number to Elation, click the "I need help" -> "Contact Elation Support" button to submit a request to the Elation Support Team.
Manual options
If you have a physical fax machine in your office and you do not want to set up fax forwarding from your landline fax number to your electronic Elation fax number, you can use your physical fax machine to send faxes to your electronic Elation fax number as if the fax machine was a scanner.
If you have a scanner that scans documents to your computer, you can also
upload the document from your computer to the Fax Inbox to file it into a patient's chart or upload the document directly to the patient's chart using the
drag and drop feature.
The Fax Inbox is located at the top of your Practice Home. The number in the bubble tells you how many pages of documents are in your Fax Inbox at any given time. Clicking the "Fax Inbox" button will also show you a breakdown of how many pages are in each section of the Fax Inbox.
The Fax Inbox is typically divided into two sections.
- The first section, usually labeled Incoming Documents, houses all faxes received by your Elation fax number.
- The Unfiled Images section typically houses any reports that are re-filed from a patient's chart in Elation.
The top of each section of the Fax Inbox has shortcut buttons for you to:
- sort documents by newest first or oldest first; the default is oldest first
- see recently deleted faxes (and restore them if needed)
- upload documents from your computer to the Fax Inbox
Important Note: You can optionally
configure a setting to default your fax sorting to "Newest" or "Oldest" first.
Documents are grouped by fax transmission or grouped together if they came from the same report/record. The title of each listing is either the fax number of the sender (if available) for faxed documents or the name of reports. You will see the number of pages of each listing along with the date and time the documents reached the Fax Inbox. Within each document listing, only the first 5 images are shown by default. If there are additional pages, click on the "More" button to see the next 5 images within that listing.
Click the "Recently Deleted" button at the top of the
Fax Inbox to see all the recently (last 7 days) deleted faxes. Once you find the pages you want to restore, select all the pages and then click the "Restore" button at the top of the listing. Afterwards, click the "Recently Deleted" button again to return to the main
Fax Inbox.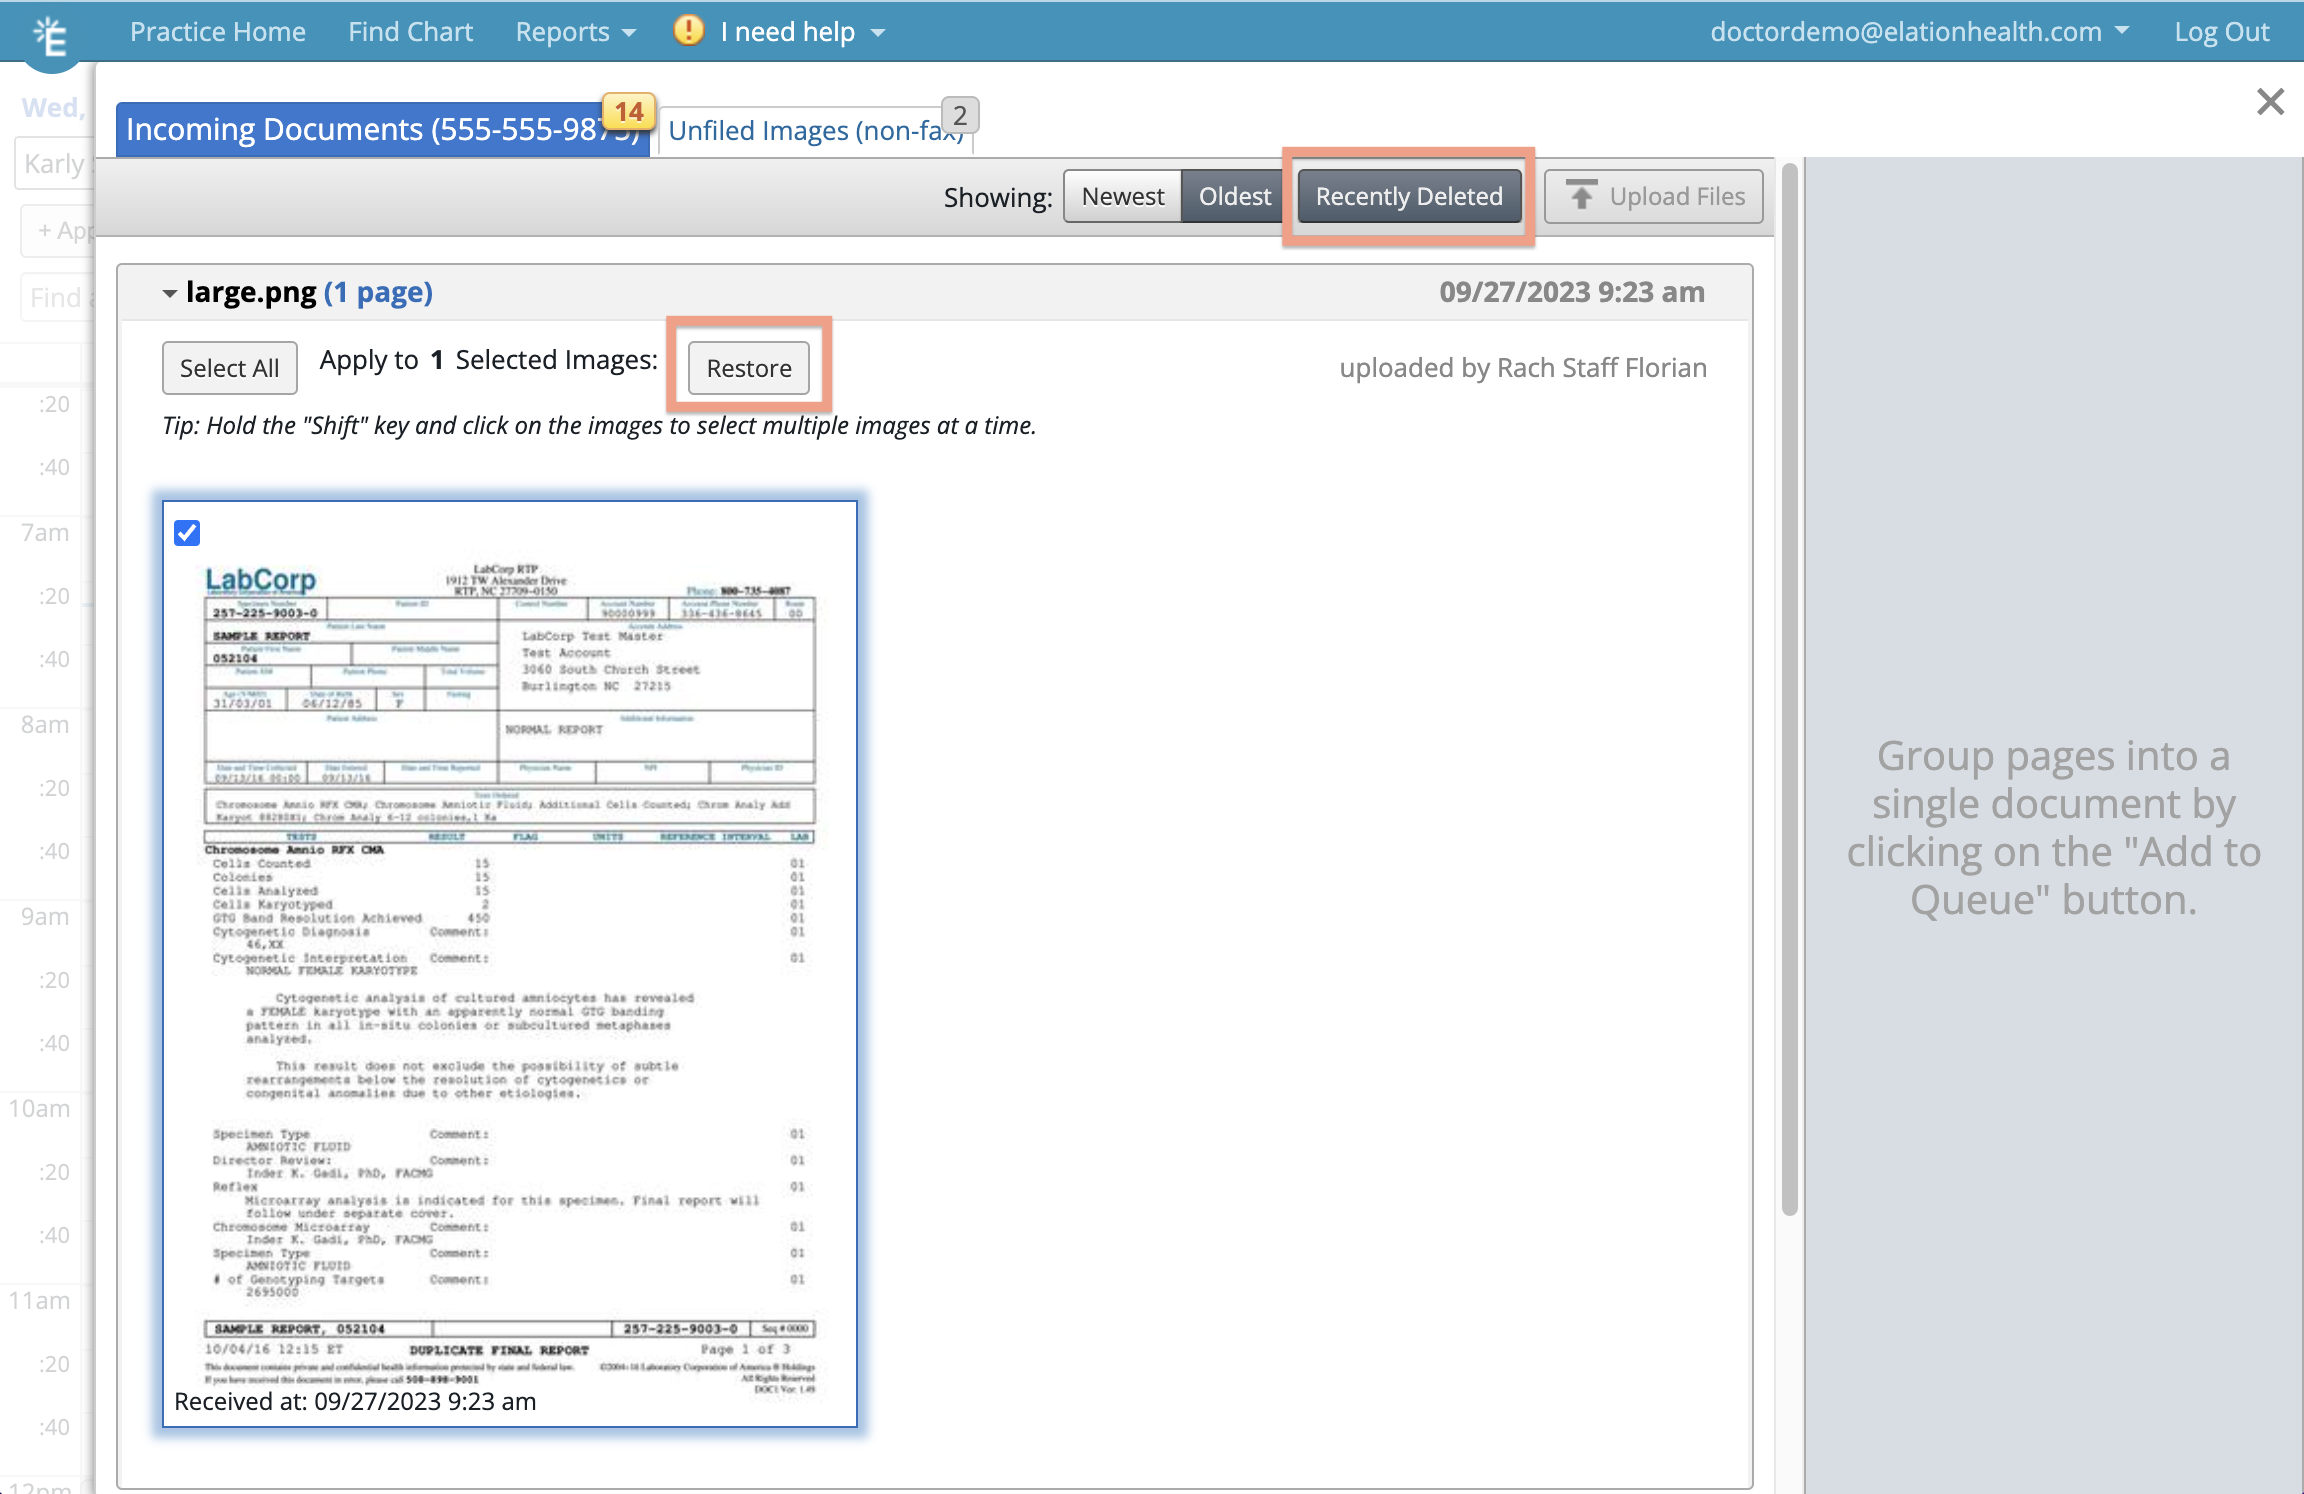
Clicking on the title of a listing will expand or collapse the documents in the listing. When expanded, you will see
- the first 5 images of the document. If there are additional pages, click on the "More" button to see the next 5 images within that listing.
- a toolbar at the top listing different actions you can take on all documents in that listing. You can select all images, rotate selected images, add selected images to the filing queue or delete the selected images. Selected images will have a blue shadow and you will see a check mark in the corner of the image.
- options to take actions on individual images by clicking the "Add to Queue" or "Actions" button in the image.
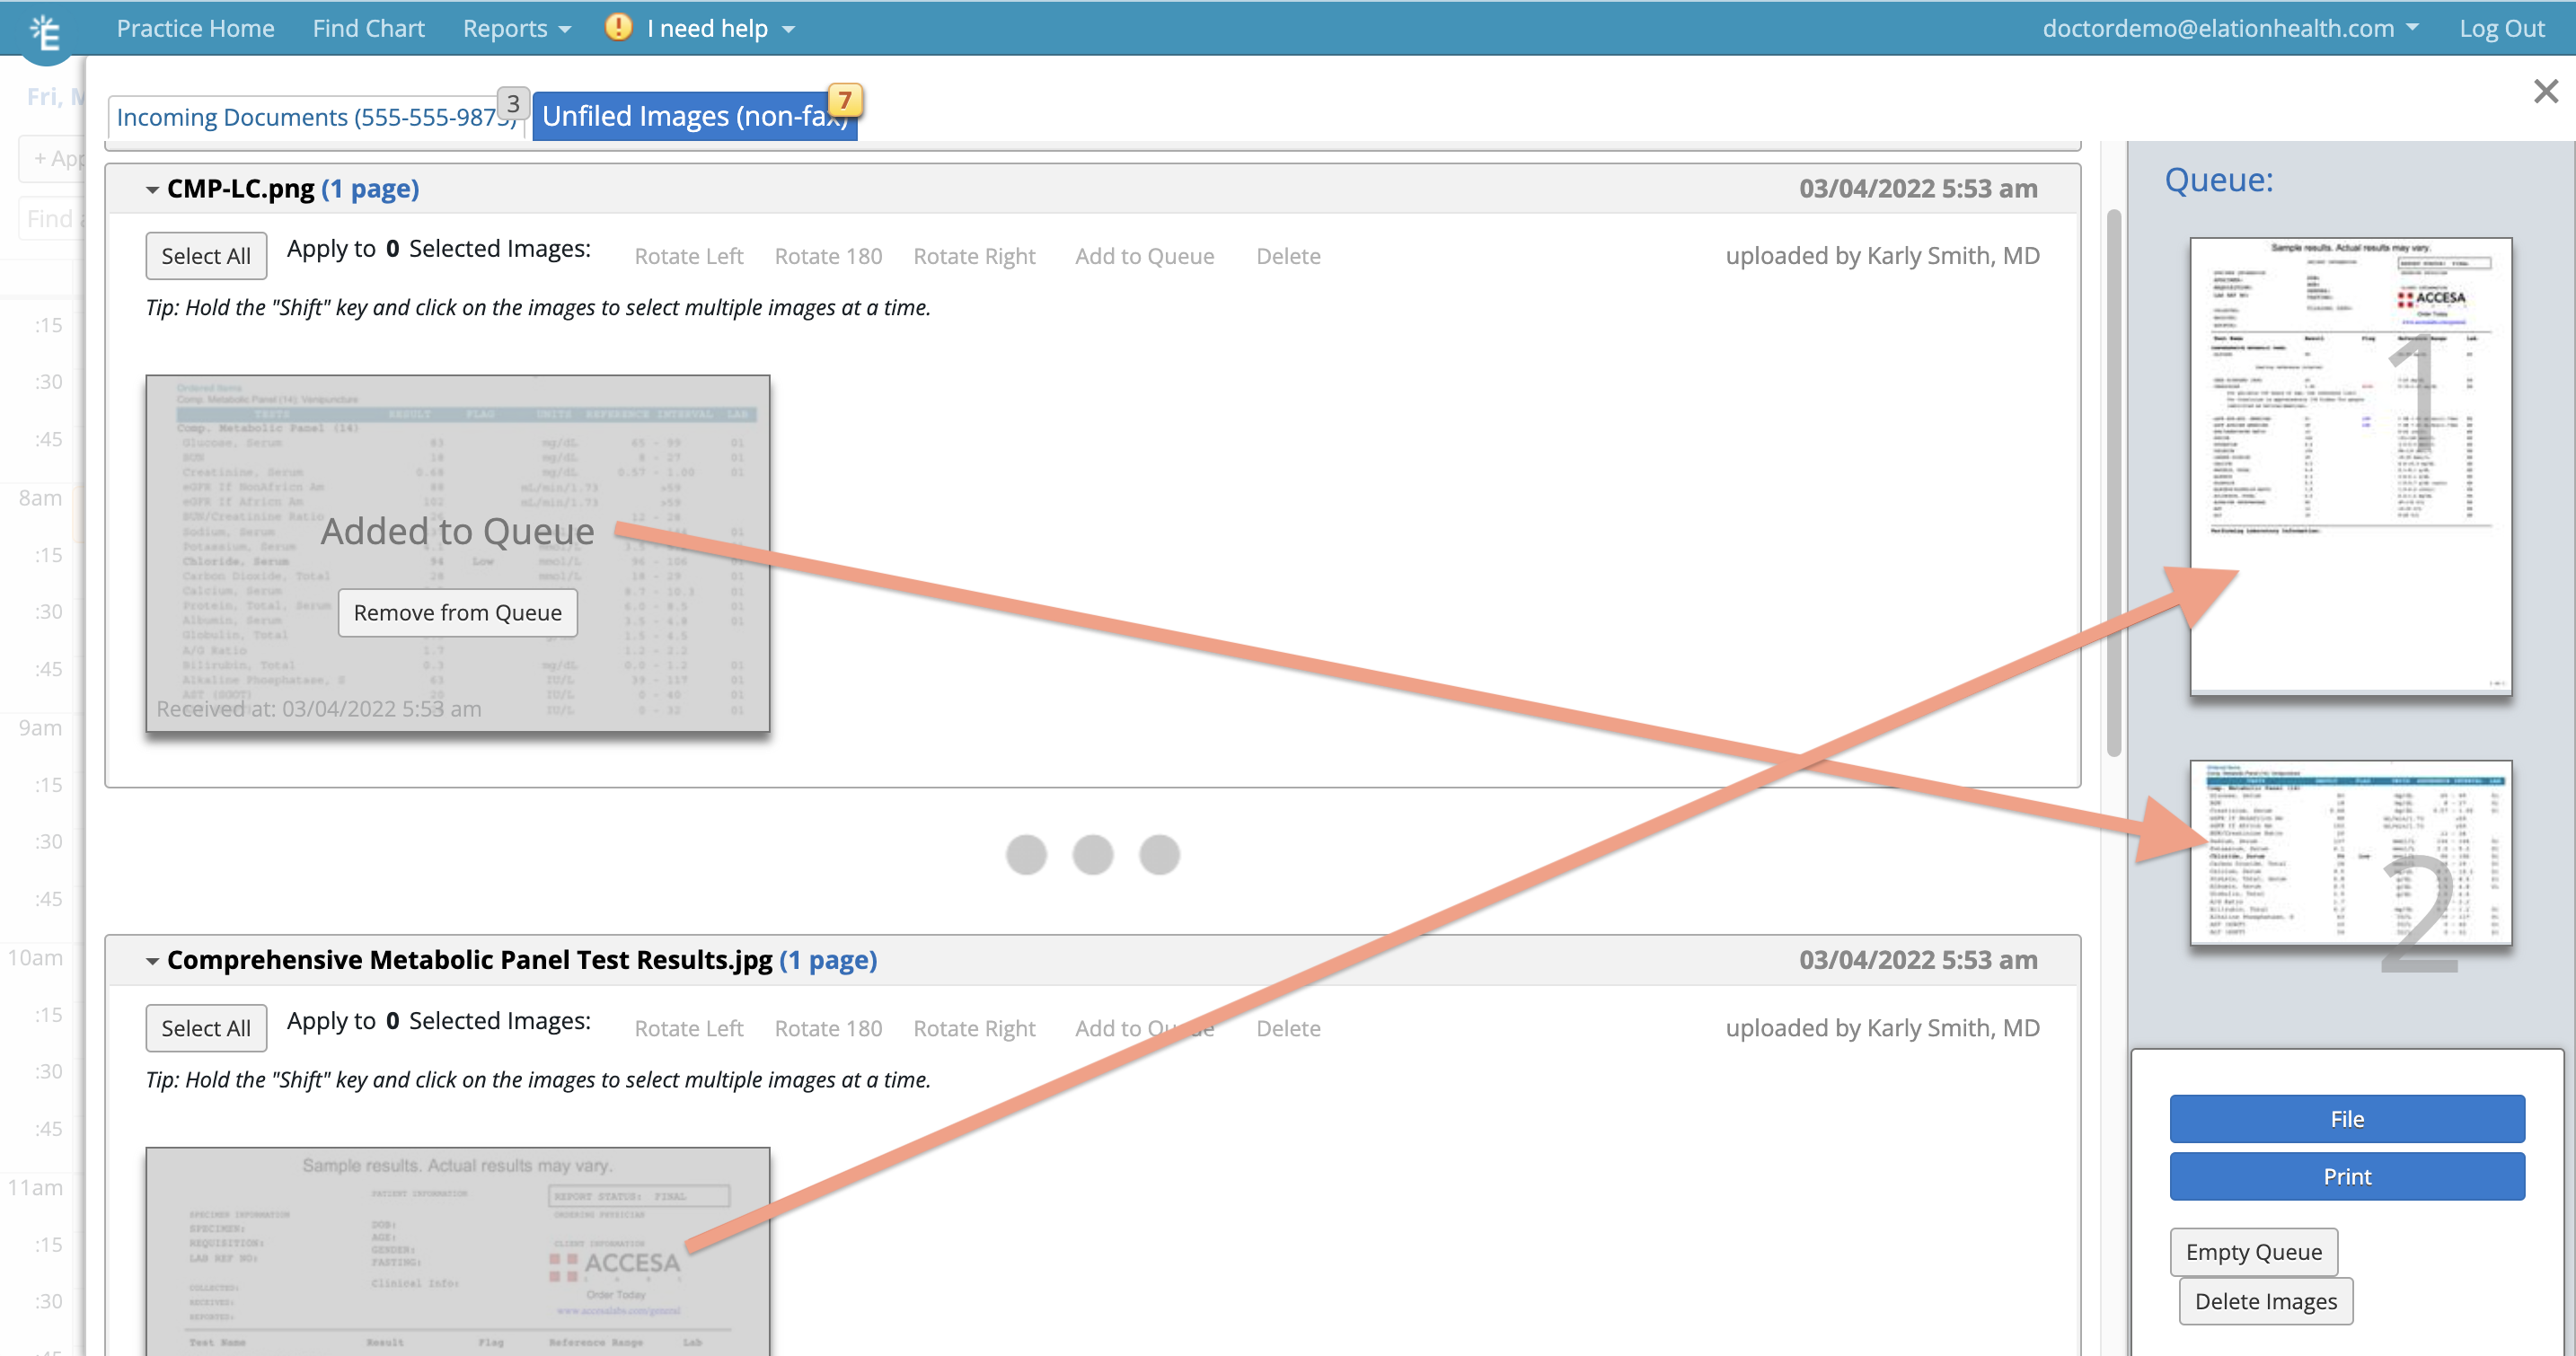
When you are ready to file certain pages of a document, click the "Add to Queue" button to add those pages to the filing queue. In the filing queue you can:
- click & drag pages up and down the queue to re-order them
- click "Remove From Queue" to remove specific pages from the filing queue
- click "File" to begin filing all the pages into a patient's chart
- click "Print" to print all the pages in the queue
- click "Empty Queue" to remove all pages from the filing queue - images will be placed back in the Fax Inbox
- click "Delete Images" to delete all the images in the queue
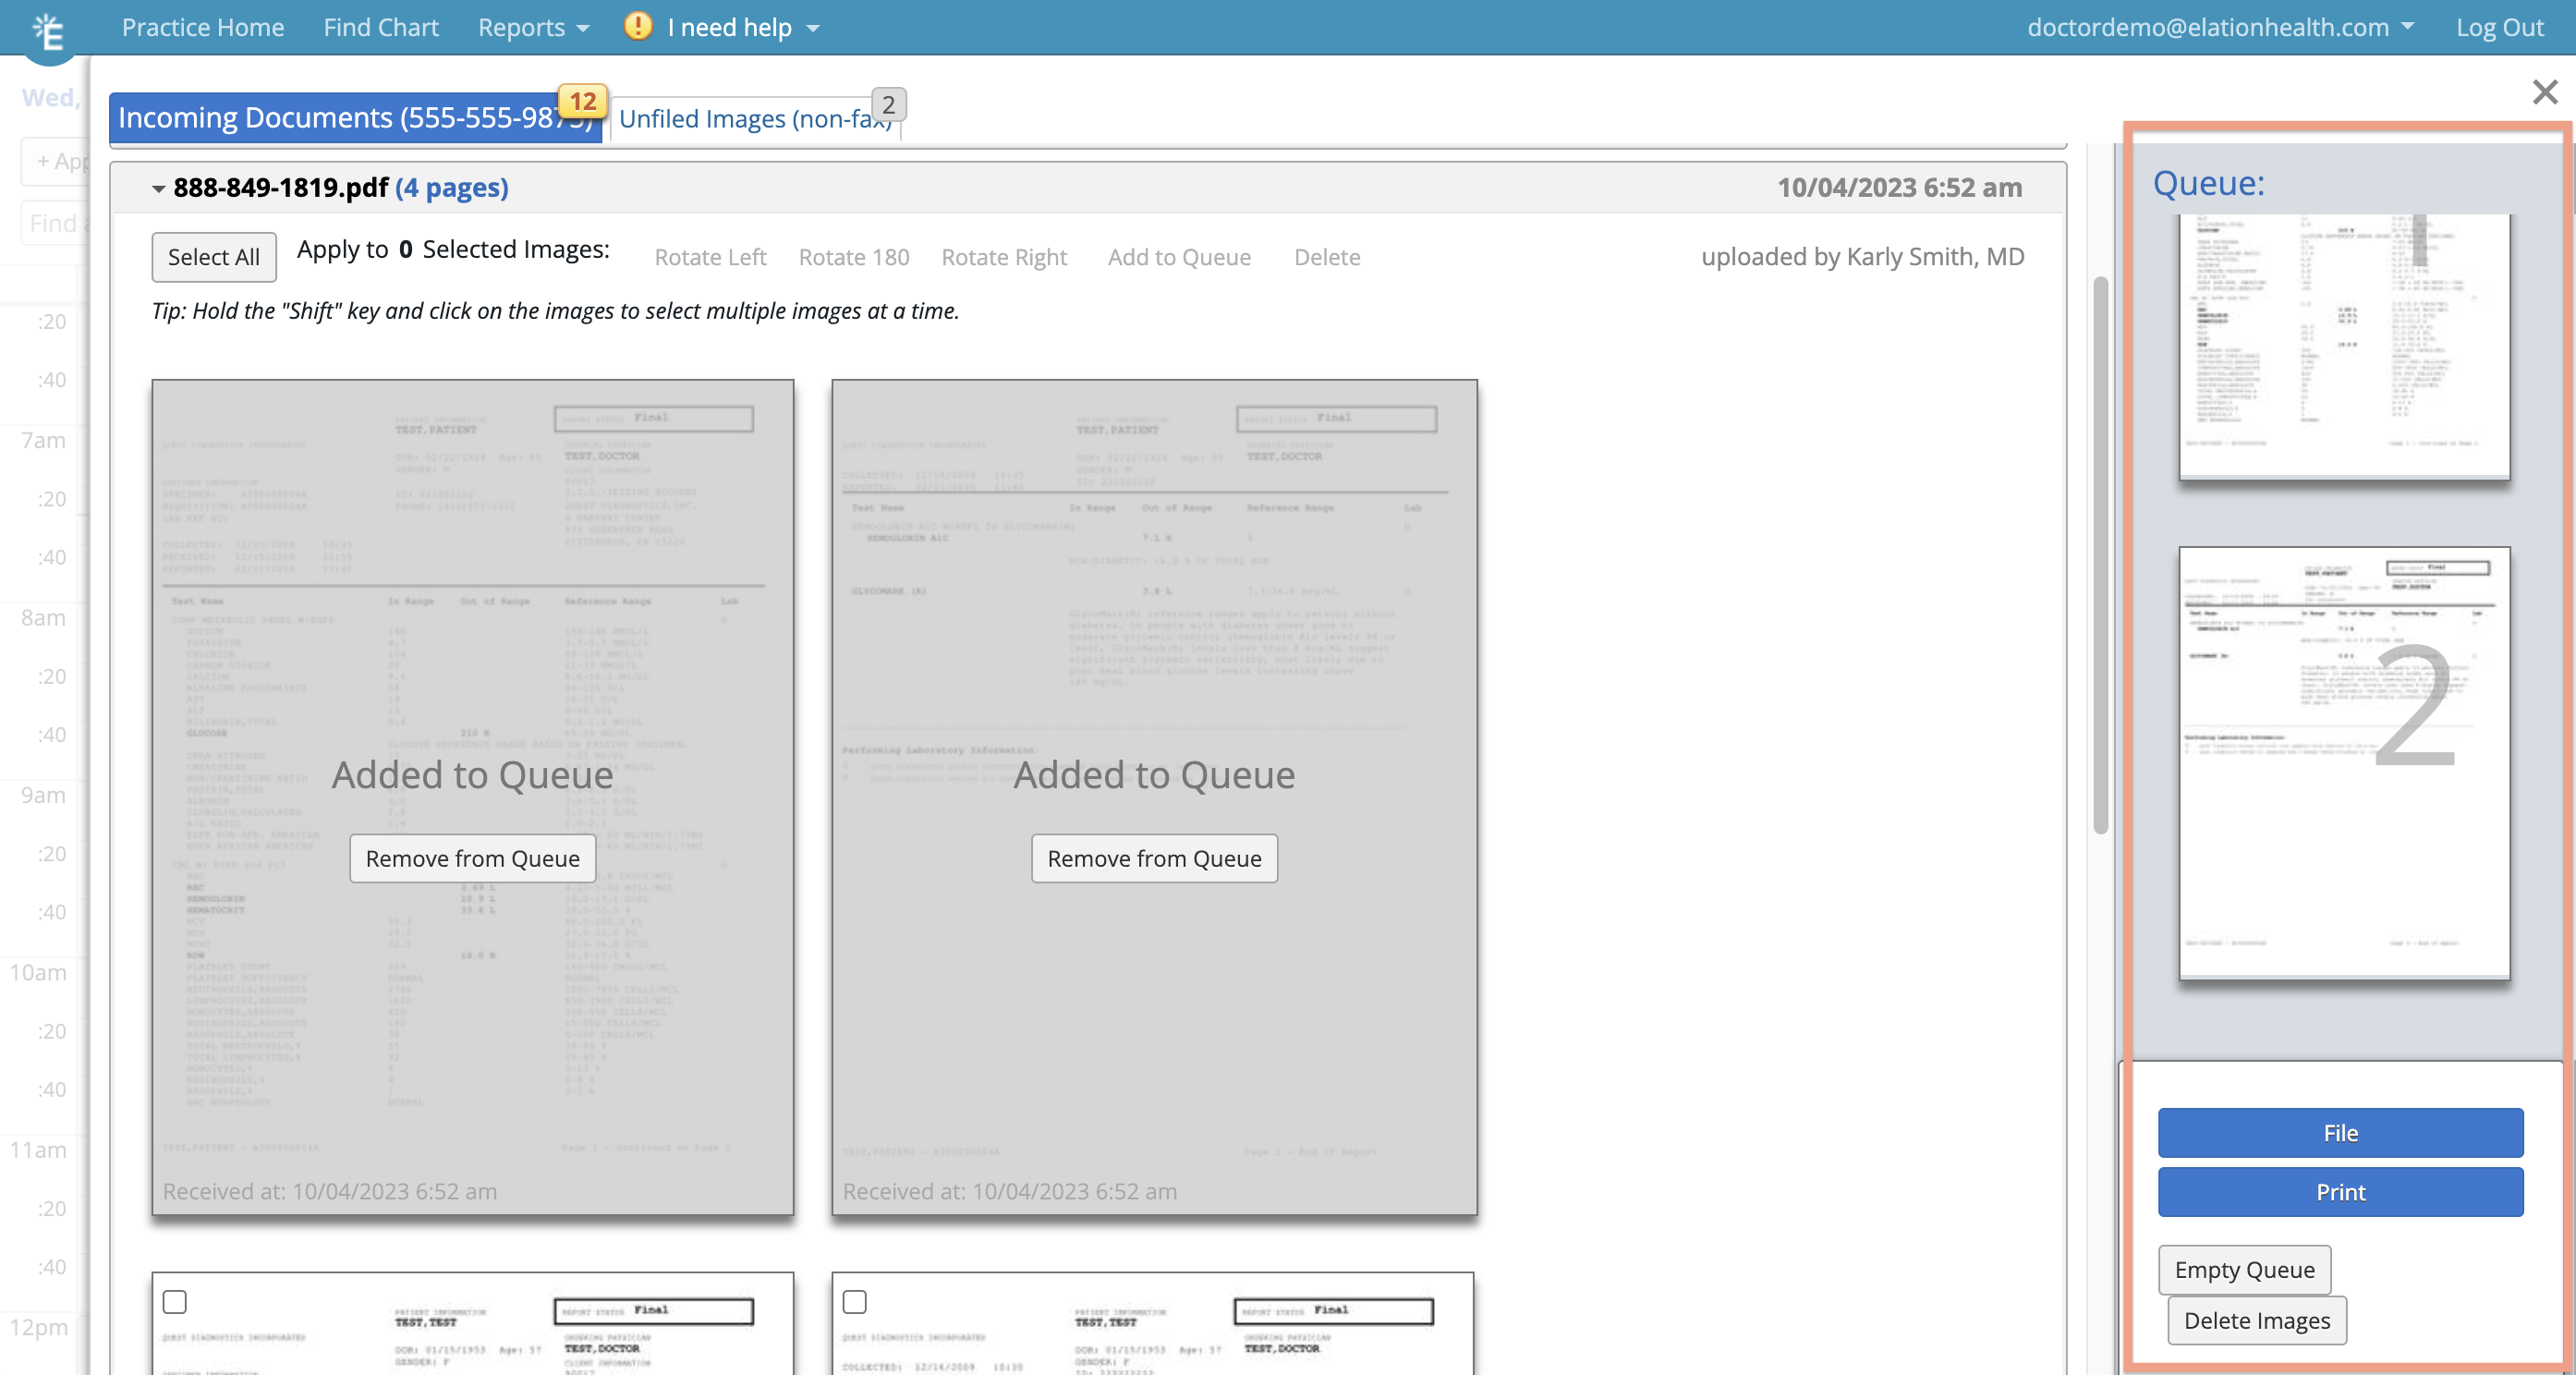
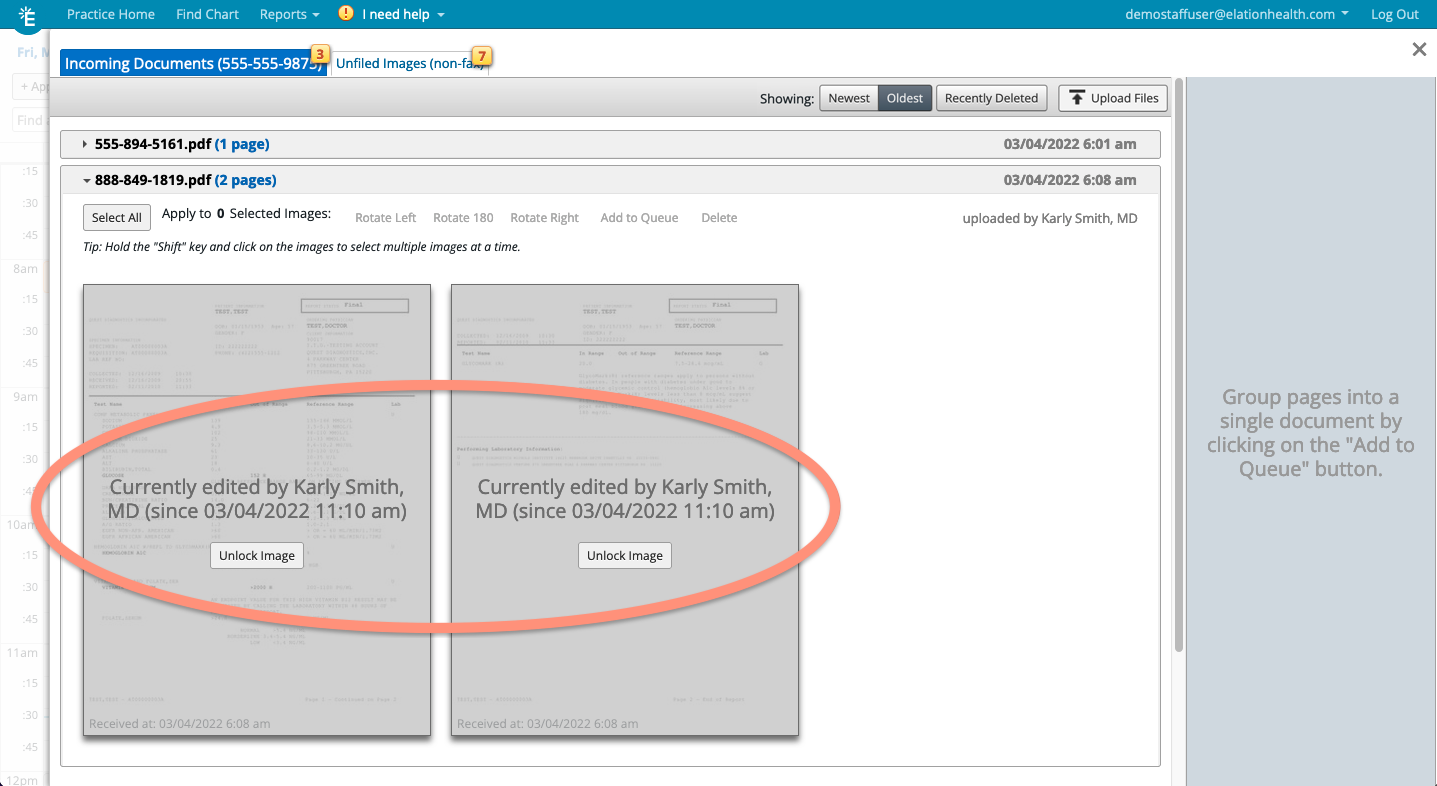
Pages added to the filing queue will be greyed out so that you know which pages you are actively working on. This also locks the images for other users in your practice to block them from taking action on the same document pages while you are working on them.
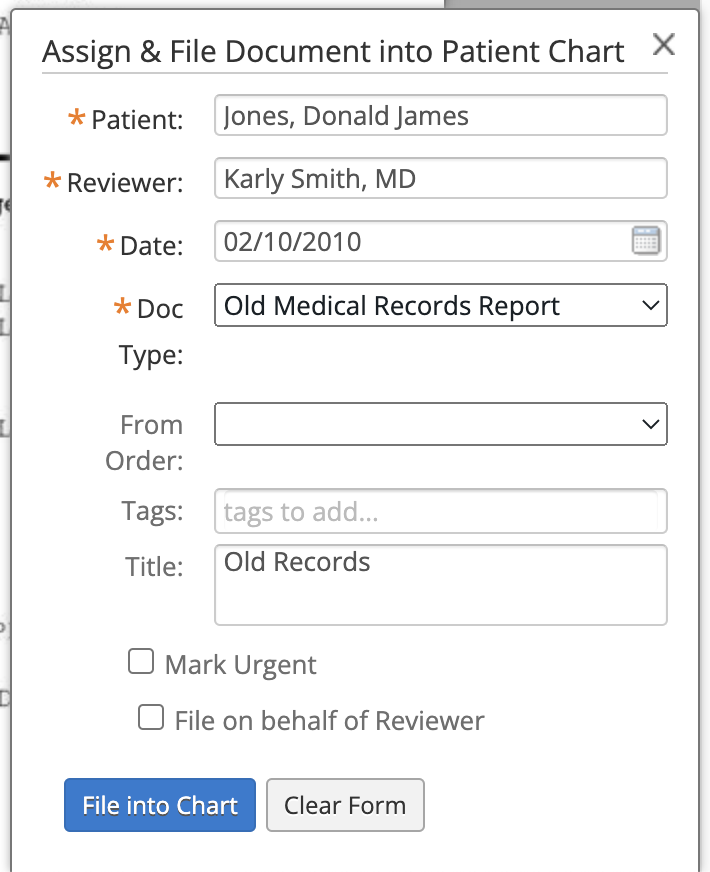
When you are ready to file the document pages in the filing queue, click the "File" button. This will bring you to a window that displays the document pages in a larger view to allow you to see the details of the document. You will use the details of the document to fill out the assignment form.
- Type the patient's name and select the correct chart from the patient search dropdown.
- Assign the document to a Reviewer (Provider Level User) in the practice. This provider will be responsible for reviewing and signing the report.
- Specify the date of the document
- Select the document type
- Add document tags as needed
- Enter a title for the document. Use the title to distinguish different documents from each other within the patient's chart.
- Check the "Mark Urgent" check box if you want this document to appear in the provider's 'Urgent' inbox.
- Check the "File on behalf of Reviewer" box if want to sign off the report on behalf of the Provider.
- This feature comes in handy when the provider already reviewed the report and they only want to store a copy of the report in the patient's chart.
- (Optional) Click the "Clear Form" button if you need to clear the details of the assignment form and start over.
- Click "File into Chart" once you are ready to file the documents into the patient's chart as a report. The filed pages will immediately be removed from the Fax Inbox.
You can upload documents from your computer to the Fax Inbox and then file those documents into the patient's chart. While you can upload files using any section of the Fax Inbox, we recommend using the Unfiled Images box to distinguish uploaded documents from faxed documents.
You can upload any type of file into Elation. If you upload a .PDF, .JPEG, .PNG, or .GIF file, you will be able to view the images of the document directly within the Fax Inbox and patient charts. Other file types (like .DOC, .CSV, .XLS, etc.) can also be uploaded and saved to a patient's chart but you will need to download the file to your computer whenever you need to view the contents.
Using the "Upload File" button
- Click on the
 button within the Fax Inbox
 - Select the file(s) you want to upload & click "Open"
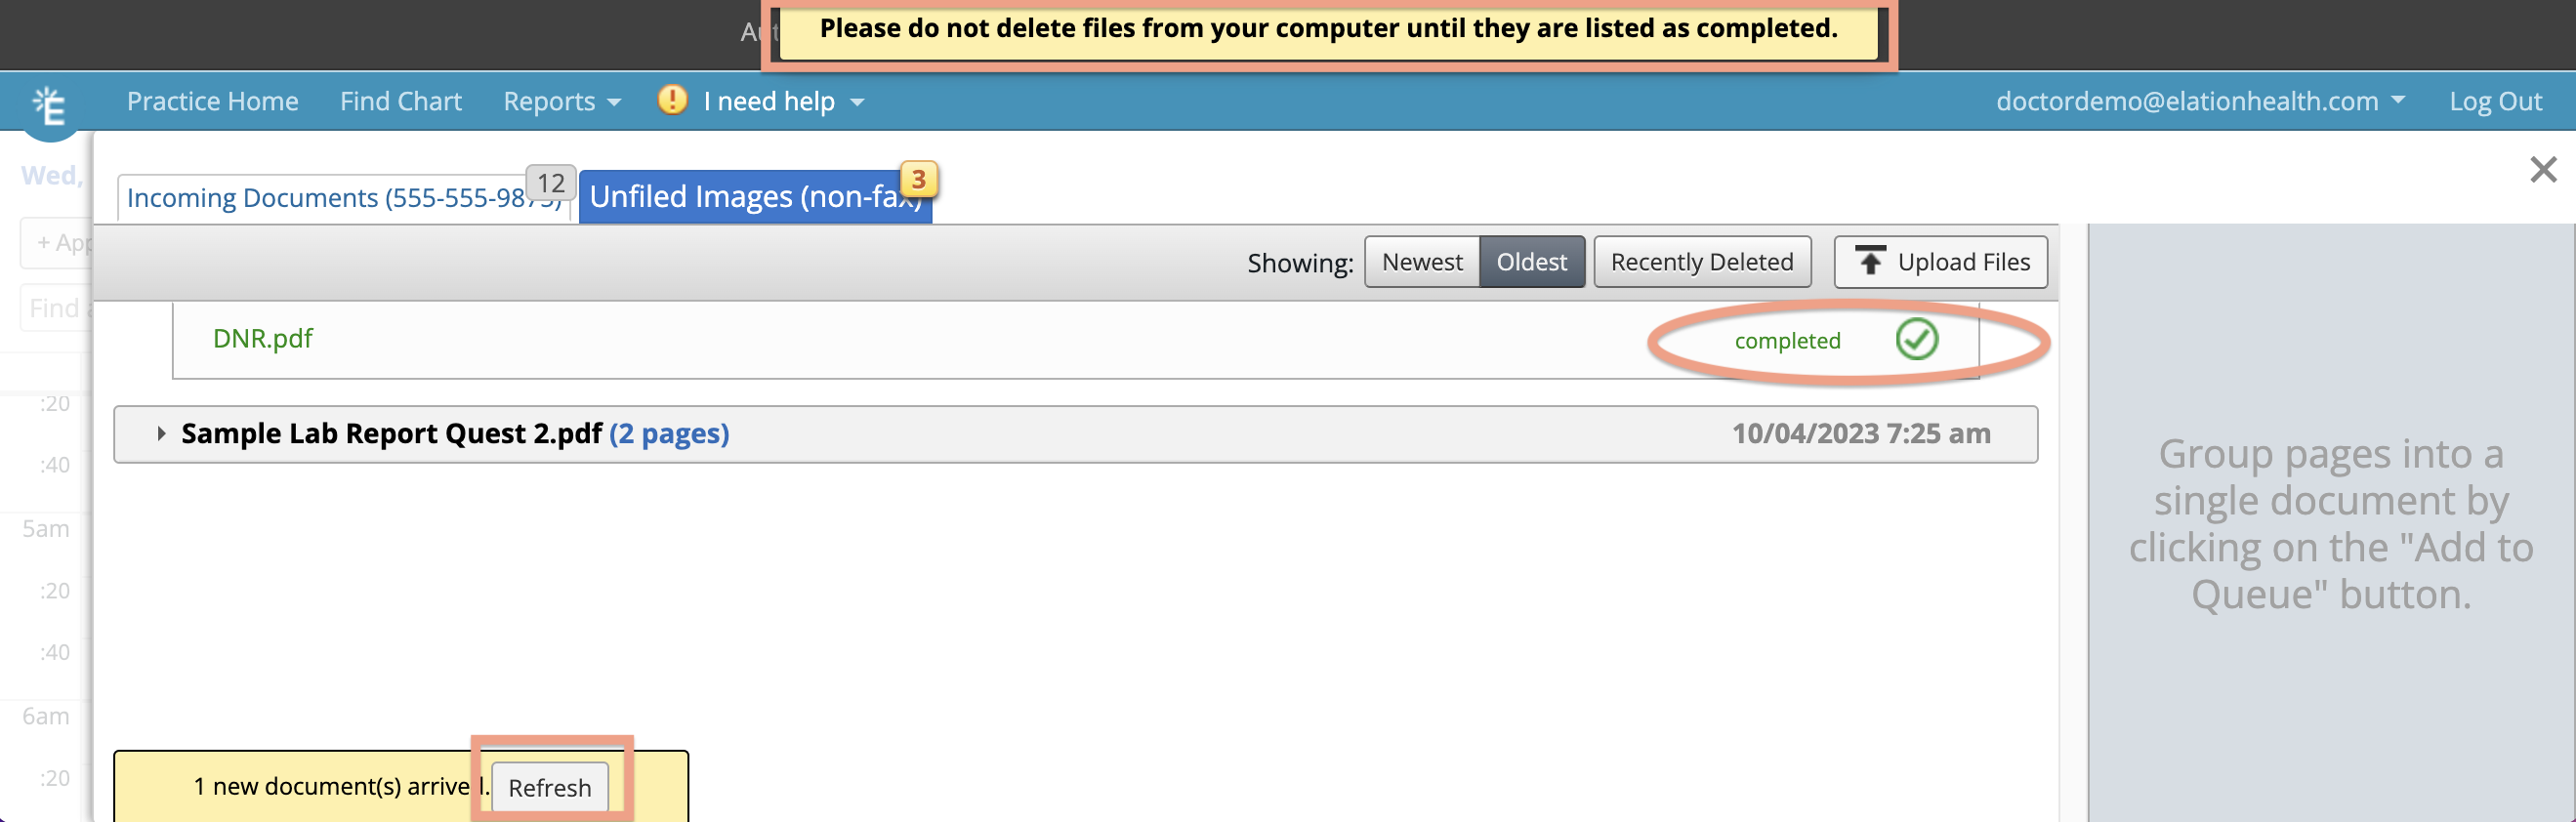
The file(s) will then be processed in the
Fax Inbox. You will see a yellow banner at the top of your account that reminds you to not delete or move the file(s) from where they currently are on your computer before the processing is complete. Once the processing is complete, you will see a 'completed' status next to the document title and a "Refresh" button at the bottom of the
Fax Inbox. Click the "Refresh" button at the bottom of the
Fax Inbox to refresh the
Fax Inbox to see new documents.
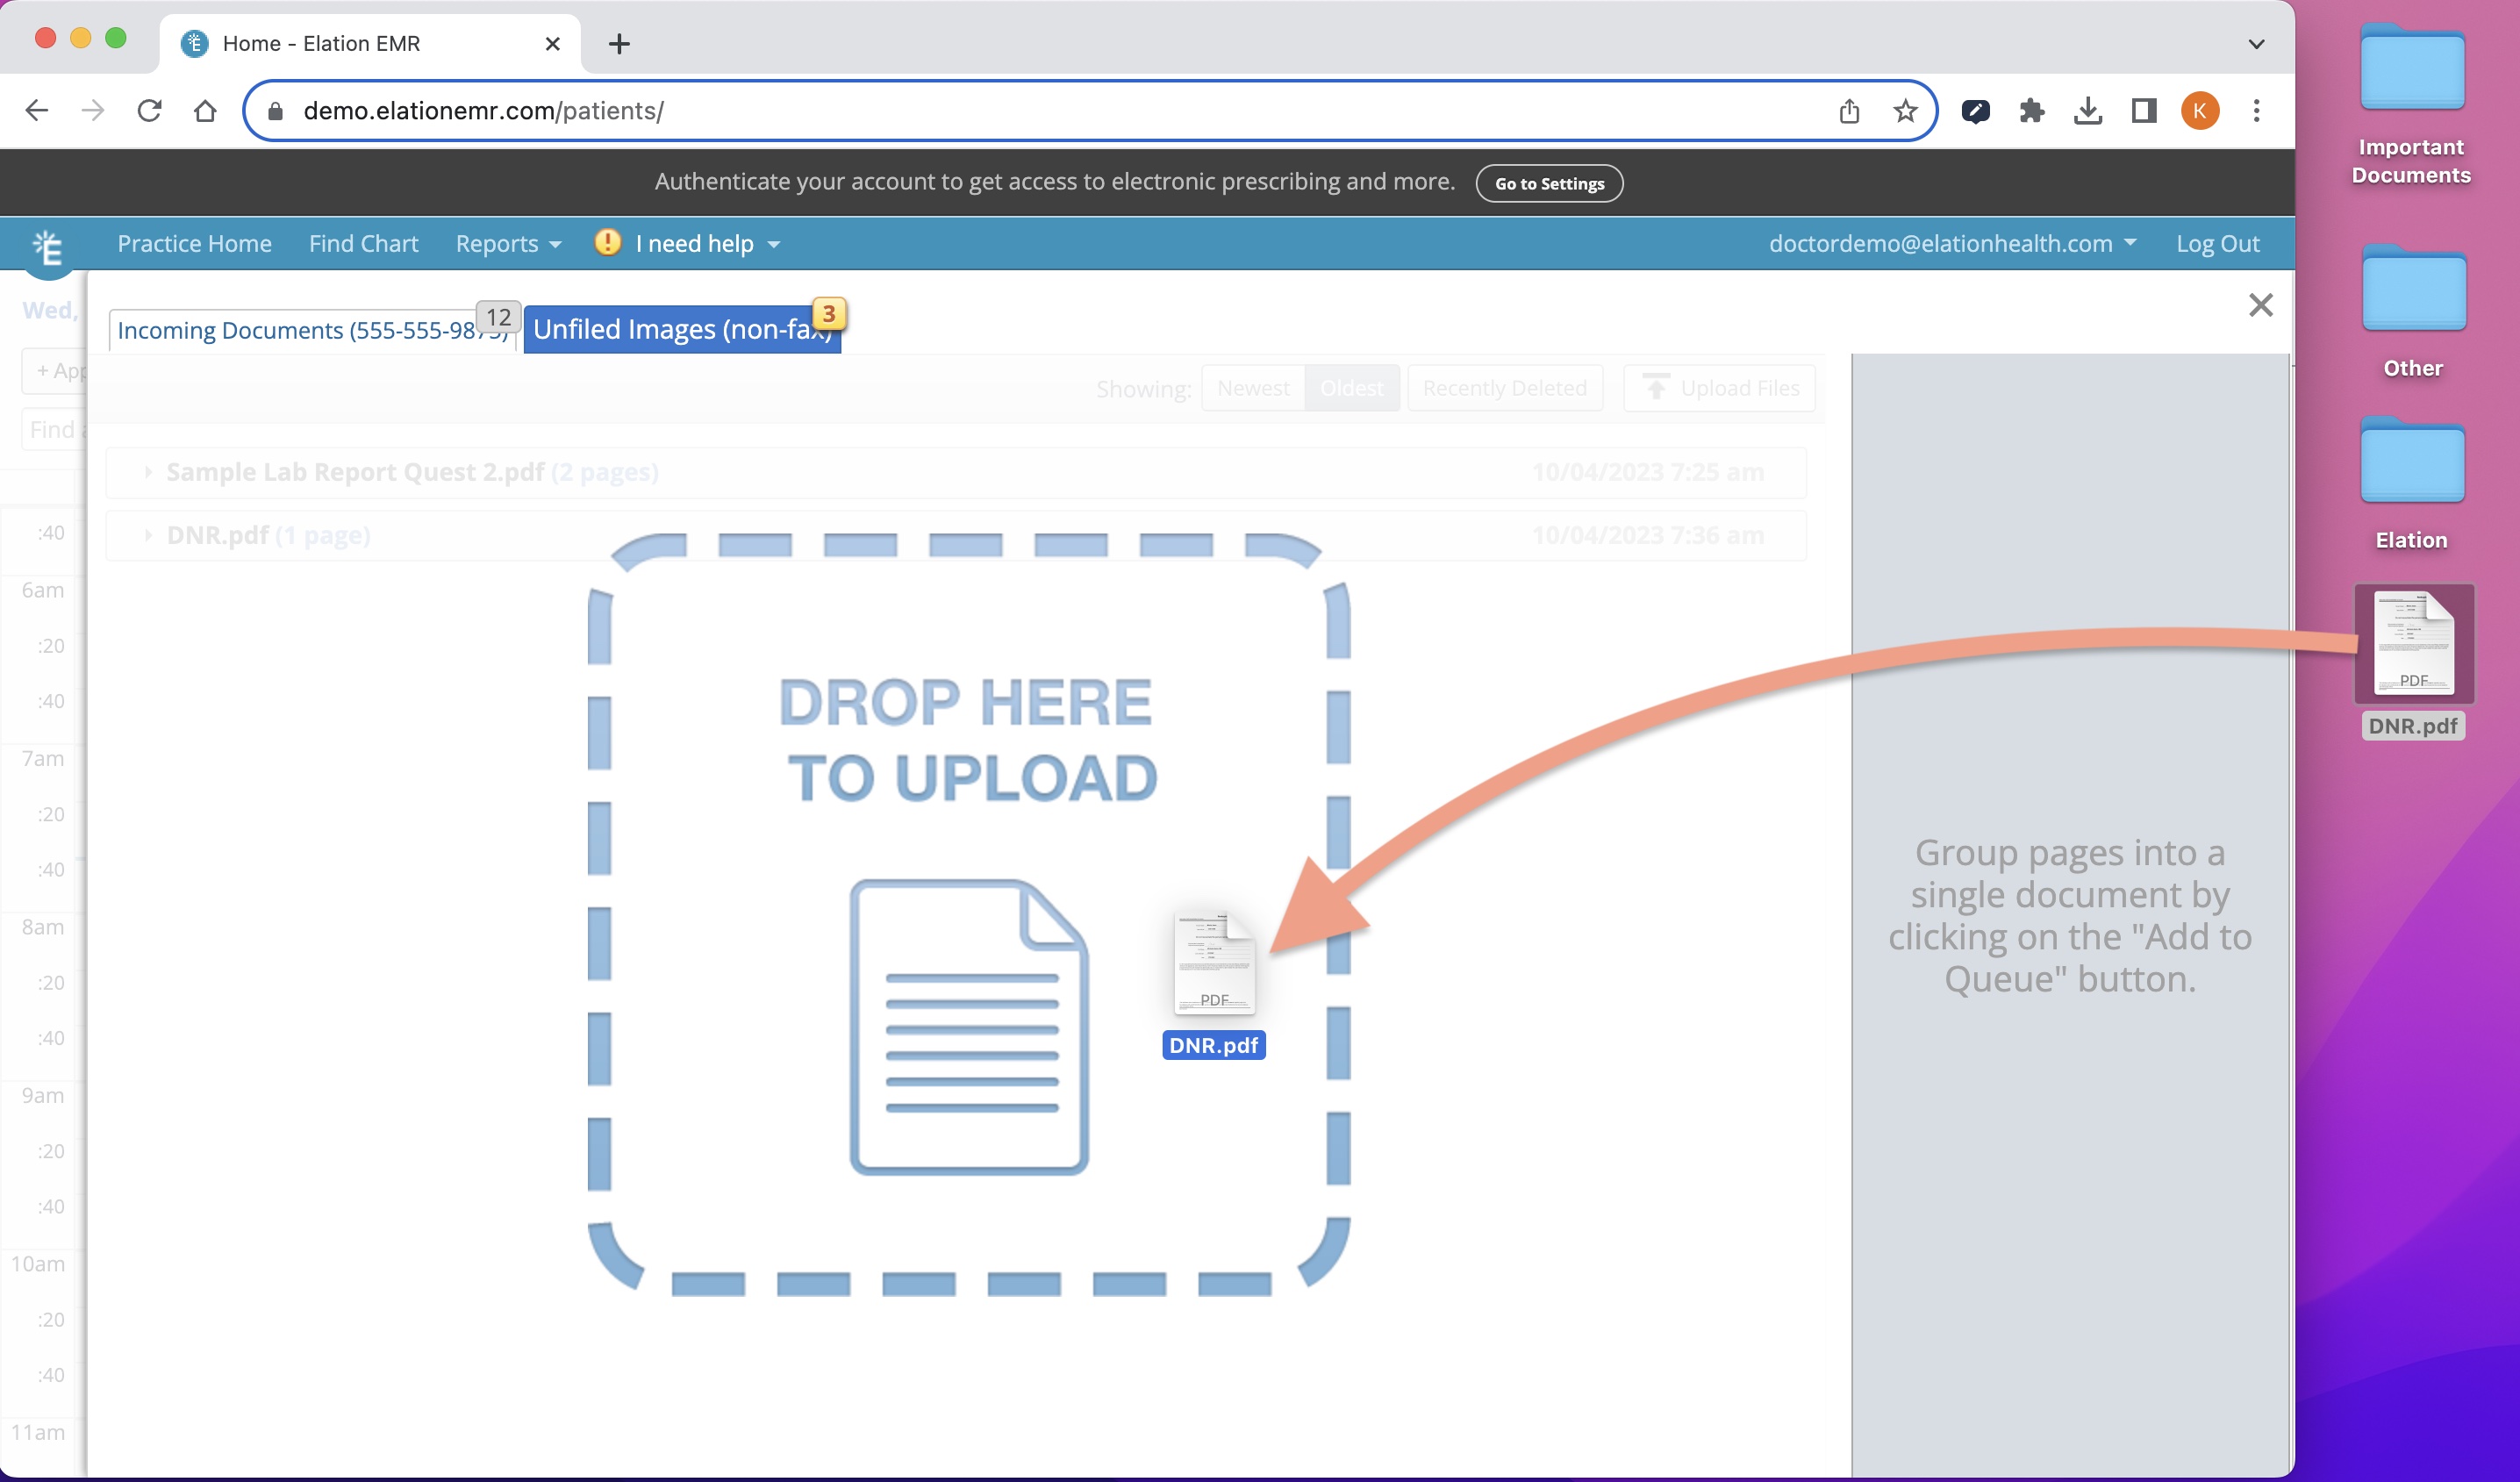
Drag & drop files
- Use your mouse or trackpad to click on a file from your computer, hold down the cursor and then drag the file into the Fax Inbox
- A blue "Drop Here to Upload" graphic will appear
- Let go of your cursor to drop the document into the dotted blue square
The file(s) will processed in the Fax Inbox. You will see a yellow banner at the top of your account that reminds you to not delete or move the file(s) from where they currently are on your computer before the processing is complete. Once the processing is complete, you will see a 'completed' status next to the document title and a "Refresh" button at the bottom of the Fax Inbox. Click the "Refresh" button at the bottom of the Fax Inbox to refresh the Fax Inbox to see new documents.
Collapse listings to see all documents more easily
You can click on the title of a document in the Fax Inbox to collapse that document and see a list of all the documents in the list. This will allow you to see all your documents at a glance and find/prioritize the most important documents first.
Zoom-in on images
Depending on your screen resolution, some of the images may be difficult to read. You can increase the size of a document page by double clicking on it. A larger image with higher resolution will appear on your screen.
-
User Tip: If you want to increase the size of the image incrementally, you can zoom by hitting the "Ctrl" key and "+" key together (for Apple© users, hit the "Command" key and "+" key together). To resume to the normal image size, hit the "Ctrl" key + "0" (for Apple© users, hit the "Command" key and "0" key together).
Combining documents from different listings
If needed, you can combine pages of different document listings together into a single report. If a document came in via two separate fax transmissions or if a report was uploaded using multiple files, you can add different pages to a single filing queue and file all the pages together into one report.
Fax Usage is the amount of inbound fax pages received plus the outbound fax pages sent by a practice for a given calendar month. Each Regular Provider Level User is allotted a combined total of 1,500 free inbound and outbound pages each calendar month. All other users types are not allotted any free pages. Elation charges you additional fees per page if you exceed your allotted free fax pages.
You can monitor your fax usage in the "Settings" section of your account under "Fax Usage & Settings". Learn more about Fax Usage in the Fax Usage - Frequently Asked Questions article.

Do I need to keep the Fax Inbox open when uploading a document?
You do not need to keep the Fax Inbox open when uploading a document. If you navigate away from the Fax Inbox while a document is still processing, the progress bar will still be there when you return. As a reminder, do not delete or move the file(s) from where they currently are on your computer before the processing is complete.
Another office said they sent a fax to me but I do not see it in my Fax Inbox. Did something go wrong?
It can take up to 30 minutes for a fax to reach your Fax Inbox once it has been sent by the other office. This is due to the processing time and integration time that comes with using electronic faxing. If you do not see the fax after 30 minutes, ask the sender to send it again in case there were any sending issues. If the sender is not having any sending issues, reach out to the Support Team using the "I need help" -> "Contact Elation Support" button, provide us with the following information and we will gladly assist you with troubleshooting the issue:
- fax number the sender is using to fax to you
- approximate date and time the fax attempt was made
- number of attempts made
- any error messages flagged by the sender's fax number or fax machine
I accidentally deleted a fax from my Fax Inbox, is there a way for me to retrieve it?
Click the "Recently Deleted" button at the top of the Fax Inbox to see all the recently (last 7 days) deleted faxes. Once you find the pages you want to restore, select all the pages and then click the "Restore" button at the top of the listing. Afterwards, click the "Recently Deleted" button again to return to the main Fax Inbox.
Copyright © 2023 Apple Inc. All rights reserved.
Next Step
Convert all your paperwork into electronic records using the Fax Inbox today!
Related Articles

